Free original lessons
Drawing a Crayfish: Segmented Body, Claws, and Antennae
Learn to draw a crayfish with a clear carapace, segmented abdomen, paired claws, and antennae using a simple construction method and self-checks.
Free lesson
Four exercises
Worked answers
Object Drawing Lessons
This lesson teaches a reliable way to draw a crayfish by building it from large shapes to small details. You will place the carapace, abdomen, tail fan, claws, legs, and antennae in a consistent order, then refine outlines and add segment lines. The method uses a defined convention: the crayfish faces left, the body is horizontal, and the x-height of lettering is measured from baseline to midline when labeling. Because crayfish anatomy varies, the proportions here are a teaching convention, not a single correct specimen. Measure your own paper and tools if you scale the drawing, and treat any numerical values as hypothetical examples.
Practice materials: Printable downloads are not available for this lesson yet. Use the instructions and four exercises below.
Reference illustration
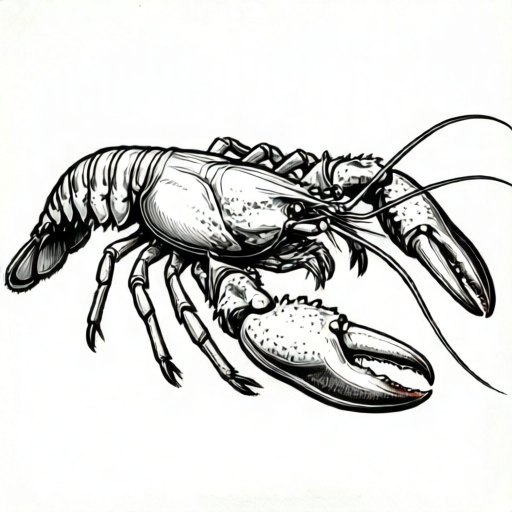
Use the stated measurements and conventions for each exercise.
Set up the page and place the main body
Choose a drawing surface and measure it with a ruler. For example, on a 20 cm by 28 cm sheet, a hypothetical crayfish body length of 14 cm leaves room for antennae and claws. Mark a faint horizontal midline across the page; this is the body axis. Place the carapace as an oval about one third of the total body length, with its long axis along the midline. The oval should be wider at the rear where it meets the abdomen and narrower toward the head.
Next, add the abdomen as a series of overlapping curved bands behind the carapace. Use six bands as a teaching convention; real crayfish segment counts vary. Each band should be slightly narrower than the one before it, creating a tapered tail. End with a tail fan made of three short, rounded lobes. Keep all construction lines light so they can be adjusted.
- Measure the paper and mark a horizontal midline.
- Draw a light oval for the carapace, about one third of the planned body length.
- Add six overlapping curved bands behind the carapace for the abdomen.
- Draw three rounded lobes at the end for the tail fan.
Add claws, legs, and antennae
Place the paired claws at the front of the carapace, one above the midline and one below. Each claw begins as a short arm segment, then a rounded palm, then two tapering fingers with a small gap between them. Keep the two claws similar in size but not identical; slight asymmetry looks natural. Draw the walking legs as four short, jointed lines on each side of the carapace, angled backward.
Antennae attach near the front of the head. Draw two long, thin curves sweeping forward and slightly outward, and two shorter antennae-like structures closer to the body. Use a single smooth curve for each antenna, then thicken it slightly at the base. Check that the antennae do not cross the claws in a confusing way; if they do, adjust the curve.
- Draw the upper claw as arm, palm, and two fingers.
- Draw the lower claw with the same three parts, slightly different in size.
- Add four jointed walking legs on each side of the carapace.
- Draw two long antennae and two shorter frontal structures as smooth curves.
Refine outlines and add segment lines
Once the construction is complete, darken the final outlines. Use a consistent line weight for the body and a slightly heavier line for the claws if you wish to emphasize them. Add curved segment lines across the abdomen bands, following the band curves. On the carapace, add a gentle curved line to suggest the head region and a small mark for the eye. Keep the tail fan lobes separate with short dividing lines.
Labeling is optional. If you label parts, use a clear handwriting convention: x-height is measured from baseline to midline, and letter styles may vary. Write labels horizontally where possible, and use a ruler for leader lines. Check that every label points to the correct part and that no leader line crosses another.
- Darken final outlines with a consistent line weight.
- Add curved segment lines across the abdomen.
- Mark the eye and head region on the carapace.
- Add optional labels using the baseline-to-midline x-height convention.
Worked example
On a 20 cm by 28 cm sheet, draw a crayfish facing left with a body length of 14 cm. The carapace is one third of the body length. How long is the carapace, and how much space remains along the body axis if the tail fan adds 2 cm?
Worked answer
Carapace length = 14 cm divided by 3, which is about 4.7 cm. Body plus tail fan = 14 cm + 2 cm = 16 cm. Space remaining along the 20 cm axis = 20 cm minus 16 cm = 4 cm. These values are hypothetical examples for planning the page.
Four practice exercises
Exercise 1
A crayfish drawing uses a body length of 12 cm on a 24 cm wide sheet. The carapace is one quarter of the body length. Calculate the carapace length and the space left on each side if the body is centered.
Show answer and check
Carapace length = 12 cm divided by 4 = 3 cm. Space left on each side = (24 cm minus 12 cm) divided by 2 = 6 cm.
Why: Divide the body length by four to get the carapace length. Subtract the body length from the sheet width, then divide by two for equal side margins.
Check: Multiply the carapace length by four to recover 12 cm. Add 6 cm, 12 cm, and 6 cm to recover 24 cm.
Exercise 2
You draw six abdomen bands. The first band is 3 cm wide and each later band is 0.5 cm narrower than the one before it. What is the width of the sixth band?
Show answer and check
The sixth band is 0.5 cm wide.
Why: The widths decrease by 0.5 cm five times from the first to the sixth band: 3, 2.5, 2, 1.5, 1, 0.5 cm.
Check: Count the five decreases and subtract 5 times 0.5 cm from 3 cm: 3 minus 2.5 equals 0.5 cm.
Exercise 3
A claw is drawn as three parts: arm 2 cm, palm 3 cm, and fingers 4 cm. If you draw two claws, what is the total length of claw material along the arm-palm-finger line?
Show answer and check
Each claw is 2 + 3 + 4 = 9 cm. Two claws total 18 cm.
Why: Add the three part lengths for one claw, then multiply by two for the pair.
Check: Divide 18 cm by two to recover 9 cm per claw, then subtract 2 cm and 3 cm to recover the 4 cm finger length.
Exercise 4
On a 15 cm by 21 cm sheet, you plan a crayfish with a 10 cm body and a 3 cm tail fan. The claws extend 4 cm forward of the body. What total horizontal length must the drawing fit, and how much margin remains if the drawing is centered?
Show answer and check
Total horizontal length = 4 cm + 10 cm + 3 cm = 17 cm. Margin remaining = 21 cm minus 17 cm = 4 cm, or 2 cm on each side when centered.
Why: Add the forward claw extension, body length, and tail fan length. Subtract from the sheet width, then divide by two for centered margins.
Check: Add 2 cm, 17 cm, and 2 cm to recover 21 cm. Subtract 4 cm and 3 cm from 17 cm to recover the 10 cm body.
Common mistakes
- Drawing the abdomen as a single smooth oval instead of overlapping bands. Divide the abdomen into six curved bands and draw each band as a separate overlapping shape.
- Making both claws identical in size and angle. Vary the claw size and angle slightly; real crayfish often show asymmetry.
- Attaching antennae to the middle of the carapace. Place antennae near the front of the head, ahead of the carapace oval.
- Using heavy construction lines that cannot be erased. Keep early construction lines light and darken only the final outlines.
Self-check rubric
- Carapace is an oval placed along a clear body axis.
- Abdomen shows at least five distinct overlapping segment bands.
- Tail fan has three rounded lobes.
- Two claws are present, each with arm, palm, and two fingers.
- Antennae attach near the front of the head and do not confuse the claw outlines.
- Final outlines are darker than construction lines.
- Optional labels are legible and use the baseline-to-midline x-height convention; alternative letter styles are acceptable.
Questions and answers
How many abdomen segments should I draw?
Use six as a teaching convention. Real crayfish vary, so the exact number is not a universal rule.
Do the claws have to be the same size?
No. Slight asymmetry is acceptable and often looks more natural. Keep the basic three-part structure: arm, palm, and two fingers.
Where do the antennae attach?
Near the front of the head, ahead of the carapace oval. Draw two long curves and two shorter frontal structures.
Can I label the drawing?
Yes. Use a clear handwriting convention where x-height is baseline to midline. Letter styles may vary, so focus on legibility and correct leader lines.