Free original lessons
Easy Disco Ball Drawing: Map Facets and Place Highlights
Learn to draw a mirrored disco ball by mapping latitude and longitude facet grids, then placing clustered specular highlights that read as curved reflective tiles.
Free lesson
Four exercises
Worked answers
Object Drawing Lessons
A disco ball reads as a sphere covered in small mirror tiles. The trick is to draw the facet grid as if it wraps around a ball, then place highlights in clusters that follow the curvature. This lesson teaches a simple latitude and longitude grid, a consistent tile convention, and a highlight placement method you can check by eye. You will use a pencil, paper, and a straightedge. All measurements are hypothetical examples; measure your own paper and tools. The goal is a believable faceted sphere, not a perfect copy of any single photograph.
Practice materials: Printable downloads are not available for this lesson yet. Use the instructions and four exercises below.
Reference illustration
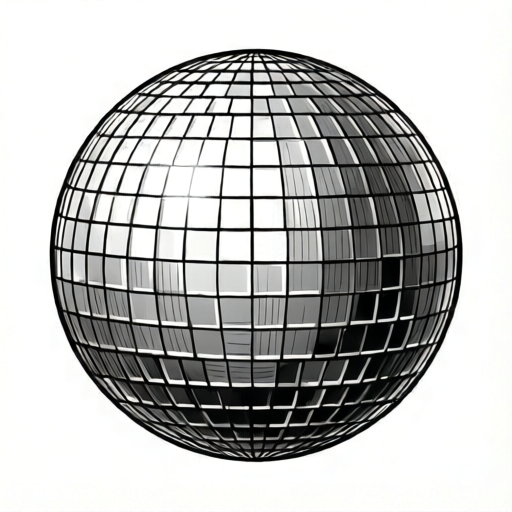
Use the stated measurements and conventions for each exercise.
Build the sphere and the facet grid
Start with a circle drawn lightly. Mark the vertical center line and the horizontal center line. These are your longitude and latitude reference lines. Decide a tile convention: for this lesson, each facet is a small quadrilateral whose top and bottom edges curve slightly with the latitude line, and whose side edges converge toward the poles. You do not need exact perspective; consistent curvature is enough.
Mark an even number of evenly spaced points along the horizontal center line (the equator), for example eight. These mark where each longitude line crosses the equator. Draw each longitude line from the top pole to the bottom pole passing through its equator point, curving outward near the equator. Then draw latitude lines as gentle arcs parallel to the equator, spaced closer near the top and bottom and wider near the middle. This creates a grid of tiles that appears to wrap around the sphere.
- Draw a circle about 10 cm across on plain paper; mark center with a light cross.
- Mark eight evenly spaced points on the horizontal center line inside the circle; these are where the longitude lines will cross the equator.
- Draw curved longitude lines from the top pole to the bottom pole, each passing through one of the marked equator points and bowing outward near the equator.
- Draw four latitude arcs above and four below the equator, spacing them wider near the middle.
- Darken the grid lines only after the spacing looks even.
Place highlights in clusters
A mirrored sphere reflects a bright light source as a cluster of small bright patches, not one large white blob. Choose a light direction, for example upper left. The brightest tiles sit where the sphere faces the light. Because each tile is a tiny mirror, the highlight appears as a group of adjacent tiles that are lighter than their neighbors.
Leave the paper white for the brightest tiles and shade the surrounding tiles with light pencil strokes. Do not outline every highlight tile heavily; instead, let the contrast between white tiles and shaded tiles create the sparkle. Add a few smaller secondary highlights opposite the main cluster to suggest reflected room light.
- Choose a light direction and mark it lightly outside the circle.
- Select three to five adjacent tiles in the upper-left quadrant as the main highlight cluster.
- Keep those tiles white; shade neighboring tiles with light diagonal strokes.
- Add two or three single white tiles on the lower-right side as secondary reflections.
- Check that highlight tiles follow the grid curvature rather than sitting as flat squares.
Shade the sphere and refine edges
Shade the lower-right portion of the sphere gradually darker to suggest the ball's roundness. Keep the shading inside the circle and avoid covering the white highlight tiles. The facet grid lines should remain visible but not dominate; erase or lighten any line that looks too heavy.
Finally, check the silhouette. A disco ball is a sphere, so the outer edge should be a clean circle. If the grid lines bulge outside the circle, erase them. Add a small hanging loop at the top only if you want a complete object; it is optional and does not affect the facet mapping.
- Shade from the lower-right edge toward the center with light pencil strokes.
- Keep highlight tiles white and avoid smudging them.
- Lighten any grid line that is darker than the shading.
- Erase grid lines that extend outside the circle.
- Optionally add a small loop at the top pole.
Worked example
A student draws a 10 cm circle, marks eight points on the horizontal center line, and draws longitude lines through them. They then draw four latitude arcs above and four below the equator. They choose upper-left light and keep three adjacent tiles white in the upper-left quadrant. Describe how to check the result.
Worked answer
Check that the eight longitude lines meet at the top and bottom poles and curve outward near the equator. Check that latitude arcs are closer near the poles and wider near the middle. Confirm the three white tiles are adjacent and sit in the upper-left quadrant. Shade the lower-right area lightly and ensure no white highlight tile is covered. The outer edge should remain a clean circle with no grid lines outside it.
Four practice exercises
Exercise 1
On a circle 8 cm across, mark six evenly spaced points on the horizontal center line. Draw longitude lines through them from top pole to bottom pole. Describe how the lines should curve near the equator.
Show answer and check
The six longitude lines should meet at the top and bottom poles and bow outward near the equator, creating wider gaps at the middle than near the poles.
Why: Longitude lines on a sphere converge at poles and spread at the equator. Curving them outward near the middle makes the grid read as wrapping around a ball.
Check: Confirm all six longitude lines meet at both poles and pass through the six evenly spaced equator points. Check that the spacing between adjacent longitude lines is widest at the equator and narrows toward the poles.
Exercise 2
A student places a single large white circle as the highlight on a faceted sphere. Explain why this weakens the disco ball effect and describe a better placement using three to five tiles.
Show answer and check
A single large white circle looks like a flat spot, not many small mirrors. A better approach is to keep three to five adjacent tiles white in the quadrant facing the light, then shade surrounding tiles to create contrast.
Why: Each facet is a tiny mirror, so the highlight appears as a cluster of bright tiles. Adjacent white tiles with shaded neighbors read as sparkle on a curved surface.
Check: Count the white highlight tiles. They should be adjacent and number three to five. Confirm surrounding tiles are shaded and the cluster sits in the chosen light direction.
Exercise 3
Draw four latitude arcs above the equator and four below on a 10 cm circle. Describe the spacing rule and give one hypothetical spacing example in centimeters.
Show answer and check
Latitude arcs should be closer near the poles and wider near the equator. A hypothetical example on a 10 cm circle (radius 5 cm): above the equator, place arcs at 1.0 cm, 1.8 cm, 2.4 cm, and 2.8 cm from the equator toward the top pole. The gaps between consecutive arcs are 0.8 cm, 0.6 cm, and 0.4 cm, so the inter-arc gaps shrink toward the pole. The remaining distance from the last arc to the pole is 2.2 cm; that is not an inter-arc gap, so the spacing rule applies only to the gaps between arcs. Mirror the same four positions below the equator (1.0 cm, 1.8 cm, 2.4 cm, and 2.8 cm toward the bottom pole) to give four arcs above and four below, with the same gap pattern.
Why: On a sphere, latitude lines appear compressed near the poles and spread near the equator. Wider spacing at the middle supports the curved-surface illusion.
Check: Measure the vertical gaps between consecutive arcs along the center line. Inter-arc gaps should be largest near the equator and smallest near the pole. Confirm four arcs above and four below, and that all values stay within the 5 cm radius.
Exercise 4
A finished drawing has grid lines extending outside the circle and shading covering two white highlight tiles. List two corrections and explain how each improves the disco ball effect.
Show answer and check
Erase grid lines outside the circle to restore a clean spherical silhouette. Re-establish the two covered tiles as white by erasing shading on them, then shade around them to keep contrast.
Why: A disco ball is a sphere, so the outer edge must be circular. White highlight tiles create the sparkle; covering them removes the mirror effect.
Check: Trace the outer edge to confirm it is a circle with no lines outside. Count white highlight tiles and confirm they are uncovered and adjacent.
Common mistakes
- Drawing all facets as flat squares with straight edges. Curve the top and bottom edges of each tile to follow latitude arcs, and let side edges converge slightly toward the poles.
- Placing one large white blob as the highlight. Use a cluster of three to five adjacent white tiles, then shade the surrounding tiles to create contrast.
- Spacing latitude lines evenly from top to bottom. Space latitude arcs closer near the poles and wider near the equator to suggest spherical wrapping.
- Shading over the white highlight tiles. Shade around the highlight cluster first, then darken the lower-right area while leaving selected tiles white.
Self-check rubric
- Sphere silhouette is a clean circle with no grid lines outside it.
- Longitude lines converge at poles and curve outward near the equator.
- Latitude arcs are spaced closer near poles and wider near the equator.
- Facet tiles follow the grid curvature rather than appearing as flat squares.
- Main highlight is a cluster of adjacent white tiles facing the chosen light direction.
- Secondary highlights are smaller and placed opposite the main cluster.
- Shading darkens the lower-right area without covering white highlight tiles.
- Grid lines remain visible but do not dominate the shading.
- Valid alternatives: rounded tiles, slightly irregular tiles, or a finer grid are acceptable if curvature and highlight logic are consistent.
Questions and answers
How many facets should I draw?
There is no fixed number. A grid of eight longitude lines and eight latitude arcs gives a readable pattern. You can use more lines for a finer grid, but keep spacing even and consistent.
Do I need a ruler or compass?
A compass helps make a clean circle, but a traced round object works. A straightedge helps mark even points on the center line. Measure your own tools; any numerical sizes in this lesson are hypothetical examples.
Can I use a different tile shape?
Yes. The convention here is curved quadrilaterals, but rounded tiles or slightly irregular tiles are valid alternatives if they follow the grid curvature and read as mirror facets.
Where should the main highlight go?
Place it where the sphere faces your chosen light direction. For upper-left light, the main cluster sits in the upper-left quadrant. Secondary highlights can appear opposite the main cluster.