Free original lessons
Faceted Gemstone Drawing: Cut Shapes, Facet Layout and Highlight Placement
Learn to draw round, oval and emerald-cut gems with accurate facet geometry, step-by-step shading and controlled highlights using a simple pencil convention.
Free lesson
Four exercises
Worked answers
Object Drawing Lessons
Faceted gemstones are drawn convincingly when the cut shape, facet layout and highlight placement agree. This lesson treats the gem as a geometric object: you first establish the outline and the table (the flat top facet), then map the crown facets that slope down to the girdle, then shade each facet as a separate plane. A consistent convention is used throughout: the girdle is the widest horizontal line, the table sits above it, and the pavilion tapers below. Highlights are placed only where a facet faces the light source. Because hand-drawing allows many valid interpretations, the rubric rewards correct relationships rather than a single perfect outline. All measurements below are hypothetical examples chosen for clarity; measure your own paper and tools before relying on any number.
Practice materials: Printable downloads are not available for this lesson yet. Use the instructions and four exercises below.
Reference illustration
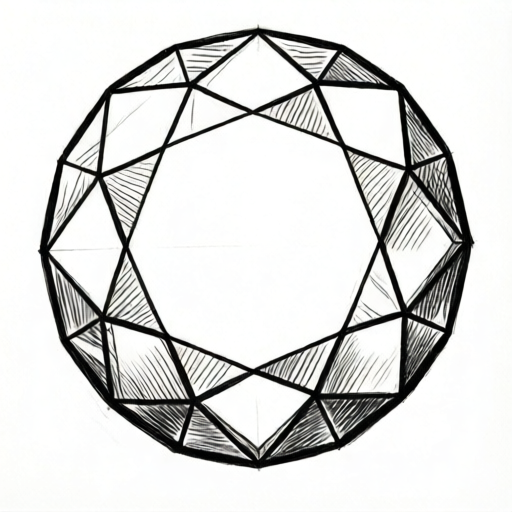
Use the stated measurements and conventions for each exercise.
Establishing the Cut Shape and Girdle
Begin by choosing one cut shape and drawing its girdle as a clean closed curve. For a round cut, the girdle is a circle; for an oval, an ellipse with a clear long axis; for an emerald cut, a rectangle with clipped corners. Keep the girdle line light, because it will later be partly covered by facet lines.
Mark the centre and the long axis if the shape is oval or rectangular. These guide lines keep the table centred and prevent the pavilion from drifting sideways. A useful hypothetical example is a girdle 60 mm wide on a 100 mm wide sheet, leaving room for the pavilion below.
- Draw a light vertical axis and a light horizontal axis crossing at the gem centre.
- Draw the girdle curve or clipped rectangle symmetrically around the axes.
- Check symmetry by folding the paper gently or by measuring equal distances from the axes.
- Erase construction lines only after the girdle is confident.
Laying Out the Table and Crown Facets
The table is a smaller shape parallel to the girdle, centred above it. For a round cut the table is a smaller circle; for an oval it is a smaller ellipse; for an emerald cut it is a smaller clipped rectangle. Connect the table corners to the girdle with straight facet lines. On a round cut, these lines radiate outward; on an oval they fan slightly; on an emerald cut they run mostly parallel to the short sides.
Facet lines should meet cleanly at the table edge and at the girdle. Avoid lines that cross each other inside a facet, because each enclosed region represents one flat plane. If a line looks wrong, redraw it rather than darkening it.
- Draw the table shape centred on the axes, about one third of the girdle width in the hypothetical example.
- Mark evenly spaced points around the table edge.
- Connect each point to a corresponding point on the girdle with a straight line.
- For the emerald cut, add the long parallel facet lines first, then the corner facets.
- Confirm every facet is a closed four-sided or triangular region.
Shading Facets and Placing Highlights
Treat each facet as a separate plane. Decide a single light direction, for example from the upper left, and shade facets facing away from that direction more darkly. Adjacent facets should differ in value so the cut reads as three-dimensional. Keep the table lightest because it faces the viewer and the light most directly.
Place highlights as small, sharp marks on facets that face the light. Do not scatter highlights randomly; each highlight should sit inside one facet and follow its shape. A thin bright line along the girdle can suggest reflected light, but keep it subtle so it does not compete with the facet shading.
- Choose and mark a light direction outside the gem.
- Shade the pavilion facets first, using two or three values.
- Shade the crown facets, keeping the table lightest.
- Add highlights only on light-facing facets.
- Blend edges lightly, but preserve crisp facet boundaries.
Checking Geometry and Value Balance
Before finishing, check that the table is centred, the girdle is the widest line, and the pavilion tapers symmetrically. Check that every facet is a closed region and that no facet line crosses another inside a plane. Then check value balance: the darkest facet should not be so dark that it hides the facet shape, and the lightest facet should still show its boundary.
A simple arithmetic check helps with oval and rectangular cuts: measure the girdle width and the table width; the table should be roughly one third of the girdle width in this hypothetical convention. If your measurement differs greatly, adjust the table before shading.
- Measure girdle width and table width; compare the ratio.
- Trace each facet boundary to confirm it is closed.
- Squint at the drawing to check that light and dark facets alternate clearly.
- Erase stray construction marks and reinforce final facet lines.
Worked example
Draw a round-cut gemstone with a centred table, radiating crown facets and a tapered pavilion. Use a single light direction from the upper left and place two highlights on light-facing facets.
Worked answer
A completed drawing shows a circular girdle, a smaller centred circular table, straight facet lines radiating from the table edge to the girdle, and a pavilion tapering to a point below. Crown facets on the upper left are lighter, facets on the lower right are darker, and two small highlights sit inside upper-left facets. The table remains the lightest region and the girdle is the widest line.
Four practice exercises
Exercise 1
Draw an oval-cut gemstone with a long axis 80 mm and a short axis 50 mm on a 120 mm wide sheet. Place a centred oval table about one third of the girdle width and add radiating facet lines. Shade with light from the upper right.
Show answer and check
The drawing shows an oval girdle 80 mm by 50 mm, a centred oval table about 27 mm wide, radiating facet lines meeting cleanly at table and girdle, and shading lighter on upper-right facets with two highlights there.
Why: The axes fix the oval shape; the table ratio keeps the crown balanced; radiating lines create closed facets; a single light direction makes adjacent values distinct.
Check: Measure the long and short axes and the table width; confirm the table is roughly one third of the girdle width and that every facet is a closed region.
Exercise 2
Draw an emerald-cut gemstone as a clipped rectangle 70 mm by 50 mm with corner facets. Add a smaller centred clipped rectangle as the table and connect corresponding corners. Shade with light from the left and place one highlight on a long side facet.
Show answer and check
The drawing shows a clipped rectangle girdle, a centred smaller clipped rectangle table, parallel long-side facet lines, corner facet lines, and shading darker on the right with one highlight on a left-facing long facet.
Why: The clipped rectangle defines the cut; parallel long-side lines and corner lines create the characteristic emerald-cut facet layout; left light makes left facets lighter.
Check: Confirm the girdle is the widest line, the table is centred, corner facets are closed triangles or quadrilaterals, and the highlight sits inside one facet.
Exercise 3
Draw a round-cut gemstone with a girdle diameter of 60 mm. Mark a light direction from the top. Shade the pavilion with three values and the crown with two values, keeping the table lightest. Add a thin bright line along the lower girdle.
Show answer and check
The drawing shows a circular girdle, a centred table, radiating crown facets, a tapered pavilion, three pavilion values, two crown values, a lightest table, and a subtle bright line along the lower girdle.
Why: Separating pavilion and crown values clarifies the two main zones; the table stays lightest because it faces the viewer; the girdle line suggests reflected light without overpowering facet shading.
Check: Squint to confirm the table is lightest and adjacent facets differ; check that the bright girdle line does not cross facet boundaries.
Exercise 4
Draw any one of the three cut shapes and deliberately place one highlight on a dark facet. Then correct the drawing by moving that highlight to a light-facing facet and adjusting the shading so the light direction is consistent.
Show answer and check
The corrected drawing shows a consistent light direction, with the highlight moved inside a light-facing facet and the previously dark facet either lightened or left dark according to the chosen direction.
Why: A highlight on a dark facet contradicts the light direction; moving it restores consistency and makes the facet planes read correctly.
Check: Identify the chosen light direction and confirm every highlight lies on a facet facing that direction; check that no highlight sits on the darkest facet.
Common mistakes
- Drawing the table off-centre or too large. Re-measure from the axes and redraw the table at about one third of the girdle width in the hypothetical example.
- Letting facet lines cross inside a facet. Redraw the offending line so each enclosed region is a single flat plane.
- Shading every facet with the same value. Assign two or three values according to one light direction and keep adjacent facets distinct.
- Scattering highlights randomly across the gem. Place each highlight inside a light-facing facet and follow that facet's shape.
- Making the pavilion wider than the girdle. Check that the girdle remains the widest horizontal line and taper the pavilion inward.
Self-check rubric
- Girdle is the widest horizontal line and is symmetrical about the axes.
- Table is centred and proportionally smaller than the girdle.
- Facet lines form closed regions without crossing inside a facet.
- Pavilion tapers symmetrically below the girdle.
- Shading uses a consistent light direction with distinct adjacent facet values.
- Highlights are placed only on light-facing facets and follow facet shapes.
- Final drawing is clean, with construction lines removed or faint.
Questions and answers
Do I need to draw every facet line perfectly straight?
Aim for clean straight lines, but small variations are acceptable if each facet remains a closed plane and the overall symmetry reads correctly.
How many values should I use for shading?
Two or three values are enough for a clear drawing. More values can add richness but are not required for the rubric.
Can I use a different light direction?
Yes. Choose one direction and apply it consistently. The rubric checks consistency, not a specific direction.
What if my oval looks slightly uneven?
Check that the long axis is straight and that distances from the axis are equal on both sides. Small hand-drawn differences are acceptable if the oval reads clearly.