Free original lessons
Dumbbell Pose Drawing: Motion Arrows and Limb Construction
Learn to draw a dumbbell exercise pose using joint landmarks, limb construction, and motion arrows. Includes practice tasks, a worked example, and a flexible rubric.
Free lesson
Four exercises
Worked answers
Object Drawing Lessons
This lesson teaches a repeatable method for drawing a person holding dumbbells in an exercise pose. You will build the figure from joint landmarks, construct limbs with simple shapes, and add motion arrows that show the direction of movement. The focus is on pose clarity and limb alignment, not on rendering gym equipment or muscle anatomy. A convention is defined for judging proportions and arrow placement so that valid stylistic alternatives are accepted.
Practice materials: Printable downloads are not available for this lesson yet. Use the instructions and four exercises below.
Reference illustration
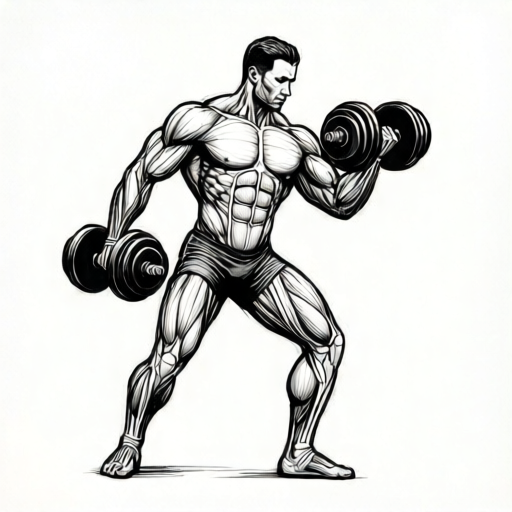
Use the stated measurements and conventions for each exercise.
Establishing Joint Landmarks and the Pose Skeleton
Begin by placing joint landmarks as small dots: shoulders, elbows, wrists, hips, knees, and ankles. Use a light pencil so these points can be adjusted. The landmarks define the pose before any limb thickness is added.
Connect the landmarks with straight guide lines to form a pose skeleton. Check that the skeleton reads clearly as a dumbbell exercise: for example, a standing curl with one arm bent and the other extended, or a shoulder press with both arms raised. The skeleton should show the direction each limb travels.
Define a simple proportion convention for this lesson: the head height is one unit, and the standing figure is approximately seven head heights tall. This is a hypothetical example for practice, not a universal standard. Measure your own drawing against this convention and adjust as needed.
- Mark the head as an oval and place a dot at its center for the neck reference.
- Place shoulder dots at equal distances from the neck reference.
- Place elbow dots so that each upper arm has a clear direction.
- Place wrist dots and draw small dumbbell handles as short lines through each wrist.
- Place hip, knee, and ankle dots to complete the stance.
Constructing Limbs with Simple Shapes
Build each limb from two tapered shapes: an upper segment from shoulder to elbow, and a lower segment from elbow to wrist. Use a light outline first, then refine. The elbow should sit at the junction of the two shapes, not floating between them.
For the torso, use a rounded rectangle from shoulders to hips. Add a center line to check left-right balance. Each arm holding a dumbbell should connect clearly to its shoulder landmark so the pose reads as one connected body.
Keep the dumbbell simple: a short handle line and two end weights drawn as small rectangles or circles. The dumbbell should align with the wrist and follow the direction of the forearm. Do not render detailed gym equipment; the goal is pose clarity.
- Draw the upper arm shape from shoulder dot to elbow dot.
- Draw the forearm shape from elbow dot to wrist dot.
- Add the hand as a small oval around the wrist dot.
- Draw the dumbbell handle through the hand oval and add two end weights.
- Repeat for the other arm and both legs, checking that each joint dot remains visible.
Adding Motion Arrows and Checking Alignment
Motion arrows show the path of the dumbbell or limb during the exercise. Draw a curved arrow beside the moving arm, starting near the wrist and ending in the direction of travel. Keep the arrow outside the limb outline so it does not obscure the construction.
Use a consistent arrow convention: a single arrowhead for the primary motion, and a dashed arrow for the return path if needed. Label the arrow only if it helps clarity; otherwise let the shape speak.
Check alignment by comparing the wrist dot, elbow dot, and shoulder dot. In a curl, the elbow stays near the torso while the wrist travels upward. In a press, the wrist travels above the shoulder. Adjust the skeleton before refining the outline.
- Identify the primary moving joint and the direction of travel.
- Draw a curved arrow beside the moving limb, starting near the wrist.
- Add a second arrow only if the exercise has two clear phases.
- Check that the arrow does not cross the face or torso center line.
- Compare the final outline to the joint landmarks and correct any drift.
Worked example
Draw a standing dumbbell curl pose with the right arm bent and the left arm extended, using joint landmarks and one motion arrow.
Worked answer
Place the head oval and neck dot. Add shoulder dots, then hip, knee, and ankle dots for a standing stance. For the right arm, place the elbow dot near the torso and the wrist dot higher, near shoulder height. For the left arm, place the elbow and wrist dots lower, with the arm extended downward. Draw tapered upper and lower arm shapes meeting at each elbow. Add hand ovals and simple dumbbells aligned through each wrist. Draw one curved motion arrow beside the right wrist, pointing upward. Check that the right elbow stays near the torso and the left arm reads as extended.
Four practice exercises
Exercise 1
Draw a standing shoulder press pose with both arms raised. Place joint landmarks, construct both arms, and add one motion arrow per arm.
Show answer and check
A standing figure with shoulder dots, elbow dots above shoulder height, and wrist dots above the elbows. Both arms are constructed from tapered shapes meeting at the elbows. Dumbbells align through the wrists. Two upward motion arrows sit beside the wrists.
Why: The press pose requires the wrists to travel above the shoulders. Placing elbow and wrist dots first ensures the arms read as raised before outlines are refined.
Check: Verify that each wrist dot is above its shoulder dot and that each motion arrow points upward without crossing the face.
Exercise 2
Draw a bent-over row pose with the torso leaning forward and one arm pulling a dumbbell toward the hip. Add a motion arrow showing the pull direction.
Show answer and check
A figure with the torso leaning forward so the shoulders are lower than in a standing pose but still above the hips, with the head forward. The pulling arm has an elbow dot near the torso and a wrist dot moving toward the hip. The dumbbell aligns with the wrist. A curved arrow points from the wrist toward the hip.
Why: The row pose depends on the torso lean and the wrist path toward the hip. The elbow stays near the torso while the wrist travels.
Check: Check that the torso is clearly leaning forward (shoulders forward of the hips) and that the motion arrow ends near the hip landmark.
Exercise 3
Draw a lateral raise pose with both arms extended to the sides at shoulder height. Use joint landmarks and add motion arrows showing the lift from the sides.
Show answer and check
A standing figure with shoulder dots, elbow dots at shoulder height, and wrist dots extended outward. Both arms are constructed horizontally. Dumbbells align through the wrists. Two curved arrows start near the wrists at the lowered position and end beside the raised wrists, showing the lift.
Why: The lateral raise requires the wrists to travel outward and upward to shoulder height. The arrows show the path from a lowered position to the raised position.
Check: Verify that the wrist dots are at approximately shoulder height and that the arrows do not cross the torso center line.
Exercise 4
Draw a split-stance curl pose with one leg forward and the right arm curling a dumbbell. Add one motion arrow and check limb alignment.
Show answer and check
A figure with one ankle dot forward and one back, hip dots level, and a bent right arm with the elbow near the torso and the wrist raised. The left arm is extended. A curved arrow points upward beside the right wrist. The dumbbell aligns with the right wrist.
Why: The split stance changes the leg landmarks but the curl mechanics remain the same: elbow near torso, wrist traveling upward.
Check: Check that the forward ankle dot is ahead of the back ankle dot and that the right elbow dot stays near the torso center line.
Common mistakes
- Drawing the dumbbell before placing the wrist landmark. Place the wrist dot first, then align the dumbbell handle through that dot.
- Letting the elbow float away from the upper and lower arm shapes. Draw the upper arm and forearm shapes so they meet at the elbow dot, then refine the junction.
- Using motion arrows that cross the face or obscure the pose. Move the arrow outside the limb outline and keep it beside the moving arm.
- Making both arms identical when the exercise is asymmetric. Check the pose skeleton: one arm may be bent while the other is extended. Adjust each limb separately.
Self-check rubric
- Joint landmarks are visible and connect the pose skeleton.
- Upper and lower arm shapes meet at the elbow landmark.
- Dumbbell handles align with the wrist landmarks.
- At least one motion arrow shows the primary direction of travel.
- The pose reads clearly as a dumbbell exercise without detailed equipment rendering.
- Valid stylistic alternatives are accepted if the landmarks and motion direction remain clear.
Questions and answers
Do I need to draw realistic muscles?
No. This lesson focuses on pose construction and motion arrows. Muscle anatomy is outside the boundary; simple limb shapes are sufficient.
How many motion arrows should I use?
Use one primary arrow for the main movement. Add a second dashed arrow only if the exercise has a clear return path.
Can I use a different proportion convention?
Yes. The seven-head convention is a hypothetical example. Any consistent convention is valid if you state it and check your drawing against it.
What if my dumbbell looks too detailed?
Simplify it to a handle line and two end weights. The pose should remain the focus.