Free original lessons
Fancy Cross Drawing: Flourishes, Borders, and Shading
Learn to draw an ornate cross with symmetrical flourishes, a decorative border, and layered shading using a clear convention and checkable steps.
Free lesson
Four exercises
Worked answers
Object Drawing Lessons
This lesson teaches a repeatable method for drawing a fancy cross: establish a clean cross armature, build symmetrical flourishes from simple curves, add a decorative border, then apply layered shading. You will use a stated convention for x-height and letter-like strokes so that valid stylistic alternatives are accepted. All measurements are hypothetical examples; measure your own paper and tools. The focus is decoration and shading, not plain crosses, winged crosses, or religious figures.
Practice materials: Printable downloads are not available for this lesson yet. Use the instructions and four exercises below.
Reference illustration
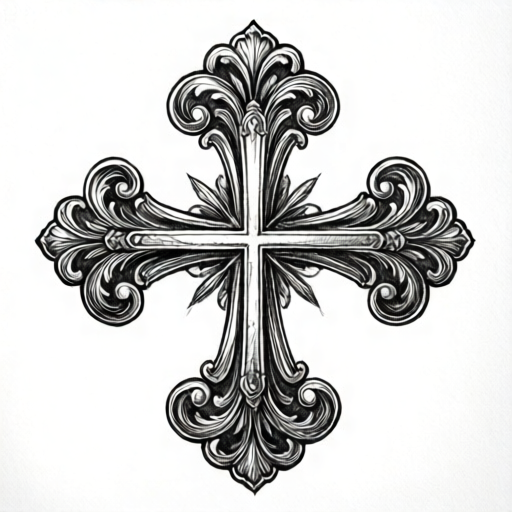
Use the stated measurements and conventions for each exercise.
Set the cross armature and convention
Begin with a vertical center line and a horizontal center line on your page. Mark the cross intersection where they meet. Decide the total height and width of the cross as simple whole numbers in the same unit, for example 12 units tall and 8 units wide. These are hypothetical values; substitute your own measured page dimensions.
Use a drawing convention: x-height is the distance from the baseline to the midline of lowercase-style strokes. For this lesson, treat the cross arms as having a baseline at the outer edge and a midline at the inner edge of each arm. Letter styles vary, so you may round or square the arm ends as long as the baseline-to-midline proportion stays consistent across all four arms.
- Draw a vertical center line and a horizontal center line.
- Mark the intersection and label it C.
- Measure equal distances from C along each line to set arm length; record the value.
- Draw the outer rectangle of the cross using the recorded arm length and a chosen arm thickness.
- Check that all four arms share the same thickness and that opposite arms are equal.
Build symmetrical flourishes
Flourishes are decorative curves that grow from the cross arms. Work on one quadrant at a time, then mirror the curves to the opposite quadrant. Use a light pencil so you can adjust. A flourish can be a single S-curve, a paired C-curve, or a small loop; choose one style and repeat it consistently.
Anchor each flourish at a point on the arm edge, not floating in space. Keep the largest flourish near the cross intersection and make outer flourishes smaller. This creates visual hierarchy without changing the cross structure.
- Choose one flourish style, such as an S-curve with a small terminal loop.
- Mark anchor points on the top arm at equal intervals.
- Draw the first flourish in the upper-right quadrant.
- Mirror the same curve to the upper-left quadrant by reflecting across the vertical center line.
- Repeat on the lower arms, then check symmetry by folding the page along the center lines or using a mirror.
Add a decorative border
A border frames the cross and makes the decoration read as a single object. Draw a second outline outside the cross arms at a consistent offset, for example 1 unit, which is a hypothetical value you can replace with your measured offset. Keep the offset equal on all sides.
Inside the border, add simple repeated marks such as short dashes or small dots. Space them evenly by counting intervals rather than guessing. The border should not touch the flourishes; leave a small gap so the cross remains the focal point.
- Measure and mark a consistent offset outside the cross outline.
- Draw the border as a closed shape that follows the cross silhouette.
- Divide the border into equal segments using a ruler and count them.
- Place one repeated mark per segment.
- Check that the gap between border and cross is equal on all sides.
Apply layered shading
Shading gives the cross depth. Choose a single light direction, such as upper left, and keep it consistent. Use three tones: light, medium, and dark. The light tone covers most of the surface, the medium tone sits on the lower-right side of each arm, and the dark tone is a narrow band at the edge.
Shade each arm separately, then blend the tones with light pencil strokes. Avoid shading the flourishes and border with the same intensity as the cross; keep them lighter so the cross stands out. Check your work by squinting: the dark band should appear on the same side of every arm.
- Mark the light direction with a small arrow outside the drawing.
- Fill the main cross surface with the light tone.
- Add the medium tone on the side away from the light.
- Add a narrow dark band at the outer edge on the same side.
- Blend gently and check that all arms show the same tonal order.
Worked example
A student draws a cross 10 units tall and 6 units wide with an arm thickness of 2 units. They add an S-curve flourish anchored at the midpoint of the top arm and mirror it to the left. They set a border offset of 1 unit and shade with light from the upper left. Check the symmetry and shading order.
Worked answer
The cross is symmetric because opposite arms are equal: top and bottom are 10 units, left and right are 6 units, and thickness is 2 units on all arms. The mirrored flourish is correct if the anchor point is the same distance from the center on both sides. The border offset is consistent at 1 unit. Shading is correct if the medium and dark tones appear on the lower-right side of every arm, matching the upper-left light direction.
Four practice exercises
Exercise 1
Draw a cross 8 units tall and 4 units wide with arm thickness 1 unit. Add one C-curve flourish on the right side of the top arm and mirror it to the left. Describe how you check symmetry.
Show answer and check
The cross has equal opposite arms: top and bottom 8 units, left and right 4 units, thickness 1 unit. The C-curve is anchored at the same distance from the center on both sides. Check symmetry by folding the page along the vertical center line or using a mirror; the two flourishes should align.
Why: Equal measurements on opposite arms and mirrored anchor points produce symmetry. The fold or mirror test confirms alignment without relying on a single universal style.
Check: Measure each arm and thickness with a ruler; fold or mirror to compare flourish positions.
Exercise 2
A cross has a border offset of 1 unit on the top and left, but 2 units on the bottom and right. What is the mistake, and how do you fix it?
Show answer and check
The border offset is inconsistent. Fix it by measuring one offset value, marking it at several points around the cross, and redrawing the border so the gap is equal on all sides.
Why: A border must frame the cross evenly; unequal offsets make the frame look lopsided. Measuring and marking before drawing prevents drift.
Check: Measure the gap between border and cross at four sides; all values should match.
Exercise 3
You shade a cross with light from the upper right. On the top arm, the dark band is on the left edge; on the right arm, the dark band is on the top edge. Is the shading consistent? Explain.
Show answer and check
No. With light from the upper right, the dark band should be on the lower-left side of every arm. The top arm's left edge is acceptable only if it is the lower-left side; the right arm's top edge is not consistent. Redraw the dark bands on the lower-left side of each arm.
Why: A single light direction produces the same tonal order on all arms. Checking each arm against the light-direction arrow reveals inconsistency.
Check: Draw a light-direction arrow and compare the dark band position on each arm; squint to see the overall pattern.
Exercise 4
Design a decorative border with 12 equal segments around a cross. You place one dot per segment. If you count 10 dots, what is likely wrong, and how do you check?
Show answer and check
Two segments are missing dots. Check by counting the segments and dots separately; the counts should match at 12. If they do not, mark the empty segments and add the missing dots.
Why: Equal segments require one mark each. A mismatch means the spacing or counting drifted, which is easy to fix by recounting.
Check: Count segments and dots aloud; compare totals and inspect any segment without a dot.
Common mistakes
- Flourishes are drawn freehand without anchor points, so they float or cross the border. Mark anchor points on the arm edges first, then draw each flourish from an anchor and mirror it.
- The border offset changes on different sides, making the frame look uneven. Measure one offset value and mark it at several points around the cross before drawing the border.
- Shading uses different light directions on different arms. Draw a light-direction arrow before shading and apply the same tone order to every arm.
- Arm thickness varies because the outer rectangle was drawn by eye. Record one arm thickness value and measure it on all four arms before drawing the outline.
Self-check rubric
- Cross armature uses equal opposite arms and consistent arm thickness.
- Flourishes are anchored on arm edges and mirrored across center lines.
- Border offset is equal on all sides and does not touch flourishes.
- Shading uses one light direction with a consistent light-medium-dark order on every arm.
- Valid stylistic alternatives, such as rounded or squared arm ends, are accepted if proportions and symmetry are maintained.
Questions and answers
Do I need to use the exact numbers in this lesson?
No. The numbers are hypothetical examples. Measure your own paper and tools, then keep your chosen values consistent throughout the drawing.
Can I use different flourish styles?
Yes. The convention allows valid alternatives as long as each flourish is anchored, mirrored, and consistent in style across quadrants.
How do I know my shading is correct?
Squint at the drawing. The dark band should appear on the same side of every arm, and the light direction arrow should match the tonal order.
What if my cross arms are rounded instead of square?
Rounded ends are acceptable under the convention. Keep the baseline-to-midline proportion equal on all arms and mirror the rounding.