Free original lessons
Fish Contour Drawing: Single-Line Outline Practice
Learn fish contour drawing with blind-contour warmups, edge tracing for fins and tail, and a single continuous outline. Includes rubric, exercises, and a planned printable plate.
Free lesson
Four exercises
Worked answers
Object Drawing Lessons
Contour drawing captures the visible edge of a form without shading or scale texture. For a fish, the outline runs from the mouth along the back, around the tail, and forward along the belly, with fins attached as separate contour loops. This lesson uses blind-contour practice to train hand-eye coordination, then guided edge tracing for fins, tail, and body, and finally a single-line fish outline. Work on plain paper with a pencil. The convention for this lesson is that contour means the visible outer edge and any internal edge where a fin overlaps the body, drawn as one continuous line without lifting the pencil. Shared attachment points where a fin or tail loop meets the body edge are not counted as self-crossings. The rubric rewards clear edge decisions and continuity rather than a single perfect shape.
Practice materials: Printable downloads are not available for this lesson yet. Use the instructions and four exercises below.
Reference illustration
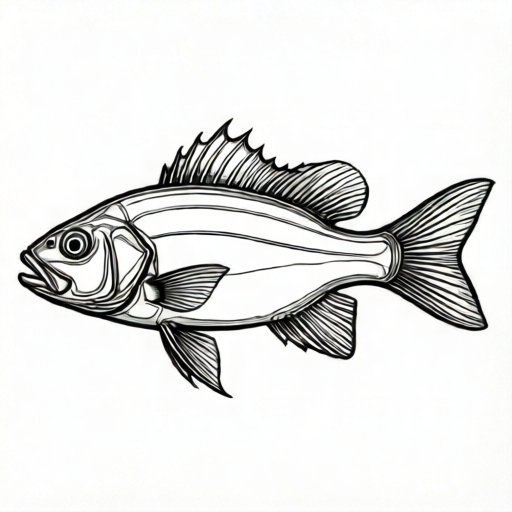
Use the stated measurements and conventions for each exercise.
Blind-contour warmup
Blind contour means you look only at the subject, not at the paper, while your pencil follows the edge. The goal is not accuracy but slow, connected looking. Spend two minutes tracing the fish outline with your eye and letting your hand move at the same pace.
Keep the pencil on the paper for the whole warmup. If you lose the edge, pause, find it again with your eye, and continue. The resulting drawing may look distorted; that is expected and useful.
- Place the fish reference where you can see it clearly without turning your head.
- Cover or ignore your paper so you cannot see the drawing.
- Start at the mouth and move your pencil as your eye travels the outline.
- Do not lift the pencil until you return to the mouth.
- Compare the warmup to the reference only after finishing.
Edge tracing for fins, tail, and body
After the warmup, trace the same edges while looking at the paper. Break the fish into three contour zones: body outline, tail, and fins. The body outline is the largest continuous edge. The tail is a separate loop that meets the body at the caudal peduncle. Fins are smaller loops attached to the body edge.
Draw the body outline first as one line from mouth to tail and back to mouth. Then add the tail as a closed loop that shares the peduncle edge. Finally, add each fin as a loop that starts and ends on the body outline. Where a fin overlaps the body, draw the visible fin edge and stop at the body line; do not draw hidden parts.
- Trace the body outline from mouth along the back to the tail base and forward along the belly.
- Draw the tail as a closed shape attached at the tail base.
- Draw the dorsal fin as a loop starting and ending on the back edge.
- Draw the pectoral fin as a loop on the side, using the visible overlap edge.
- Check that every fin loop touches the body outline at two points.
Single-line fish contour
A single-line contour uses one continuous line for the whole fish, including fins and tail. Plan the order before drawing: mouth, back, dorsal fin, tail, belly, pectoral fin, back to mouth. Where the line must cross itself, keep the crossing clean and deliberate.
Use a light pencil so you can adjust. The line should describe edges, not texture. Do not add scales, gill shading, or eye detail beyond a simple contour circle if needed. The finished drawing should read as a fish from its outline alone.
- Mark the mouth and tail base lightly as start and end points.
- Draw the back edge from mouth to tail base, adding the dorsal fin as a loop.
- Draw the tail loop and return along the belly to the mouth.
- Add the pectoral fin loop where it overlaps the body.
- Erase guide marks and darken the final contour line.
Worked example
A fish reference shows a body length of 12 cm from mouth to tail base, a tail length of 4 cm, and a dorsal fin height of 3 cm. Draw a single-line contour that includes the body, tail, and dorsal fin. Use a scale of 1 cm on the reference to 1 cm on your paper.
Worked answer
At the stated scale of 1 cm on the reference to 1 cm on paper, the drawing should show a continuous line starting at the mouth, running along the back for 12 cm to the tail base. During the back pass, before reaching the tail base, loop up 3 cm for the dorsal fin and return to the back edge. Then loop around the tail for 4 cm and return to the tail base, then run forward along the belly 12 cm to the mouth. The dorsal fin loop touches the back edge at two attachment points. The tail loop attaches at the tail base. Under the lesson convention, shared attachment points such as the tail base and fin attachment points are not counted as crossings, so this routing has zero genuine self-crossings. No scales or shading are added.
Four practice exercises
Exercise 1
A fish reference has a body length of 10 cm, a tail length of 3 cm, and a pectoral fin that starts 4 cm behind the mouth and is 2 cm long. Describe the order of a single-line contour that includes the body, tail, and pectoral fin. State how many genuine self-crossings occur under the lesson convention.
Show answer and check
Use this routing: start at the mouth, draw the back edge 10 cm to the tail base, draw the tail loop 3 cm and return to the tail base, then draw the belly forward toward the mouth. The pectoral fin attachment is 4 cm behind the mouth (equivalently 6 cm forward from the tail base). Draw the pectoral fin loop there, extending 2 cm and returning to the belly edge, then continue 6 cm along the belly to the mouth. Under the lesson convention, shared fin attachment points and the tail base are not counted as crossings. The described routing therefore has zero genuine self-crossings.
Why: The body outline is the largest continuous edge. The tail is a closed loop at the tail base. The pectoral fin is a loop on the belly edge. Shared attachment points are not crossings under the stated convention.
Check: Verify that the body length is 10 cm, tail length is 3 cm, and the pectoral fin starts 4 cm behind the mouth and is 2 cm long. Count two attachment points for the pectoral fin. Confirm the pencil never lifts and that no genuine self-crossing is counted.
Exercise 2
A fish reference shows a dorsal fin that overlaps the back edge. Measured from the mouth along the back, the visible fin edge runs from 5 cm to 8 cm and rises 2 cm. Explain how to draw this overlap in contour line without drawing hidden parts.
Show answer and check
Draw the back edge from the mouth to 5 cm, then draw the visible dorsal fin edge rising 2 cm and returning to the back edge at 8 cm, then continue the back edge to the tail base. Do not draw the part of the fin that is behind the body. The fin loop touches the back edge at 5 cm and 8 cm.
Why: Contour line shows only visible edges. The overlap edge is where the fin meets the body. Hidden parts are omitted.
Check: Check that the fin loop starts at 5 cm and ends at 8 cm on the back edge and that no line is drawn inside the body outline for the hidden fin.
Exercise 3
A blind-contour warmup of a fish takes 90 seconds. The pencil stays on the paper for the whole time. The resulting drawing has a body length of 14 cm on paper while the reference body length is 12 cm. The lesson convention is that a blind-contour warmup is successful if the pencil stays on the paper and the drawer does not look at the paper; size accuracy is not required. Is the warmup successful? Explain using the lesson convention.
Show answer and check
Yes, the warmup is successful because blind contour is judged by continuous looking and pencil contact, not by matching size. The 14 cm versus 12 cm difference is acceptable in a warmup. The convention rewards continuity and observation, not a single correct shape.
Why: Blind contour trains hand-eye coordination. Size accuracy is not the goal. The rubric allows valid alternatives in shape and proportion for warmups.
Check: Confirm the pencil stayed on the paper for 90 seconds and that the drawing was made without looking at the paper. Compare size only as a note, not as a pass or fail.
Exercise 4
A single-line fish contour must include the body, tail, dorsal fin, and pectoral fin. The body is 12 cm, the tail is 4 cm, the dorsal fin is 3 cm high, and the pectoral fin starts 5 cm behind the mouth and is 2 cm long. List a drawing order that uses one continuous line and state how many genuine self-crossings occur under the lesson convention.
Show answer and check
Order: mouth, back edge to tail base, dorsal fin loop (3 cm up and back to the back edge), tail loop (4 cm) returning to the tail base, belly edge forward toward the mouth. The pectoral fin attachment is 5 cm behind the mouth (equivalently 7 cm forward from the tail base). Draw the pectoral fin loop there, extending 2 cm and returning to the belly edge, then continue 7 cm to the mouth. Under the lesson convention, shared fin attachment points and the tail base are not counted as crossings. The described order therefore produces zero genuine self-crossings.
Why: Each loop returns to the body edge, so the continuous line does not lift. Shared attachment points such as the tail base and fin attachments are not crossings under the convention, so the count is zero.
Check: Trace the stated order and confirm the pencil never lifts. Count only genuine self-crossings, where the line passes over itself; do not count shared fin or tail attachment points. Verify lengths: body 12 cm, tail 4 cm, dorsal fin 3 cm, pectoral fin 2 cm. Confirm the pectoral fin attachment is 5 cm behind the mouth (equivalently 7 cm forward from the tail base). Confirm the crossing count matches the stated convention.
Common mistakes
- Lifting the pencil repeatedly during the single-line contour. Plan the order and practice the route twice with a finger before drawing. Accept small crossings instead of lifting.
- Drawing fins as separate floating shapes. Start and end each fin loop on the body outline so the fin shares an edge with the body.
- Adding scale texture or shading inside the outline. Keep the drawing to edges only. If you want texture, do it in a separate study, not this contour exercise.
- Making the tail too small because the peduncle is narrow. Measure the tail length against the body length on the reference and mark the tail tip before drawing.
Self-check rubric
- Contour continuity: the main outline is drawn as one continuous line with no unintended gaps.
- Edge decisions: fins and tail are attached to the body outline at two points each.
- Overlap handling: visible fin edges stop at the body line; hidden parts are not drawn.
- Proportion check: body length, tail length, and fin height match the reference within 1 cm on a 12 cm body.
- No texture: no scales, shading, or anatomy detail beyond a simple eye contour.
- Valid alternatives: a different drawing order or a slightly different fin shape is acceptable if the edge logic and continuity are clear.
Questions and answers
Do I have to keep the pencil on the paper the whole time?
For the blind-contour warmup and the single-line contour, yes. For edge tracing, you may lift between zones, but each zone should be one continuous line.
Can I draw the eye?
A simple contour circle for the eye is allowed, but it is optional. Do not add pupil shading or detail beyond the outline.
What if my fish looks distorted?
Distortion is normal in blind contour. The purpose is training observation. Use the edge-tracing stage to correct proportions while looking at the paper.
How do I show a fin that overlaps the body?
Draw the visible fin edge and stop at the body outline. Do not draw the hidden part of the fin. The overlap edge is part of the contour.