Free original lessons
Realistic Fish Drawing: Proportion and Shading Guide
Learn to draw a realistic fish using body proportion rules, fin placement, and a five-value shading strip. Includes practice tasks and a rubric.
Free lesson
Four exercises
Worked answers
Object Drawing Lessons
This guide teaches realistic fish drawing through two controllable skills: body proportion and shading. You will use a simple length-to-depth ratio, place fins relative to body landmarks, and apply a five-value shading strip to suggest form. The convention for all measurements is that body length is measured from the tip of the snout to the base of the tail fin, and body depth is the maximum vertical distance between the top and bottom outlines, measured perpendicular to the body axis. X-height is not used here; instead, all proportion checks use body length as the baseline unit. Letter styles and handwriting vary, so written labels are optional and never graded for style. Numerical values in examples are hypothetical teaching values, not equipment standards. Measure your own paper and pencil if you need actual sizes.
Practice materials: Printable downloads are not available for this lesson yet. Use the instructions and four exercises below.
Reference illustration
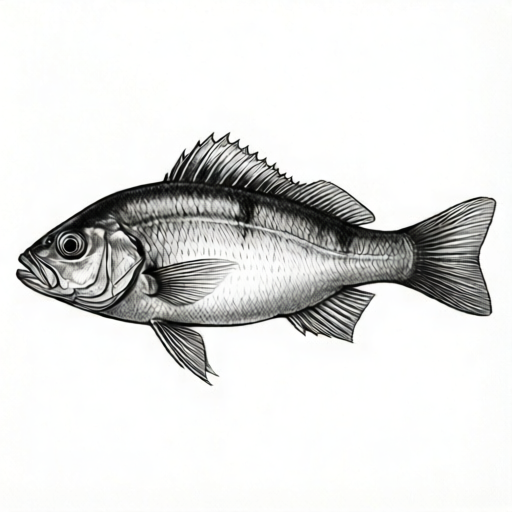
Use the stated measurements and conventions for each exercise.
Establishing Body Proportion
Begin with a light construction line for body length. Choose a length that fits your paper with room for fins. A common realistic fish body has a depth between one-third and one-half of its length, but this varies by species and pose. For this guide, use a hypothetical ratio of 2:5, meaning depth is two-fifths of length. If your body length is 20 cm on paper, the maximum depth would be 8 cm. Mark the snout tip and tail-fin base, then mark the deepest point of the body at about one-third of the length from the snout. This is a teaching convention, not a universal rule.
Draw a smooth top curve and a matching bottom curve through the depth mark. Keep the curves asymmetrical if the fish is tilted; a level fish can use mirrored curves. Check proportion by measuring the depth at three points: near the head, at the deepest point, and near the tail base. The deepest point should be the largest measurement. If your near-tail depth is larger than the mid-body depth, adjust the outline before adding fins.
- Draw a horizontal construction line and mark snout tip and tail-fin base.
- Measure body length and calculate a hypothetical depth of two-fifths of that length.
- Mark the deepest point at one-third of the length from the snout.
- Draw top and bottom body curves through the depth mark.
- Measure depth at three points and adjust until the mid-body depth is largest.
Placing Fins with Landmarks
Use body landmarks rather than guessing. The dorsal fin sits on the top outline, beginning above the deepest point and ending before the tail base. The anal fin sits on the bottom outline, roughly opposite the rear half of the dorsal fin. Pelvic fins sit below the body, about one-third of the length from the snout. Pectoral fins sit on the side, just behind the head and above the pelvic fins. The tail fin attaches at the tail-fin base and extends backward.
Draw fins as light shapes first. A dorsal fin can be a low triangle with a curved trailing edge. The tail fin can be a shallow fork or a rounded fan; choose one shape and keep it consistent. Check fin placement by drawing vertical guide lines from the dorsal fin start to the pelvic fin and from the dorsal fin end to the anal fin. These lines need not be perfectly vertical, but they should show that fins are grouped around the mid-to-rear body, not crowded at the snout.
- Mark the dorsal fin start above the deepest point and end before the tail base.
- Mark the anal fin on the bottom outline opposite the rear dorsal fin.
- Mark pelvic fins below the body at one-third length from the snout.
- Mark pectoral fins on the side just behind the head.
- Draw light fin shapes, then check grouping with vertical guide lines.
Building a Five-Value Shading Strip
Make a shading strip with five values: 1 is the lightest paper tone, 2 is light gray, 3 is mid gray, 4 is dark gray, and 5 is the darkest pencil tone you can control without smudging. Test your pencil on scrap paper and label the strip with these numbers. The strip is a reference, not a standard; your values depend on your pencil and paper.
On the fish, assign value 1 to the lightest areas, such as the upper flank facing the light. Use value 2 for gentle transitions, value 3 for the mid-body shadow, value 4 for the lower flank and under the head, and value 5 sparingly for the deepest shadow under the belly and behind fins. Keep fin shading lighter than body shading unless the fin overlaps the body. Check shading by squinting: the fish should still read as a solid form with a clear light-to-dark direction.
- Create and label a five-value strip from 1 lightest to 5 darkest.
- Decide a light direction, such as upper left.
- Place value 1 on the upper flank facing the light.
- Use values 2 and 3 for transitions and mid-body shadow.
- Use values 4 and 5 for lower flank, belly shadow, and behind fins.
Refining Outline and Surface Detail
After shading, refine the outline with a darker pencil only where the fish overlaps the background. Keep the outline lighter on the lit side. Add scales as short, overlapping curved marks, not full circles. Space them wider on the lit side and closer in shadow. Draw the eye as a small circle with a dark pupil and a tiny light highlight; place it about one eye-width behind the snout and one eye-width below the top outline.
Check surface detail by stepping back. If scales compete with the shading, reduce their contrast. If the eye looks too large, compare it to the head length: a hypothetical eye diameter of one-eighth of head length is a useful teaching check. Adjust before finalizing.
- Darken the outline only where the fish meets the background.
- Add short overlapping scale marks, wider on the lit side.
- Draw the eye with pupil and highlight, checking size against head length.
- Step back and reduce scale contrast if it hides the shading.
- Make final small adjustments to fins and outline.
Worked example
A fish is drawn with body length 20 cm on paper. Using the hypothetical 2:5 depth ratio, find the maximum body depth and state where to mark it.
Worked answer
Maximum depth is 8 cm. Mark it at about one-third of the body length from the snout, which is about 6.7 cm from the snout tip.
Why: Depth equals two-fifths of length: 20 times 2 divided by 5 equals 8 cm. One-third of 20 cm is about 6.7 cm, so the deepest point is marked there. This is a teaching convention, not a universal rule.
Check: Measure the depth at the mark with a ruler. It should be 8 cm. Measure from the snout to the mark; it should be about 6.7 cm. If either measurement is off by more than 0.5 cm, adjust the construction marks.
Four practice exercises
Exercise 1
A fish drawing has body length 15 cm. Using the hypothetical 2:5 depth ratio, calculate the maximum depth and the distance from the snout to the deepest point.
Show answer and check
Maximum depth is 6 cm. The deepest point is about 5 cm from the snout.
Why: Depth is two-fifths of 15 cm: 15 times 2 divided by 5 equals 6 cm. One-third of 15 cm is 5 cm.
Check: Measure the depth at the mark; it should be 6 cm. Measure from the snout to the mark; it should be about 5 cm. Accept within 0.5 cm.
Exercise 2
A fish has head length 8 cm. Using the hypothetical eye-diameter check of one-eighth of head length, calculate the suggested eye diameter.
Show answer and check
Suggested eye diameter is 1 cm.
Why: One-eighth of 8 cm is 8 divided by 8, which equals 1 cm. This is a teaching check, not a universal standard.
Check: Measure the drawn eye across its widest point. It should be about 1 cm. Accept between 0.8 cm and 1.2 cm if the eye still looks proportionate.
Exercise 3
You have a five-value strip labeled 1 lightest to 5 darkest. A fish is lit from the upper left. List which values you would use for the upper flank, mid-body shadow, lower flank, and a small shadow behind a fin.
Show answer and check
Upper flank: value 1 or 2. Mid-body shadow: value 3. Lower flank: value 4. Small shadow behind a fin: value 5.
Why: The lit upper flank gets the lightest values. The mid-body transitions to mid gray. The lower flank is darker. The darkest value is reserved for small deep shadows.
Check: Squint at the drawing. The upper flank should appear lightest, the lower flank darker, and the darkest marks should be small and localized. If value 5 covers a large area, lighten it.
Exercise 4
A dorsal fin is drawn starting above the deepest point and ending before the tail base. The body length is 20 cm. The dorsal fin starts 7 cm from the snout and ends 16 cm from the snout. Calculate the dorsal fin length along the body and state whether it stays before the tail base at 20 cm.
Show answer and check
Dorsal fin length along the body is 9 cm. It ends at 16 cm from the snout, which is before the tail base at 20 cm.
Why: Subtract the start distance from the end distance: 16 minus 7 equals 9 cm. Since 16 cm is less than 20 cm, the fin ends before the tail base.
Check: Measure the dorsal fin base along the body outline. It should be about 9 cm. Confirm the end mark is at least 4 cm before the tail base. Accept within 0.5 cm.
Common mistakes
- Making the body equally deep from head to tail. Mark the deepest point at about one-third length from the snout and taper toward the tail base.
- Crowding all fins near the head. Use vertical guide lines to group dorsal, pelvic, and anal fins around the mid-to-rear body.
- Shading with only one dark tone. Use the five-value strip and reserve the darkest value for small shadow areas.
- Drawing scales as full circles over the whole body. Use short overlapping curved marks and reduce contrast on the lit side.
Self-check rubric
- Body length and maximum depth follow a stated ratio within 0.5 cm.
- Deepest point is marked near one-third length from the snout.
- Dorsal, anal, pelvic, and pectoral fins are placed using body landmarks.
- Five-value shading strip is present and labeled 1 to 5.
- Shading uses at least three values and reserves value 5 for small shadows.
- Scales are short overlapping marks, not full circles.
- Eye size is checked against head length and is not oversized.
- Valid alternative fin shapes and ratios are accepted if consistently applied.
Questions and answers
Do I have to use the 2:5 depth ratio?
No. It is a hypothetical teaching value. Measure your own drawing and choose a ratio that matches the fish you want, then keep it consistent.
Can I use a different fin shape?
Yes. The guide teaches placement and proportion, not species identification. Choose a fin shape and keep it consistent across the drawing.
How do I know if my shading is working?
Squint at the drawing. If the fish still reads as a solid form with a clear light-to-dark direction, the shading is working.
What if my pencil cannot make five distinct values?
Test on scrap paper and adjust the strip to your pencil. The strip is a reference, not a standard.