Free original lessons
Draw a Kitchen Food Scale with Dial, Platform, and Bowl
Sketch a mechanical kitchen scale using ellipse guides, proportion steps, and a clear convention for construction lines, final outlines, and hatching.
Free lesson
Four exercises
Worked answers
Object Drawing Lessons
This lesson teaches you to draw a mechanical kitchen food scale with a round dial, a flat platform, and a weighing bowl. Use this convention: construction lines are light and dashed, final outlines are solid and darker, and shading uses parallel hatching spaced about 2 mm apart at a consistent angle. Because bowl shapes and dial markings vary, the rubric accepts any legible, consistent labeling. All measurements are hypothetical examples; measure your own paper and tools before drawing.
Practice materials: Printable downloads are not available for this lesson yet. Use the instructions and four exercises below.
Reference illustration
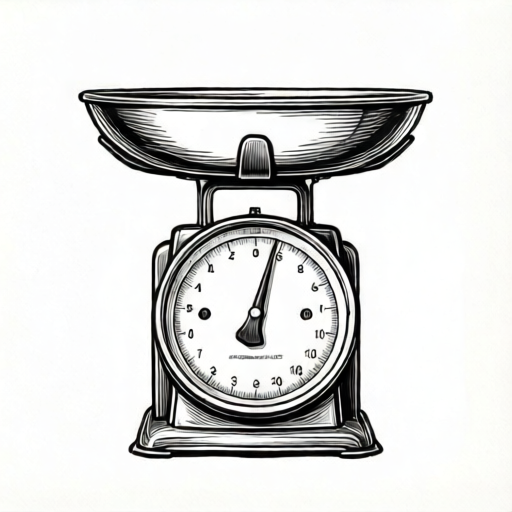
Use the stated measurements and conventions for each exercise.
Set up the page and define the convention
Place paper in portrait orientation. Draw a light border 2 cm from each edge as your working frame and mark its center with a small cross. Define the scale's overall height as 12.5 cm from the bottom of the base to the top of the dial housing; this is a hypothetical example, so adjust it to fit your paper. The platform ellipse will be centered 5 cm above the base line, and the bowl will rest on the platform. The dial will be a circle 6 cm in diameter centered 9.5 cm above the base line.
- Draw the border and center cross lightly.
- Mark the base line 2 cm above the bottom border.
- Mark the dial center 9.5 cm above the base line on the vertical center line.
- Label the convention in a corner: dashed = construction, solid = final, hatched = shadow.
Build the base, platform, and dial
The base is a rounded rectangle 10 cm wide and 3 cm tall, centered on the vertical line with its bottom on the base line. The platform is a horizontal ellipse 8 cm wide and 3 cm tall centered 5 cm above the base line, so its underside is 5−1.5=3.5 cm above the base line, just above the base top at 3 cm. The dial housing is a circle 6 cm in diameter centered 9.5 cm above the base line, so its bottom is 9.5−3=6.5 cm. Use a compass or circular guide for the dial and an ellipse guide for the platform. Connect the base top to the platform underside with two short vertical supports 1 cm wide, placed 3 cm apart center-to-center; they span from 3 cm to 3.5 cm and are 0.5 cm tall. The platform top is 5+1.5=6.5 cm, so it meets the dial housing bottom. Where the platform edge passes behind the dial housing, omit that hidden part from the solid final outline.
- Draw the base rounded rectangle.
- Draw the platform ellipse centered above the base.
- Draw the dial circle centered 9.5 cm above the base line.
- Add the two supports and omit the platform edge hidden behind the dial housing.
- Check symmetry by measuring from the center line to each side.
Add the weighing bowl and dial details
The bowl is a shallow ellipse-based form sitting on the platform. Draw its rim as an ellipse 9 cm wide and 4 cm tall centered on the platform. The bowl body curves down to a smaller ellipse 6 cm wide and 2 cm tall at its base, which rests on the platform. Use smooth curves connecting rim to base. The bowl overlaps the platform slightly; show only the visible platform edge beside the bowl as a solid final line and omit or dash any portion hidden behind the bowl. On the dial, draw a concentric dial-face circle inset 1 cm from the housing rim for the scale face. Add 12 tick marks every 30 degrees around the dial. Label six consecutive ticks along the lower half 0 to 5 (for example, from 4 o'clock through 9 o'clock inclusive), so each number aligns with one tick; these are hypothetical markings, and any legible, consistent numbering is acceptable. Place a pointer from the center to the 12 o'clock position. Add a small knob at the bottom of the dial housing.
- Draw the bowl rim ellipse and base ellipse.
- Connect them with smooth side curves.
- Draw the inner dial circle and tick marks.
- Add the pointer and numbers.
- Draw the knob and finalize all solid outlines.
Shade and review using the rubric
Apply parallel hatching to the shadow side of the bowl, the underside of the platform, and the right side of the dial housing. Keep hatching consistent in angle and spacing, and leave the light side unshaded. Erase construction lines only after final outlines are solid. Check that the dial is circular, the platform is elliptical, and the bowl sits centered on the platform. Valid alternatives include different bowl shapes and different dial numbering, as long as they are consistent and legible.
- Hatch the shadow areas with 2 mm spacing.
- Erase dashed construction lines.
- Measure key dimensions and compare to the plan.
- Check symmetry and dial legibility.
- Label the base, platform, dial, and any connecting neck.
Worked example
Draw a kitchen scale with a 10 cm wide by 3 cm tall base. Place an 8 cm by 3 cm platform ellipse 5 cm above the base line, and a 6 cm diameter dial centered 9.5 cm above the base line so its bottom meets the platform top. Add a shallow bowl with a 9 cm by 4 cm rim and a 6 cm by 2 cm base.
Worked answer
Base: rounded rectangle 10 by 3 cm. Platform: ellipse 8 by 3 cm centered 5 cm above the base line, so its underside is 5−1.5=3.5 cm above the line, 0.5 cm above the base top at 3 cm. Add two supports 1 cm wide and 3 cm apart center-to-center, spanning 3 to 3.5 cm (hypothetical drawing dimensions). Dial: circle 6 cm in diameter centered 9.5 cm above the base line, so its bottom is 9.5−3=6.5 cm and rests on the platform top (5+1.5=6.5 cm). Bowl: rim ellipse 9 by 4 cm and base ellipse 6 by 2 cm, centered on the platform. Draw the dial-face circle inset 1 cm from the housing rim, twelve ticks at 30-degree intervals, labels 0 to 5 on six consecutive lower-semicircle ticks from 4 o'clock through 9 o'clock inclusive, a pointer to 12 o’clock, and a small knob below. Shade the right side and underside with parallel hatching. Check symmetry within 0.5 cm and confirm the dial is circular.
Four practice exercises
Exercise 1
Draw a scale with a base 8 cm wide and 2 cm tall, a platform ellipse 6 cm by 2 cm centered 3 cm above the base, and a dial 4 cm in diameter centered 7 cm above the base. Add a bowl with rim 7 cm by 3 cm and base 5 cm by 1.5 cm.
Show answer and check
Base rounded rectangle 8 by 2 cm; platform ellipse 6 by 2 cm centered 3 cm above the base line; dial circle 4 cm diameter centered 7 cm above the base line; bowl rim 7 by 3 cm, base 5 by 1.5 cm centered on the platform; supports of any consistent width and spacing (for example, 1 cm wide, 2 cm apart, an added hypothetical choice not required by the prompt). The dial bottom is 7 − 2 = 5 cm above the base line, and the platform top is 3 + 1 = 4 cm above the base line, leaving a 1 cm gap; add a short neck or support connecting the platform top to the dial bottom, or adjust the dial center to 6 cm so its bottom meets the platform top at 4 cm. Draw the base first, then the platform, then the dial, then the supports and neck, then the bowl. Keep everything centered on the vertical center line and use dashed construction lines until the final solid pass.
Why: Use the same proportion steps: base first, then platform, dial, supports, bowl. Keep all centered on the vertical line and use the convention for lines. The dial bottom and platform top leave a 1 cm gap that must be bridged by a neck or support, or removed by lowering the dial center to 6 cm.
Check: Measure base width (8 cm), platform height above the base (3 cm), dial diameter (4 cm), and bowl rim width (7 cm). Confirm the dial bottom is 5 cm above the base line and the platform top is 4 cm, so the 1 cm gap is bridged by a neck or the dial center is lowered to 6 cm. Confirm symmetry within 0.5 cm by measuring from the center line to each side, and check the dial is circular with a compass or round guide.
Exercise 2
Draw a scale where the dial is 6 cm in diameter and centered 10 cm above the base, the platform is 9 cm by 3 cm centered 5 cm above the base, and the base is 11 cm by 3 cm. Add a shallow bowl with rim 10 cm by 4 cm.
Show answer and check
Base 11 by 3 cm; platform 9 by 3 cm centered 5 cm above the base line; dial 6 cm diameter centered 10 cm above the base line; bowl rim 10 by 4 cm with base 7 by 2 cm; supports of any consistent width and spacing (for example, 1 cm wide, 3 cm apart, an added hypothetical choice not required by the prompt). The platform top is 6.5 cm (center 5 plus half-height 1.5); the dial bottom is 7 cm (center 10 minus radius 3), leaving a 0.5 cm gap. Add a 0.5 cm neck to connect the platform to the dial. The bowl rim is 1 cm wider than the platform, so keep the bowl centered and show the visible platform edge beside it.
Why: The platform spans 3.5 to 6.5 cm above the base line. The dial spans 7 to 13 cm, so there is a 0.5 cm vertical gap between them; a 0.5 cm neck closes it. The bowl rim is 1 cm wider than the platform, so show its overhang while keeping it centered.
Check: Measure the platform top at 6.5 cm and dial bottom at 7 cm; confirm the 0.5 cm neck bridges the gap. Check that the 10 cm bowl rim is centered over the 9 cm platform and that the dial is circular.
Exercise 3
Draw a scale with a base 9 cm wide by 3 cm high with square corners, a platform ellipse 7 cm by 2.5 cm centered 4.25 cm above the base, and a dial 5 cm in diameter centered 8 cm above the base. Use a bowl with rim 8 cm by 3.5 cm.
Show answer and check
Square-cornered base 9 cm wide by 3 cm high; platform 7 by 2.5 cm centered 4.25 cm above the base line; dial 5 cm diameter centered 8 cm above the base line; bowl rim 8 by 3.5 cm, base 6 by 1.5 cm; supports of any consistent width and spacing (for example, 1 cm wide, 2.5 cm apart, an added hypothetical choice not required by the prompt). The platform bottom is 4.25−1.25=3 cm, touching the 3 cm-high base top; its top is 5.5 cm, matching the dial bottom (8−2.5=5.5 cm). The square-cornered base changes the outline but not the centering; keep the platform and dial on the vertical center line and show the visible platform edge behind the bowl as a solid final line where the bowl overhangs.
Why: The platform bottom is 4.25−1.25=3 cm, exactly at the top of the 3 cm base. Its top is 5.5 cm and the dial bottom is 8−2.5=5.5 cm, so the vertical stack touches without a gap. The bowl is centered over the platform.
Check: Measure the base width and height (9 by 3 cm), the platform center height (4.25 cm), and the dial diameter (5 cm). Check bowl centering and symmetry within 0.5 cm, confirm the bowl rim is 1 cm wider overall than the platform (0.5 cm per side) with a solid platform edge behind the bowl, and confirm the dial is circular.
Exercise 4
Draw a scale with a base 12 cm wide and 3 cm tall, a platform 10 cm by 3 cm centered 5 cm above the base, and a dial 7 cm in diameter centered 11 cm above the base. Add a bowl with rim 11 cm by 4 cm and base 8 cm by 2 cm.
Show answer and check
Base 12 by 3 cm; platform 10 by 3 cm centered 5 cm above the base line; dial 7 cm diameter centered 11 cm above the base line; bowl rim 11 by 4 cm, base 8 by 2 cm; supports of any consistent width and spacing (for example, 1 cm wide, 4 cm apart, an added hypothetical choice not required by the prompt). The platform top is 6.5 cm and the dial bottom is 11−3.5=7.5 cm, so add a 1 cm neck to connect them. The 11 cm bowl rim is 1 cm wider than the 10 cm platform; center it and show the overhang.
Why: The platform spans 3.5 to 6.5 cm above the base line, and the dial begins at 7.5 cm; a 1 cm neck fills the gap. The bowl rim is 1 cm wider than the platform, so center it and show that overhang.
Check: Measure bowl rim width (11 cm) and platform width (10 cm) and confirm the visible 1 cm overhang is shown with a solid platform edge behind the bowl. Confirm the platform top is 6.5 cm, dial bottom is 7.5 cm, and a 1 cm neck bridges them. Check symmetry within 0.5 cm.
Common mistakes
- Drawing the platform as a perfect circle instead of an ellipse. Use an ellipse guide or round a rectangle symmetrically; check that width is greater than height.
- Making the bowl too deep so it hides the platform entirely. Keep the bowl base ellipse smaller than the rim and show the visible platform edge beside the bowl as a solid final line; omit hidden portions.
- Using inconsistent line weights for construction and final lines. Follow the convention: dashed light lines for construction, solid darker lines for final outlines.
- Placing the dial off-center or making it oval. Use a compass or circular guide and measure from the center line to confirm equal distances.
Self-check rubric
- Proportions within 1 cm of planned dimensions.
- Symmetry within 0.5 cm from the center line.
- Dial is circular and legible with consistent markings.
- Platform is elliptical, not circular.
- Bowl sits centered on the platform and overlaps correctly.
- Convention followed: dashed construction, solid final, parallel hatching.
- Final lines clean and construction lines erased.
Questions and answers
Do I need a compass or ellipse guide?
Not strictly. Use a circular object for the dial and round a rectangle symmetrically for the platform ellipse. Measure your tools first.
Can I change the bowl shape?
Yes. Any shallow bowl form is acceptable if it sits centered on the platform and is drawn with smooth curves.
How many dial markings should I draw?
Twelve tick marks every 30 degrees is a hypothetical example. Any consistent, legible set is acceptable.
What if my dimensions differ from the example?
The 12 cm height and 6 cm dial are hypothetical. Measure your paper and adjust proportionally, keeping relationships consistent.