Free original lessons
Draw a Foot from Ankle to Toe: A Construction Guide
Learn to build a foot from ankle to toe using simple landmarks, an arch curve, and clear toe placement. Includes practice tasks and a rubric.
Free lesson
Four exercises
Worked answers
Object Drawing Lessons
Drawing a foot becomes manageable when you treat it as a structure rather than a silhouette. Start at the ankle, establish the heel and arch, then place the toes along a curved line. This guide uses a simple convention: the foot is drawn from a side-three-quarter view, with the ankle joint marked as a small circle, the heel as a rounded wedge, and the toe line as an arc. All measurements are relative to the foot's length, which you choose freely. The goal is consistent construction, not anatomical accuracy. You will practice four short tasks, each solvable from the text alone, and check your work with a simple method.
Practice materials: Printable downloads are not available for this lesson yet. Use the instructions and four exercises below.
Reference illustration
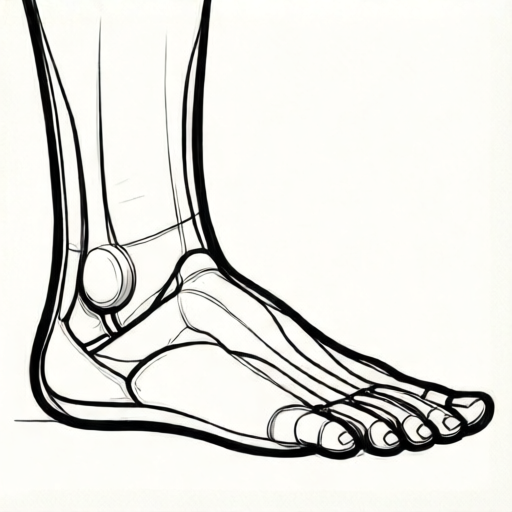
Use the stated measurements and conventions for each exercise.
Set the ankle and heel
Begin with a light vertical line for the lower leg. Mark the ankle joint as a small circle above the heel position, slightly forward of the back edge. From the ankle, draw a short line downward and slightly back to locate the heel. The heel is a rounded wedge, not a point. Its width is roughly one-quarter of the foot's total length. Keep all lines light so you can adjust them.
Next, draw a horizontal baseline from the heel forward. This baseline represents the ground contact. The distance from the heel to the ball of the foot is about two-thirds of the total foot length. Mark that ball point on the baseline. The ankle sits above the heel, slightly forward of the back edge.
- Draw a light vertical line for the lower leg.
- Mark the ankle joint as a small circle.
- Draw a rounded wedge for the heel below and slightly behind the ankle.
- Draw a horizontal baseline from the heel forward.
- Mark the ball of the foot at about two-thirds of the total length.
Build the arch curve
The arch is the curved line connecting the heel to the ball on the inner side of the foot. From the back of the heel, draw a gentle upward curve that peaks near the middle of the foot and then descends to the ball point. The peak height is about one-tenth of the foot's length above the baseline. This curve is not a straight line; it should look like a shallow bridge.
On the outer side, the arch is lower and flatter. Draw a second, subtler curve from the heel to the ball on the outer edge. The space between the two curves represents the foot's volume. Keep the curves smooth and avoid sharp corners.
- From the back of the heel, draw a gentle upward curve to the ball point.
- Peak the curve about one-tenth of the foot length above the baseline.
- Draw a flatter curve on the outer side from heel to ball.
- Check that both curves are smooth and meet the heel and ball cleanly.
Place the toes along an arc
The toes sit along a curved line that starts at the ball point and sweeps forward and slightly inward. Draw this toe line as a shallow arc. The big toe is the widest and longest; place it at the inner end of the arc. The remaining toes decrease in size toward the outer edge. Each toe is a small rounded shape, not a stick. Leave a tiny gap between toes.
Use the ball point as the anchor. The toe line extends forward by about one-fifth of the foot's length. The big toe's tip is the farthest forward. The little toe is the shortest and sits at the outer end. Check that the toe line curves gently and that no toe crosses another.
- Draw a shallow arc from the ball point forward and slightly inward.
- Place the big toe at the inner end, longest and widest.
- Add the remaining toes in decreasing size toward the outer edge.
- Keep small gaps between toes and ensure no overlaps.
Refine and check proportions
Once the construction lines are in place, darken the final outline. The ankle circle becomes a subtle bump. The heel wedge becomes a rounded back. The arch curves define the inner and outer edges. The toe arc becomes the front edge with individual toes.
Check proportions with a simple ratio: heel-to-ball is about two-thirds of total length; ball-to-toe-tip is about one-fifth; the arch peak is about one-tenth above the baseline. These are relative, not absolute. If your foot looks too long or too short, adjust the ball point and toe arc together. Keep the ankle above the heel and slightly forward.
- Darken the final outline over the light construction lines.
- Convert the ankle circle into a subtle bump.
- Round the heel wedge and smooth the arch curves.
- Draw individual toes along the toe arc.
- Verify the two-thirds and one-fifth ratios and adjust if needed.
Worked example
Construct a foot with total length 10 cm. Mark the ankle, heel, ball, arch peak, and toe line using the ratios from the guide.
Worked answer
Ankle: small circle above the heel, slightly forward. Heel: rounded wedge at the back, width about 2.5 cm (one-quarter of 10 cm). Baseline: horizontal from heel forward. Ball point: at 6.7 cm from the heel (two-thirds of 10 cm). Arch peak: about 1 cm above the baseline at the midpoint. Toe line: shallow arc extending about 2 cm forward from the ball point, with the big toe at the inner end and smaller toes toward the outer edge. Total length from heel to big toe tip is about 10 cm.
Why: The ratios are relative: heel-to-ball is two-thirds of total length, ball-to-toe-tip is one-fifth, and arch peak is one-tenth above baseline. Using 10 cm makes the arithmetic simple: 6.7 cm, 2 cm, and 1 cm. The ankle sits above the heel and slightly forward, consistent with the construction sequence.
Check: Measure heel-to-ball (should be about 6.7 cm) and ball-to-toe-tip (about 2 cm). Check arch peak height (about 1 cm). Confirm the toe line is a shallow arc and toes decrease in size toward the outer edge.
Four practice exercises
Exercise 1
Construct a foot with total length 12 cm. Mark the heel, ball point, and toe line. State the heel-to-ball distance and the ball-to-toe-tip distance.
Show answer and check
Heel-to-ball: 8 cm (two-thirds of 12 cm). Ball-to-toe-tip: about 2.4 cm (one-fifth of 12 cm). Toe line is a shallow arc from the ball point forward.
Why: Use the ratios: two-thirds of 12 is 8; one-fifth of 12 is 2.4. The toe line starts at the ball point and curves forward and slightly inward.
Check: Measure heel-to-ball (8 cm) and ball-to-toe-tip (2.4 cm). Confirm the toe line is an arc and the big toe is at the inner end.
Exercise 2
A foot drawing has a heel-to-ball distance of 9 cm and a total length of 15 cm. Is the ball point correctly placed? Explain using the two-thirds ratio.
Show answer and check
No. Two-thirds of 15 cm is 10 cm, so the ball point should be 10 cm from the heel. At 9 cm, it is too close to the heel.
Why: The guide specifies heel-to-ball as two-thirds of total length. 15 × 2/3 = 10. A 9 cm distance is less than 10 cm, so the ball point is misplaced.
Check: Calculate 15 × 2/3 = 10. Compare with the given 9 cm. If different, adjust the ball point to 10 cm from the heel.
Exercise 3
Draw a foot with an arch peak 1.2 cm above the baseline. If the total foot length is 12 cm, is the arch peak height consistent with the one-tenth guideline? Show the arithmetic.
Show answer and check
Yes. One-tenth of 12 cm is 1.2 cm, so the arch peak height matches the guideline.
Why: The guideline says arch peak is about one-tenth of total length above baseline. 12 × 1/10 = 1.2. The given height is exactly 1.2 cm.
Check: Multiply total length by 0.1: 12 × 0.1 = 1.2. Compare with the drawn height.
Exercise 4
Construct a foot with total length 10 cm. Place the big toe at the inner end of the toe arc and the little toe at the outer end. Describe how you ensure toes decrease in size and do not overlap.
Show answer and check
Draw a shallow arc from the ball point forward. Place the big toe at the inner end, longest and widest. Add toes toward the outer edge, each slightly shorter and narrower. Leave small gaps. The little toe is shortest at the outer end.
Why: The toe line is an arc, and toe size decreases from inner to outer edge. Gaps prevent overlap. The big toe tip is farthest forward.
Check: Check that the toe line is a shallow arc, the big toe is at the inner end, toes decrease in size toward the outer edge, and no toes overlap.
Common mistakes
- Drawing the heel as a sharp point. Round the heel into a wedge shape; the back of the heel should be curved, not pointed.
- Making the arch a straight line. Curve the arch upward with a peak about one-tenth of the foot length above the baseline.
- Placing toes in a straight row. Arrange toes along a shallow arc, with the big toe at the inner end and smaller toes toward the outer edge.
- Putting the ankle too far back or forward. Place the ankle above the heel and slightly forward of the back edge; check that it sits over the heel wedge.
Self-check rubric
- Ankle is marked as a small circle above the heel and slightly forward.
- Heel is a rounded wedge, not a point.
- Baseline is horizontal and connects heel to ball point.
- Ball point is about two-thirds of total length from the heel.
- Arch curve peaks about one-tenth of foot length above baseline.
- Toe line is a shallow arc with big toe at inner end and smaller toes toward outer edge.
- Final outline is smooth and construction lines are not distracting.
- Valid alternatives: toe shapes may vary; arch peak may be slightly higher or lower if visually consistent; foot length is freely chosen.
Questions and answers
Do I need to draw a realistic foot?
No. This guide teaches construction from ankle to toe using simple shapes. Realism is optional; consistent proportions matter more.
What if my foot looks too long?
Check the ball point. It should be about two-thirds of the total length from the heel. If it is farther forward, move it back and shorten the toe arc.
Can I use different toe shapes?
Yes. The convention allows varied toe shapes as long as the toe line is a shallow arc and toes decrease in size toward the outer edge.
How do I know the arch is high enough?
The arch peak should be about one-tenth of the foot length above the baseline. Measure with a ruler or compare visually.