Free original lessons
Draw a Gaming Setup: Desk, Monitor, Chair in One Scene
Learn to sketch a gaming desk setup with a monitor and chair using simple shapes, clear proportions, and a checkable drawing convention.
Free lesson
Four exercises
Worked answers
Object Drawing Lessons
This lesson teaches a reliable way to draw a gaming setup as a single scene: a desk, a monitor, and a chair. You will use a simple convention for scale and alignment, build the scene in layers, and check your work with arithmetic and visual tests. The goal is a clear, readable sketch, not photorealism. All measurements are hypothetical examples; measure your own paper and tools if you need exact values.
Practice materials: Printable downloads are not available for this lesson yet. Use the instructions and four exercises below.
Reference illustration
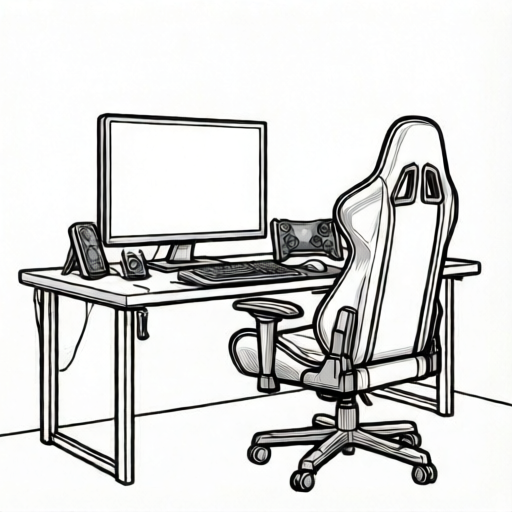
Use the stated measurements and conventions for each exercise.
Set a drawing convention before you start
Choose a scale unit so the three objects relate correctly. For example, let one desk width equal 60 units and one desk height equal 30 units. These numbers are hypothetical; they only keep proportions consistent. Draw a light baseline for the floor and a horizontal line for the desk top. Mark the desk top as a long rectangle seen slightly from above, so the front edge is lower than the back edge.
Use a simple x-height convention for any labels or small notes: x-height is measured from the baseline to the midline of lowercase letters. Letter styles vary, so do not force a single shape. For the drawing itself, use clean outlines and light construction lines that you can erase later.
- Draw a floor baseline and a light horizontal line for the desk top.
- Mark the desk width as 60 units and height as 30 units (hypothetical).
- Add a vertical center line to help place the monitor and chair.
Build the desk plane first
The desk is the anchor. Draw the top as a parallelogram: a front edge, a back edge, and two side edges that slant slightly. Keep the front edge parallel to the floor baseline. Add two front legs as narrow rectangles from the desk top to the floor. If you want a back leg, show only a short segment behind the front leg to suggest depth.
Check the desk by measuring: the front edge should be about 60 units long, and each front leg about 30 units tall. If your units differ, keep the ratio 2:1 between width and height. This ratio is a hypothetical example, not a standard.
- Draw the front edge of the desk top as a horizontal line.
- Add the back edge above it and connect the sides to form a parallelogram.
- Draw two front legs as rectangles reaching the floor baseline.
- Add a short back-leg segment for depth if desired.
Place the monitor on the desk
Center the monitor on the desk using the vertical center line. Draw the screen as a rectangle with a slight slant that matches the desk top. A typical gaming monitor is wider than it is tall; for example, use 24 units wide and 14 units tall (hypothetical). Add a stand: a short vertical neck and a small base ellipse or rectangle on the desk top.
To show a different monitor angle, tilt the screen rectangle a few degrees and adjust the stand base accordingly. Keep the bottom of the stand on the desk top line. Check that the monitor width is less than the desk width and that the stand base sits fully on the desk surface.
- Mark the monitor width and height on the center line.
- Draw the screen rectangle with a slight slant.
- Add the stand neck and base on the desk top.
- Erase construction lines that cross the screen.
Draw the chair in front of the desk
Place the chair slightly in front of the desk so it overlaps the desk legs but does not hide the monitor. Draw the seat as a shallow parallelogram at about knee height, then add the backrest as a taller rectangle behind the seat. Add a center post and a simple star base with wheels if you want a gaming chair look.
Use the same unit scale: for example, seat height 18 units, backrest height 22 units, and seat width 20 units (hypothetical). Check that the chair back does not cover the monitor screen and that the seat is lower than the desk top. Vary the chair style by changing the backrest shape, but keep the seat and base aligned with the floor.
- Draw the seat parallelogram at knee height.
- Add the backrest behind the seat.
- Draw the center post and a simple base with wheels.
- Check overlap: chair in front, monitor visible.
Worked example
Draw a gaming setup with a desk 60 units wide and 30 units tall, a monitor 24 units wide and 14 units tall centered on the desk, and a chair with seat height 18 units and backrest height 22 units placed in front. Use a floor baseline and a center line.
Worked answer
A clear sketch shows a parallelogram desk top with two front legs reaching the floor, a centered monitor rectangle with a stand base on the desk, and a chair in front with its seat below the desk top and its backrest not covering the screen. All construction lines are light and erased where they cross the final outlines.
Four practice exercises
Exercise 1
Draw a desk 50 units wide and 25 units tall with a monitor 20 units wide and 12 units tall centered on it. Add a chair with seat height 15 units in front. Check that the monitor width is less than the desk width and the seat is lower than the desk top.
Show answer and check
A sketch with a parallelogram desk top, two front legs to the floor, a centered monitor rectangle with stand base on the desk, and a chair in front with seat below the desk top.
Why: The desk width 50 is greater than monitor width 20, and seat height 15 is less than desk height 25, so the proportions are consistent.
Check: Measure the drawn desk width and monitor width; confirm desk is wider. Measure seat height and desk height; confirm seat is lower.
Exercise 2
Draw the same desk and chair as above but tilt the monitor screen 5 degrees to the right. Keep the stand base on the desk top and the screen fully visible above the chair back.
Show answer and check
A sketch with a tilted monitor rectangle, stand base still on the desk, and chair back not covering the screen.
Why: Tilting changes the screen angle but not its width or height, so the monitor still fits on the desk and remains visible.
Check: Check that the bottom of the stand base touches the desk top line and that no part of the chair back overlaps the screen rectangle.
Exercise 3
Draw a gaming setup with a desk 70 units wide and 35 units tall, a monitor 28 units wide and 16 units tall, and a chair with a tall backrest 30 units high. Place the chair slightly to the left so the monitor stays visible. Check all overlaps.
Show answer and check
A sketch with the chair shifted left, seat below the desk top, and the monitor screen unobstructed.
Why: Shifting the chair left prevents the tall backrest from covering the centered monitor while keeping the chair in front of the desk.
Check: Trace a vertical line from the monitor screen down; confirm it does not cross the chair backrest. Confirm seat height is less than desk height.
Exercise 4
Draw a setup where the desk is 40 units wide and 20 units tall, the monitor is 18 units wide and 10 units tall, and the chair seat is 12 units high. Add a simple star base with wheels. Check that the chair base stays within the floor area and the monitor is centered.
Show answer and check
A sketch with a centered monitor, a chair in front with a star base, and all parts within the floor baseline.
Why: The smaller desk still fits the monitor because 18 is less than 40, and the seat height 12 is less than desk height 20.
Check: Measure the distance from the center line to each side of the monitor; they should be equal. Check that the star base does not extend beyond the floor baseline.
Common mistakes
- Drawing the desk top as a flat rectangle with no depth. Use a parallelogram with a back edge above the front edge to suggest depth.
- Making the monitor wider than the desk. Measure the monitor width and keep it less than the desk width; adjust the stand base to fit.
- Letting the chair back cover the monitor screen. Shift the chair slightly to one side or lower the backrest so the screen remains visible.
- Using inconsistent units for height and width. Pick one unit and keep ratios consistent, such as desk width 60 and height 30.
Self-check rubric
- Desk top is drawn as a parallelogram with a front edge parallel to the floor baseline.
- Desk legs reach the floor baseline and the desk width is greater than the monitor width.
- Monitor is centered and its stand base sits fully on the desk top.
- Chair is in front of the desk, seat lower than the desk top, and backrest does not hide the monitor screen.
- Construction lines are light and final outlines are clean; labels use the stated x-height convention if present.
Questions and answers
Do I need exact measurements?
No. Use hypothetical units to keep proportions consistent. Measure your own paper only if you want a specific size.
Can I change the monitor angle?
Yes. Tilt the screen rectangle slightly and adjust the stand base so it still sits on the desk top.
What if my chair style is different?
Change the backrest shape or base, but keep the seat height lower than the desk top and the chair in front of the desk.
How do I check my drawing?
Use simple arithmetic: desk width greater than monitor width, chair seat lower than desk top, and all legs reaching the floor baseline.