Free original lessons
Draw a Jungle Tree: Layered Canopy and Hanging Vines
Learn to draw a jungle tree with clear canopy layers and draped vines using simple guides, leaf clusters, and a checkable drawing convention.
Free lesson
Four exercises
Worked answers
Object Drawing Lessons
This lesson teaches a repeatable way to draw a jungle tree that reads as tall, dense, and tropical. You will build the trunk and main branches first, then add three canopy layers from back to front, and finally drape vines so they hang naturally between leaf clusters. The method uses a simple convention: x-height is measured from the baseline to the midline of each letter-like leaf shape, and leaf styles may vary as long as the layer order and vine paths stay clear. All measurements are hypothetical examples; measure your own paper and tools before drawing. The goal is a believable layered silhouette, not a single universal leaf shape.
Practice materials: Printable downloads are not available for this lesson yet. Use the instructions and four exercises below.
Reference illustration
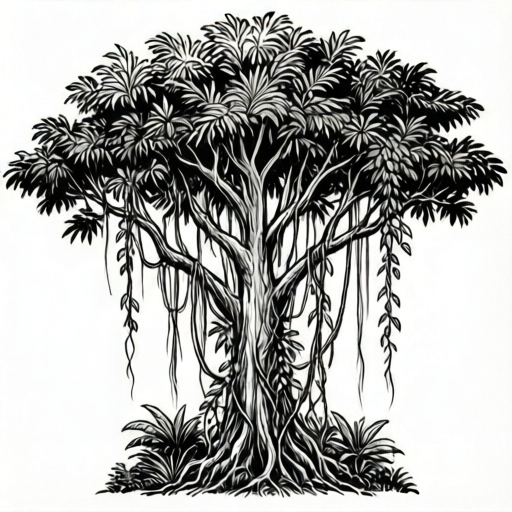
Use the stated measurements and conventions for each exercise.
Set the trunk and branch frame
Begin with a light vertical line for the trunk, then add two or three main branches that spread outward and slightly upward. Keep the trunk narrower at the top and wider at the base so the tree feels rooted. Mark a horizon-free ground point only if you need it for scale; the brief excludes full forest-scene composition, so keep the focus on the tree itself.
Use a soft pencil and keep these lines light because they will be partly covered by foliage. Decide the tree's overall height first, for example a hypothetical 18 cm on a 21 by 29 cm sheet, then place the first branch fork at about two-thirds of that height. These numbers are examples only; adjust to your paper.
- Draw a light vertical trunk line and taper it from wide base to narrow top.
- Add two or three main branches that fork outward and upward.
- Mark the fork height as a light tick so canopy layers can be spaced consistently.
Build three canopy layers from back to front
Treat the canopy as three overlapping bands: a back layer, a middle layer, and a front layer. The back layer sits highest and widest, the middle layer overlaps its lower edge, and the front layer sits lowest and closest to the viewer. Draw each layer as a loose cloud of leaf clusters rather than a solid blob, leaving small gaps so the layers remain readable.
Use the x-height convention to keep leaf clusters consistent: each leaf shape spans from its baseline to its midline, and you may vary the outline as long as the cluster still reads as foliage. Overlap the layers by about one-third of a cluster width so the depth is obvious. Avoid drawing all layers at the same height, which flattens the tree.
- Sketch the back layer as the widest, highest band of loose leaf clusters.
- Add the middle layer so it overlaps the lower third of the back layer.
- Add the front layer lowest and closest, overlapping the middle layer.
- Leave small gaps between clusters to show layer edges.
Drape hanging vines between clusters
Vines should hang from branch points or from the underside of canopy layers, not from empty air. Draw each vine as a gentle curve that starts at a support point, sags slightly, and ends in a small leaf cluster or a tapered tip. Vary vine lengths so some stop within the canopy and others hang below the lowest layer.
Keep vine paths clear of the trunk outline so they read as separate elements. A useful check is to trace each vine from its support point to its tip without crossing another vine more than once. If two vines cross repeatedly, simplify one path. The convention allows curved or nearly straight vines as long as the support point and hanging direction are clear.
- Mark support points on branches or under canopy layers.
- Draw each vine as a single gentle curve from support to tip.
- Add small leaf clusters along the vine at uneven spacing.
- Check that each vine has one clear support point and one clear tip.
Refine leaf clusters and layer contrast
Once the layers and vines are placed, refine leaf clusters by varying size and angle. Larger clusters belong in the back layer, medium clusters in the middle, and smaller clusters in the front. This size change reinforces depth without needing shading. You may use simple oval, pointed, or lobed leaf shapes; the rubric accepts valid alternatives as long as the x-height convention is respected.
Add a few short branch lines inside gaps to connect the canopy to the trunk. Do not fill every gap; empty space helps the layers read. Finish by darkening the front layer outlines slightly more than the back layer, which is a simple contrast cue rather than a strict rule.
- Vary leaf cluster size by layer: large back, medium middle, small front.
- Add short connecting branch lines inside selected gaps.
- Darken front-layer outlines slightly more than back-layer outlines.
- Leave some gaps unfilled to preserve layer separation.
Worked example
Draw a jungle tree on a hypothetical 21 by 29 cm sheet. Use an 18 cm tree height, a branch fork at two-thirds height, three canopy layers, and two hanging vines. Describe the layer order and vine support points.
Worked answer
Draw a light trunk from a wide base to a narrow top at 18 cm. Place the main fork at about 12 cm from the base. Sketch the back canopy layer as the widest band near the top, the middle layer overlapping its lower third, and the front layer lowest and smallest. Mark two support points: one on a main branch and one under the middle layer. Draw each vine as a single gentle curve to a tapered tip, with one vine ending inside the canopy and one hanging below the front layer. Check that the front layer overlaps the middle and the middle overlaps the back.
Four practice exercises
Exercise 1
A drawing has a back canopy layer at 14 cm height, a middle layer at 11 cm, and a front layer at 8 cm on a hypothetical sheet. Each layer overlaps the one behind it by 2 cm. What is the visible height of the back layer above the middle layer?
Show answer and check
3 cm
Why: Subtract the middle layer height from the back layer height: 14 cm minus 11 cm equals 3 cm. The 2 cm overlap affects the covered portion, not the height difference between layer tops.
Check: Re-read the heights and subtract in the same order; confirm the result is positive and uses centimetres.
Exercise 2
Two vines start at support points 6 cm apart. Vine A hangs 9 cm and Vine B hangs 5 cm. If both tips are measured from the same baseline, how much lower is Vine A's tip than Vine B's tip?
Show answer and check
4 cm
Why: Compare the hanging lengths: 9 cm minus 5 cm equals 4 cm. The support-point distance does not change the difference in tip depth when measured from the same baseline.
Check: Subtract the shorter vine length from the longer one and confirm the units are centimetres.
Exercise 3
A front leaf cluster is drawn with a baseline at 7 cm and a midline at 9 cm. A back cluster has a baseline at 13 cm and a midline at 16 cm. Using the x-height convention, what is each cluster's x-height, and which is larger?
Show answer and check
Front x-height is 2 cm; back x-height is 3 cm; the back cluster is larger.
Why: X-height is midline minus baseline. Front: 9 minus 7 equals 2 cm. Back: 16 minus 13 equals 3 cm. Since 3 cm is greater than 2 cm, the back cluster is larger.
Check: Recalculate each subtraction and compare the two results; confirm both are positive.
Exercise 4
A tree drawing uses three canopy layers and four vines. The back layer has 6 leaf clusters, the middle has 5, and the front has 4. If each vine carries 2 small leaf clusters, how many leaf clusters are in the drawing in total?
Show answer and check
23 leaf clusters
Why: Add canopy clusters: 6 plus 5 plus 4 equals 15. Add vine clusters: 4 vines times 2 clusters equals 8. Then 15 plus 8 equals 23.
Check: Add the canopy total and vine total separately, then combine; recount the vine multiplication to confirm 8.
Common mistakes
- Drawing all canopy layers at the same height so the tree looks flat. Raise the back layer, lower the front layer, and overlap each layer by about one-third of a cluster width.
- Starting vines from empty space instead of a branch or canopy edge. Mark a support point first, then draw the vine curve from that point to its tip.
- Making every leaf cluster the same size and shape. Use larger clusters in the back layer and smaller clusters in the front, and vary leaf outlines while keeping the x-height convention.
- Letting vines cross many times and become tangled. Simplify each vine to one gentle curve and check that it crosses another vine no more than once.
Self-check rubric
- Trunk and main branches are clear and support the canopy.
- Three canopy layers are distinguishable by height and overlap.
- Leaf clusters follow the x-height convention or a clearly stated valid alternative.
- Vines have clear support points and readable hanging paths.
- Layer contrast and gaps keep the tree from looking flat.
- The drawing focuses on the tree rather than a full forest scene.
Questions and answers
Do I need to use one exact leaf shape?
No. The convention defines x-height as baseline to midline, but leaf outlines may be oval, pointed, or lobed. The rubric accepts valid alternatives if the layer order and vine paths remain clear.
How many canopy layers should I draw?
Three layers are recommended: back, middle, and front. You may add a fourth only if it stays readable and does not flatten the tree.
Can vines hang below the lowest canopy layer?
Yes. Vary vine lengths so some end inside the canopy and others hang below the front layer. Each vine still needs a clear support point and tip.
Are the measurements in this lesson fixed rules?
No. Any numerical values are hypothetical examples. Measure your own paper and tools, and adjust proportions to your drawing surface.