Free original lessons
Draw an Epic Knight: Armor Layers and Stance
Learn to draw a medieval knight with correct armor layer order, a balanced stance, and a weapon, using a simple convention and clear checks.
Free lesson
Four exercises
Worked answers
Object Drawing Lessons
This lesson teaches you to draw a medieval knight figure with armor layers in a sensible order and a believable stance. You will use a simple convention: the body is built from a head, torso, and limbs; armor pieces are added in layers from the body outward. The key layers are helm, pauldron, cuirass, and greaves. You will also set a stance and add a weapon. The goal is a clear, readable figure, not a historically exact reconstruction. Letter styles and proportions vary, so the rubric allows valid alternatives. All measurements are hypothetical examples; measure your own paper and tools.
Practice materials: Printable downloads are not available for this lesson yet. Use the instructions and four exercises below.
Reference illustration
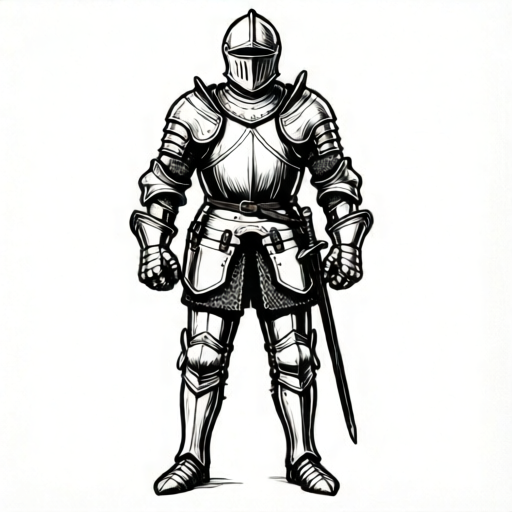
Use the stated measurements and conventions for each exercise.
Armor Layer Order
Build the knight from the inside out. First draw the body frame: head, torso, arms, and legs. Then add armor in this order: helm, pauldron, cuirass, greaves. The helm sits on the head. The pauldron covers the shoulder. The cuirass covers the torso. The greaves cover the lower legs. This order keeps overlaps clear: the cuirass can overlap the top of the greaves, and the pauldron can overlap the cuirass edge.
Use a simple convention for the body: the head is an oval, the torso is a rounded rectangle, and limbs are tapered tubes. Armor pieces are drawn as slightly larger shapes over the body. Keep the layer order consistent so the figure reads as armored, not as a pile of shapes.
- Draw the body frame with light lines: head oval, torso rectangle, two arms, two legs.
- Add the helm over the head, leaving a small gap for the neck.
- Add the pauldron over each shoulder, overlapping the top of the arm.
- Add the cuirass over the torso, covering from shoulders to hips.
- Add the greaves over the lower legs, from knee to ankle.
- Erase or lighten the body lines that are now covered.
Stance and Balance
A believable stance has a wide base and a clear center of gravity. Draw a vertical line through the middle of the figure. The feet should be apart, with one foot slightly forward. The hips and shoulders can tilt slightly, but the head should stay near the center line. This makes the knight look stable and ready.
Use a simple check: draw a line from the head through the hips to the ground. The line should land between the feet. If it lands outside, adjust the feet or hips. Keep the knees slightly bent to show readiness.
- Draw a vertical center line on your paper.
- Place the feet apart, one slightly forward, both on the ground line.
- Place the hips near the center line, with a slight tilt if desired.
- Place the shoulders above the hips, with a slight opposite tilt.
- Check that the head-to-ground line lands between the feet.
Weapon and Readability
Add one weapon, such as a sword or spear, to make the knight's role clear. Hold the weapon in one hand, with the arm slightly away from the body so the weapon does not merge with the armor. Keep the weapon simple: a straight line for the blade and a short crossguard.
Check readability by looking at the figure from a distance. The helm, cuirass, and greaves should be distinct. The weapon should not cross the face. If shapes merge, adjust the spacing or lighten the overlapping lines.
- Choose one weapon and draw it in the hand.
- Keep the weapon arm slightly away from the torso.
- Check that the weapon does not cover the helm.
- Lighten any lines that make the armor layers unclear.
Worked example
Draw a knight with a helm, pauldron, cuirass, and greaves, standing with feet apart and holding a sword. Use a center line and check balance.
Worked answer
First draw the body frame: head oval, torso rectangle, two arms, two legs. Add the helm over the head, then pauldrons over the shoulders, then the cuirass over the torso, then greaves over the lower legs. Draw a vertical center line. Place the feet apart, one slightly forward. Place the hips near the center line and the shoulders above. Add a sword in one hand, keeping the arm slightly away from the body. Check that the head-to-ground line lands between the feet and that the weapon does not cover the helm.
Four practice exercises
Exercise 1
Draw a knight with feet 6 cm apart on your paper (hypothetical example; measure your own paper). The head is 3 cm above the hips. Check balance with a center line.
Show answer and check
A figure with feet 6 cm apart and head 3 cm above hips, with the center line landing between the feet.
Why: The wide base and centered head-to-ground line create a stable stance. The measurements are examples; the check is the line landing between the feet.
Check: Draw the center line from head through hips to the ground. Confirm it lands between the feet.
Exercise 2
Draw a knight holding a spear. The spear should not cross the helm. Use the layer order helm, pauldron, cuirass, greaves.
Show answer and check
A knight with the four armor layers in order and a spear held to the side, not crossing the helm.
Why: Keeping the weapon away from the face preserves readability. The layer order keeps overlaps clear.
Check: Look at the figure: the helm is visible, the spear is separate, and the armor layers are distinct.
Exercise 3
Draw a knight with one foot forward and knees slightly bent. Check that the hips are near the center line.
Show answer and check
A knight with a forward foot, bent knees, and hips near the center line.
Why: A forward foot and bent knees show readiness. Hips near the center line keep the figure balanced.
Check: Draw the head-to-ground line and confirm it lands between the feet and near the hips.
Exercise 4
Draw a knight with a sword. Lighten any body lines covered by armor. Check that the cuirass overlaps the top of the greaves.
Show answer and check
A knight with a sword, lightened covered lines, and a cuirass overlapping the greaves.
Why: Lightening covered lines reduces clutter. The overlap shows the layer order clearly.
Check: Confirm the cuirass edge is visible over the greaves and that covered body lines are faint.
Common mistakes
- Drawing armor pieces before the body frame. Draw the body frame first, then add armor in the order helm, pauldron, cuirass, greaves.
- Making the stance too narrow so the knight looks unstable. Widen the feet and check that the head-to-ground line lands between them.
- Letting the weapon cross the face or merge with the armor. Move the weapon arm slightly away from the body and keep the weapon below the helm.
- Using heavy lines for covered body parts, making the figure cluttered. Lighten or erase body lines that are covered by armor.
Self-check rubric
- Body frame is drawn before armor.
- Armor layers appear in the order helm, pauldron, cuirass, greaves.
- Stance has feet apart and a head-to-ground line between the feet.
- One weapon is present and does not cover the helm.
- Figure is readable from a distance with distinct armor shapes.
- Valid alternatives in proportion and letter style are accepted if checks pass.
Questions and answers
Do I need to draw every armor piece exactly?
No. The lesson focuses on layer order and stance. You can simplify shapes as long as the helm, pauldron, cuirass, and greaves are readable.
Can I use a different weapon?
Yes. A sword, spear, or mace works. Keep one weapon and make sure it does not cover the face.
How do I know my stance is balanced?
Draw a line from the head through the hips to the ground. It should land between the feet.
What if my proportions look different from the example?
That is acceptable. The rubric allows valid alternatives as long as the layer order and stance checks pass.