Free original lessons
Drawing Warriors: Armor Layers, Weapon Grip, and Balanced Stance
Learn to draw warrior figures by layering armor logically, gripping weapons convincingly, and building poses that balance. Includes a worked example, four practice tasks, and a rubric.
Free lesson
Four exercises
Worked answers
Object Drawing Lessons
Drawing a convincing warrior is less about copying a famous fighter and more about construction: deciding what armor sits over what, how a hand wraps a haft, and where the body's weight lands. This lesson teaches a repeatable approach using simple shapes, an explicit layering convention, and a balance line. You will compare armor, weapon, and pose choices so each drawing reads clearly. All measurements are hypothetical examples; measure your own paper and tools. The convention for art and handwriting is defined below so valid alternatives are accepted rather than a single universal answer.
Practice materials: Printable downloads are not available for this lesson yet. Use the instructions and four exercises below.
Reference illustration
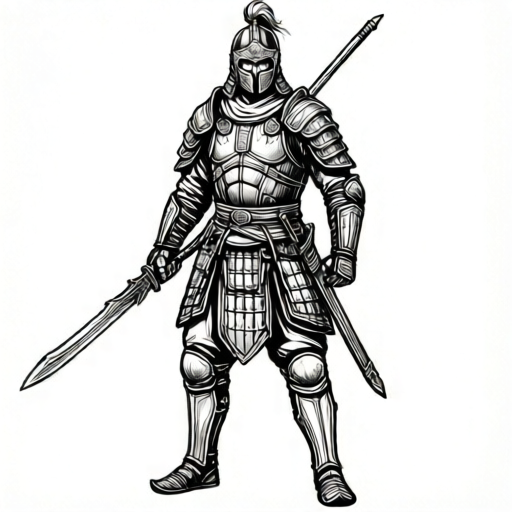
Use the stated measurements and conventions for each exercise.
Armor Layering: A Clear Order
Treat armor as layers from the body outward. A workable order is: body silhouette, soft underlayer (tunic or padding), rigid plates, straps and belts, then surface details. Draw the body first so the armor has something to sit on. The underlayer softens transitions and hides gaps between plates.
Use overlap to show order: a plate that sits closer to the viewer crosses over the one beneath it. Keep overlap consistent on both sides of the figure. If a shoulder plate covers the chest plate on the left, it should do the same on the right unless the pose twists.
Label each layer lightly before committing to dark lines. This prevents the common error of drawing a belt over a plate that should cover it.
- Draw a stick figure and block the torso, hips, and limbs with simple cylinders.
- Add a soft underlayer as a slightly larger outline around the torso and upper arms.
- Place rigid plates: chest, shoulders, forearms, and shins. Draw them as overlapping shapes.
- Add straps and belts last, crossing over the plates they secure.
- Check that every overlap tells the same story about which layer is on top.
Weapon Grip and Handling
A weapon reads as held when the hand wraps around it and the wrist aligns with the forearm. Draw the haft or handle first as a straight line, then place the thumb and fingers around it. The thumb usually crosses the front; fingers curl behind.
For a two-handed weapon, space the hands along the haft and angle the wrists so both arms can reach without locking. The weapon's line should continue the action of the arm rather than fight it.
Show weight by tilting the weapon slightly toward the ground or resting it on the shoulder. A weapon held away from the body looks lighter and less believable.
- Draw the weapon's main line before the hand.
- Block the palm as a rounded rectangle around the haft.
- Add the thumb crossing the front and four finger curves behind.
- Align the wrist with the forearm; avoid a sharp bend unless the pose demands it.
- For two hands, check that both wrists can reach the haft without stretching.
Stance and Balance Line
Every standing figure has a balance line: a vertical line from the base of the neck through the weight-bearing foot. For a warrior, the line often falls between the feet in a wide stance, or over one foot if the other is lifted.
Draw the balance line before the armor. If the line falls outside the feet, the figure looks like it is falling. Adjust the hips or feet until the line lands where you want the weight.
Compare poses by changing only the balance line and stance width. A narrow stance reads as cautious; a wide stance reads as grounded. Neither is wrong if the line supports it.
- Mark the base of the neck and the weight-bearing foot.
- Draw a light vertical line between them.
- Block the hips so they sit naturally over the line.
- Place the feet so the line falls inside the support area.
- Recheck after adding armor; heavy plates can shift the apparent weight.
Comparing Armor, Weapon, and Pose
To compare choices, draw the same body in two versions: one with light armor and a short weapon, one with heavy plates and a long weapon. Keep the balance line and stance identical so the comparison is fair.
Ask three questions: Does the armor layering read clearly? Does the grip look like the hand could lift the weapon? Does the balance line support the pose? If any answer is no, adjust that part only.
This comparison method trains judgment. You are not copying a historical faction or a named character; you are testing construction decisions.
- Draw two identical body blocks side by side.
- Add light armor to one and heavy plates to the other using the same layering order.
- Give each a different weapon and grip, keeping the stance the same.
- Compare the balance lines and note which pose reads more grounded.
- Write one sentence explaining which version works better and why.
Worked example
Draw a warrior standing with a wide stance, light chest plate, shoulder guards, and a two-handed spear held diagonally across the body. Use the layering order and balance line. Label the layers lightly.
Worked answer
Block the body with a wide stance and mark the balance line from the neck to the midpoint between the feet. Add a soft underlayer around the torso. Place the chest plate as a rounded rectangle overlapping the underlayer, then shoulder guards overlapping the chest plate edges. Draw the spear haft as a diagonal line from lower left to upper right. Place both hands along the haft, thumbs crossing the front, wrists aligned with forearms. Add straps over the chest plate. Check that the balance line falls between the feet and that every overlap is consistent. The final drawing reads as a grounded figure with clear armor order and a believable two-handed grip.
Four practice exercises
Exercise 1
Draw a warrior with a narrow stance, a single shoulder plate, and a short weapon held in one hand. Mark the balance line and label the armor layers.
Show answer and check
A figure with feet close together, balance line falling between them, one shoulder plate overlapping a soft underlayer, and a short weapon gripped with thumb crossing the front. Labels show underlayer, plate, and strap order.
Why: The narrow stance tests whether the balance line still lands inside the support area. The single plate tests consistent overlap on one side only.
Check: Verify the balance line is inside the feet, the thumb crosses the haft, and the plate overlaps the underlayer on the correct side.
Exercise 2
Draw the same body twice: once with light armor and a long weapon, once with heavy plates and a short weapon. Keep the stance identical. Write one sentence comparing which reads more grounded.
Show answer and check
Two identical body blocks with the same balance line. The light version has a thin underlayer and small plates; the heavy version has larger overlapping plates. The comparison sentence explains which version looks more grounded based on the balance line and stance.
Why: Holding the stance constant isolates the effect of armor and weapon choices, training comparison judgment.
Check: Confirm both figures share the same balance line and stance width, and that the sentence references the balance line or support area.
Exercise 3
Draw a two-handed grip on a diagonal haft. Show the thumb and fingers clearly. Then redraw the same grip with the wrists bent sharply and note one problem.
Show answer and check
First drawing: haft drawn first, both hands wrapping it, thumbs crossing front, wrists aligned. Second drawing: same haft but wrists bent, making the grip look strained. The note identifies that sharp wrist bends reduce believability.
Why: Comparing aligned and bent wrists teaches why wrist alignment matters for weapon handling.
Check: Check that the first grip has thumbs crossing the front and aligned wrists, and that the note names a specific problem in the second.
Exercise 4
Invent a warrior with three armor layers and a weapon resting on the shoulder. Use the layering order, mark the balance line, and label each layer with a legible style using the x-height convention.
Show answer and check
A figure with underlayer, chest plate, and shoulder guard in consistent order; a weapon resting on the shoulder with one hand gripping the haft; balance line inside the feet; labels in any legible style meeting the x-height convention.
Why: This task combines all three skills and allows valid alternatives in armor design and letter style.
Check: Verify layer order is consistent, the hand wraps the haft, the balance line is inside the feet, and labels are legible with x-height from baseline to midline.
Common mistakes
- Drawing armor before the body, so plates float without a structure underneath. Block the body first, then add the underlayer, then plates, then straps.
- Inconsistent overlap, where a belt covers a plate on one side and sits under it on the other. Choose one layering order and apply it symmetrically unless the pose twists.
- The hand is drawn beside the weapon instead of around it. Draw the haft first, then wrap the thumb and fingers around it.
- The balance line falls outside the feet, making the figure look unstable. Move the hips or widen the stance until the line lands inside the support area.
- Using a single dark outline for every layer, so armor order is unreadable. Use lighter lines for underlayers and stronger lines for the topmost plates.
Self-check rubric
- Armor layers follow a consistent order from body outward, with clear overlap.
- The weapon is held with thumb and fingers wrapping the haft, wrists aligned.
- The balance line falls within the support area of the feet.
- The pose and armor choices are compared in at least one sentence.
- Labels use the defined x-height convention (baseline to midline) and are legible; letter style may vary.
Questions and answers
Do I need to know historical armor to use this lesson?
No. The lesson teaches construction order and comparison, not specific factions or periods. You can apply the same layering logic to invented armor.
How do I know if my grip looks correct?
Check that the thumb crosses the front, fingers curl behind, and the wrist aligns with the forearm. If the hand looks like it is beside the haft rather than around it, redraw the haft first.
What if my figure looks off-balance but the balance line is correct?
Heavy armor can shift apparent weight. Recheck the hips and the support area after adding plates. A slight lean toward the weight-bearing foot often helps.
Can I use different letter styles in the labels?
Yes. The convention defines x-height as baseline to midline, but letter styles vary. Any legible style that meets the rubric is acceptable.