Free original lessons
Mother's Day Drawing: Combine a Bouquet and Portrait
Plan and draw a Mother's Day picture that balances a portrait with a bouquet, using clear layout zones, simple checks, and a flexible art convention.
Free lesson
Four exercises
Worked answers
Object Drawing Lessons
This lesson teaches a combined Mother's Day composition: a portrait of a mother figure and a bouquet arranged so neither crowds the other. You will define a drawing convention for letter height and facial features, plan layout zones on the page, sketch the portrait and bouquet in proportion, and check the result with measurable steps. The approach works for pencil, colored pencil, or marker on ordinary paper. All measurements are examples you can adjust to your actual paper and tools.
Practice materials: Printable downloads are not available for this lesson yet. Use the instructions and four exercises below.
Reference illustration
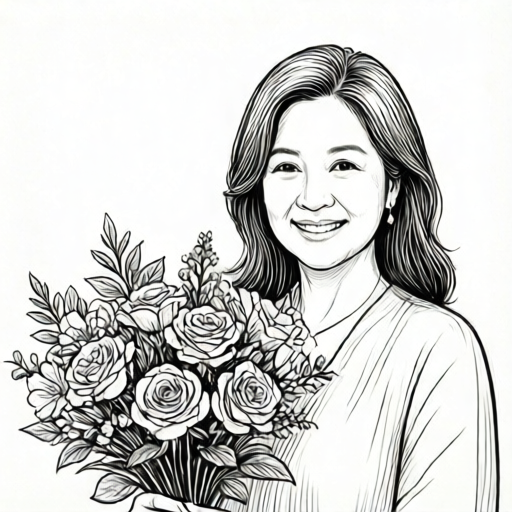
Use the stated measurements and conventions for each exercise.
Set a Drawing Convention Before You Start
A convention is a stated rule you follow so your drawing can be checked fairly. For this task, use x-height as the distance from the baseline to the midline of lowercase letters in any handwritten label. Letter styles vary, so do not force one alphabet; instead, state your own x-height in millimeters and keep it consistent across labels. For faces, state one rule for eye placement, such as eyes on a horizontal midline halfway down the head oval. These rules are yours, not universal standards.
Measure your actual paper with a ruler and write the dimensions in millimeters. If you choose a 210 by 297 millimeter sheet as a hypothetical example, divide it into three vertical zones: a portrait zone on the left, a bouquet zone on the right, and a narrow overlap zone in the center. Label each zone lightly in pencil so you can erase it later.
- Measure the paper width and height in millimeters and record both numbers.
- Draw a light vertical line at one-third and two-thirds of the width to create three zones.
- Write your x-height rule and eye-placement rule at the top margin in small pencil notes.
- Mark the center overlap zone with a dashed line so you know where portrait and bouquet may touch.
Place the Portrait and Bouquet in Proportion
In the portrait zone, draw a head oval whose height is about one-quarter of the paper height. Place the eyes on the midline you defined. Keep the shoulders inside the zone so the bouquet has room. In the bouquet zone, draw a cluster of five to seven flower heads, each no wider than one-tenth of the paper width, with stems converging toward a wrap point near the bottom of the zone.
The overlap zone is where the composition feels connected. Let one or two flower heads cross the dashed line slightly, but keep the portrait's face clear. Check proportion by comparing the head oval height to the bouquet cluster height; a useful target is that the bouquet cluster is roughly equal to or slightly taller than the head oval. Adjust before adding detail.
- Draw the head oval in the portrait zone and mark the eye midline.
- Sketch five to seven flower heads in the bouquet zone with light circles.
- Draw stems from each flower head to a single wrap point near the bottom.
- Allow one or two flower heads to cross the dashed overlap line without covering the face.
- Compare head oval height and bouquet cluster height and adjust the smaller one.
Refine, Label, and Check the Combined Picture
Once the layout is stable, refine the portrait with simple features: eyes, nose line, mouth curve, and hair shape. Refine the bouquet by adding petal shapes and two or three leaf pairs per stem. Keep line weight consistent; if you use a darker outline, apply it to both portrait and bouquet so neither dominates.
Add a short handwritten label such as a name or greeting. Use your stated x-height rule and measure one lowercase letter from baseline to midline to confirm it matches your note. Finally, run three checks: zone check, proportion check, and clarity check. Record each result in millimeters or a simple yes or no so the drawing can be reviewed without guessing.
- Refine facial features and hair inside the portrait zone.
- Add petals and leaf pairs to the bouquet without exceeding the zone boundary by more than a few millimeters.
- Write a label using the stated x-height and measure one lowercase letter.
- Run the zone check, proportion check, and clarity check and note the results.
Worked example
On a 200 by 280 millimeter sheet, place a portrait zone on the left, a bouquet zone on the right, and a 20 millimeter overlap zone in the center. The head oval is 60 millimeters tall. The bouquet cluster should be at least as tall as the head oval. State one check.
Worked answer
On a 200 by 280 millimeter sheet, reserve 20 millimeters of margin on each side, leaving 160 millimeters of working width. Split that working width into a 70 millimeter portrait zone, a 20 millimeter overlap zone, and a 70 millimeter bouquet zone: 70 plus 20 plus 70 equals 160 millimeters, and 160 plus 40 millimeters of margins equals 200 millimeters. Draw the head oval 60 millimeters tall in the portrait zone. Draw five flower heads, each 15 millimeters wide, with the cluster reaching 65 millimeters tall. Check: measure the cluster height and confirm it is at least 60 millimeters, and confirm no flower head covers the face.
Four practice exercises
Exercise 1
A 180 by 260 millimeter sheet has a 30 millimeter overlap zone. The left and right zones are equal. What is each side zone width if total margins are 20 millimeters?
Show answer and check
Each side zone is 65 millimeters wide.
Why: Subtract overlap and margins from total width: 180 minus 30 minus 20 equals 130 millimeters. Divide equally: 130 divided by 2 equals 65 millimeters per side zone.
Check: Add the parts: 65 plus 30 plus 65 plus 20 equals 180 millimeters, matching the sheet width.
Exercise 2
A head oval is 55 millimeters tall. The bouquet cluster is 48 millimeters tall. By how many millimeters must the cluster grow to match the head oval?
Show answer and check
The cluster must grow by 7 millimeters.
Why: Subtract cluster height from head oval height: 55 minus 48 equals 7 millimeters.
Check: Add the growth to the cluster: 48 plus 7 equals 55 millimeters, equal to the head oval.
Exercise 3
You state an x-height of 4 millimeters. A label's lowercase letter measures 3 millimeters from baseline to midline. Is the label within the convention, and what is the difference?
Show answer and check
No, it is 1 millimeter short of the stated x-height.
Why: Compare measured height to stated height: 4 minus 3 equals 1 millimeter difference.
Check: Measure the same letter again and confirm the baseline-to-midline distance is 3 millimeters, then compare to the written 4 millimeter rule.
Exercise 4
Six flower heads each 12 millimeters wide are placed in a 90 millimeter wide bouquet zone. What total width do the flower heads occupy if placed side by side without overlap, and how much zone width remains?
Show answer and check
They occupy 72 millimeters, leaving 18 millimeters of zone width.
Why: Multiply 6 by 12 to get 72 millimeters. Subtract from zone width: 90 minus 72 equals 18 millimeters.
Check: Add the occupied width and remaining width: 72 plus 18 equals 90 millimeters, matching the zone width.
Common mistakes
- Drawing the bouquet so large that it covers the portrait's face. Reduce flower head diameter or shift the bouquet wrap point lower so the face remains fully visible.
- Using different letter heights in labels, making the convention impossible to check. Measure one lowercase letter from baseline to midline and match every label to that x-height.
- Placing eyes without a stated rule, so the portrait looks inconsistent. Write an eye-placement rule before drawing and mark the midline lightly on the head oval.
- Letting stems end at different heights with no wrap point. Choose one wrap point near the bottom of the bouquet zone and draw all stems toward it.
Self-check rubric
- Portrait and bouquet are both present and occupy their planned zones.
- The stated x-height rule is written and at least one label matches it when measured.
- The eye-placement rule is stated and visible on the head oval.
- Bouquet cluster height is within 10 millimeters of the head oval height or taller.
- No flower head covers the portrait's face.
- Stems converge toward one wrap point.
- Zone, proportion, and clarity checks are recorded.
Questions and answers
Do I need special art supplies?
No. Pencil, eraser, ruler, and paper are enough. Colored pencil or marker is optional.
Must every drawing look the same?
No. The convention allows different letter styles and facial features as long as your stated rules are followed and measurable.
How many flowers should the bouquet have?
Five to seven flower heads is a practical range for a combined composition; adjust to your paper size.
What if my paper is a different size?
Measure it and scale the zones and head oval proportionally. The millimeter examples are hypothetical and should be replaced by your actual measurements.