HomeMirror Self-Portrait Drawing with Proportion Guides Free original lessons
Mirror Self-Portrait Drawing with Proportion Guides
Learn to draw your own face from a mirror using a symmetry line, eye, nose, and mouth guides, plus observation checks and a simple rubric.
Free lesson
Four exercises
Worked answers
Object Drawing Lessons
Drawing a self-portrait from a mirror is an observation exercise, not a test of perfect likeness. You will set up a mirror, mark a vertical symmetry line and three horizontal guides, then place features by comparing what you see. The guides are starting points; your face will not match them exactly, and that is expected. Work slowly, measure with a pencil or ruler, and adjust as you observe. This lesson uses a simple convention: the eye line sits roughly halfway between the top of the head and the chin, the nose line roughly halfway between the eye line and the chin, and the mouth line roughly one-third of the way from the nose line to the chin. These are guides, not rules. Letter styles and feature shapes vary, so valid alternatives are accepted when your drawing matches your mirror observation.
Practice materials: Printable downloads are not available for this lesson yet. Use the instructions and four exercises below.
Reference illustration
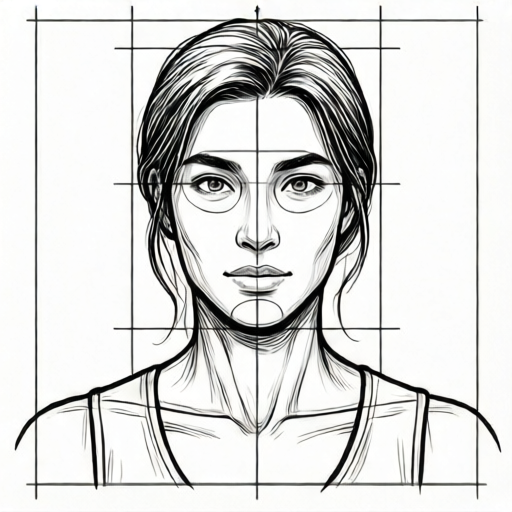
Use the stated measurements and conventions for each exercise.
Set up the mirror and the guide sheet
Place a mirror upright so you can see your whole head without leaning. Sit or stand at a comfortable distance where your head fills most of the mirror. Tape a blank sheet to a board beside the mirror, or use a worksheet with a blank face outline and guide lines. Keep your pencil, eraser, and a small ruler within reach.
Draw a light vertical line down the middle of your paper. This is the symmetry line. It helps you compare left and right, but faces are rarely perfectly symmetrical, so treat it as a reference rather than a strict mirror rule.
- Position the mirror so your full head is visible and your paper is beside it.
- Draw a faint vertical symmetry line on the paper.
- Mark the top of the head and the chin on the symmetry line.
- Measure the distance between top and chin, then mark the eye line at about half that distance.
- Mark the nose line about halfway between the eye line and the chin.
- Mark the mouth line about one-third of the way from the nose line to the chin.
Place the features by observation
Look at your reflection and compare feature positions to the guide lines. The eye line is a starting guide; your eyes may sit slightly above or below it. Draw the eyes as simple shapes first, then refine. Check the space between the eyes: it is often about one eye width, but measure your own reflection rather than assuming.
For the nose, mark the tip near the nose line and note the width of the nostrils. For the mouth, place the corners near the mouth line and check the curve. Ears usually span from around the eye line to the nose line, but confirm in the mirror. Hair and glasses change the outline, so draw the head shape first and add these details after the guides are set.
- Draw the head outline using the top and chin marks.
- Place the eyes on or near the eye line, checking spacing in the mirror.
- Mark the nose tip near the nose line and add nostril width.
- Place the mouth corners near the mouth line and check the curve.
- Add ears, hair, and glasses by comparing to the mirror.
- Step back and compare the drawing to your reflection before erasing guides.
Check proportions and refine
Use a pencil as a measuring stick. Hold it at arm's length and compare distances in the mirror, such as the width of your head versus the width of your shoulders. Transfer those comparisons to the paper with light marks. Keep units consistent: if you measure in pencil-widths, use pencil-widths for all comparisons in that check.
Refine one feature at a time. Erase guide lines only after you have checked placement. A useful check is to turn the paper upside down or view it in a mirror; this makes proportion errors easier to see. Remember that a self-portrait can be a valid likeness without matching every detail.
- Compare head width to shoulder width using a pencil measure.
- Check eye spacing and the distance from eye line to nose line.
- Adjust one feature, then recheck the whole face.
- Erase guides lightly and strengthen final lines.
- Label your drawing with the date and the guide values you used.
Worked example
A student marks the top of the head at 0 cm and the chin at 18 cm on the symmetry line. Where should the eye line, nose line, and mouth line go using the lesson convention?
Worked answer
Eye line at about 9 cm (half of 18). Nose line at about 13.5 cm (halfway between 9 and 18). Mouth line at about 15 cm (one-third of the way from 13.5 to 18, which is 1.5 cm below the nose line).
Four practice exercises
Exercise 1
On a guide sheet, the top of the head is at 0 cm and the chin is at 20 cm. Using the lesson convention, calculate the eye line, nose line, and mouth line positions.
Show answer and check
Eye line at 10 cm; nose line at 15 cm; mouth line at about 16.7 cm.
Why: Eye line is half of 20, so 10 cm. Nose line is halfway between 10 and 20, so 15 cm. Mouth line is one-third of the way from 15 to 20: the gap is 5 cm, one-third is about 1.7 cm, so 15 + 1.7 = 16.7 cm.
Check: Add the gaps: 10 cm to eye, 5 cm to nose, 1.7 cm to mouth, and 3.3 cm to chin. The total is 20 cm.
Exercise 2
A student measures head width as 12 cm and shoulder width as 30 cm in the mirror. They draw the head 6 cm wide on paper. Using the same scale, how wide should the shoulders be?
Show answer and check
15 cm.
Why: The paper head is half the mirror head width (6 cm vs 12 cm). The same half scale applied to 30 cm shoulders gives 15 cm.
Check: Check the ratio: 6/12 = 0.5 and 15/30 = 0.5. The scale is consistent.
Exercise 3
In a mirror check, a student finds the space between the eyes is about 2.5 cm and each eye is about 2.5 cm wide. They drew the eyes 3 cm apart and 2 cm wide. Describe one adjustment and one check.
Show answer and check
Adjust the eye spacing closer to 2.5 cm or adjust eye width toward 2.5 cm, then recheck the total width across both eyes and the gap.
Why: The mirror observation gives equal eye width and gap at about 2.5 cm. The drawing is inconsistent with that observation, so one or both values should be revised.
Check: Measure the drawn gap and eye width with the same unit, compare to the mirror values, and confirm the total across both eyes plus the gap matches the observed total.
Exercise 4
A student sets the eye line at 8 cm, nose line at 12 cm, and chin at 18 cm. Is the nose line halfway between the eye line and chin? Show the arithmetic.
Show answer and check
No. Halfway between 8 cm and 18 cm is 13 cm, not 12 cm.
Why: The gap from eye line to chin is 10 cm. Half of that is 5 cm, so the halfway point is 8 + 5 = 13 cm. The student's nose line at 12 cm is 1 cm above the halfway point.
Check: Subtract: 13 - 8 = 5 cm and 18 - 13 = 5 cm. The halfway point must have equal gaps on both sides.
Common mistakes
- Treating the guide lines as exact rules and forcing features onto them. Use the lines as starting points, then shift features to match your mirror observation.
- Drawing from memory instead of looking at the mirror. Look at the mirror for each feature, then draw, then look again to compare.
- Measuring different parts with different units. Choose one unit, such as pencil-widths or centimeters, and use it for all comparisons in a check.
- Erasing guides too early. Keep guides light and visible until the final proportion check is complete.
Self-check rubric
- Symmetry line and three horizontal guides are drawn lightly and labeled.
- Head outline uses the top and chin marks consistently.
- Eyes, nose, and mouth are placed by comparing to the mirror, not only by the guides.
- At least one pencil-measure comparison is recorded or described.
- Guides are erased or lightened in the final drawing.
- Valid alternatives are accepted when the drawing matches the student's mirror observation.
Questions and answers
Do I have to follow the halfway eye line exactly?
No. The eye line is a guide. Many faces have eyes slightly above or below halfway. Measure your own reflection and adjust.
What if my face is not symmetrical?
That is normal. Use the symmetry line for comparison, but draw what you observe on each side.
Can I use a ruler for every measurement?
A ruler helps for the main guides. For feature spacing, a pencil held at arm's length is often easier and keeps your measuring consistent.
How do I know when the drawing is finished?
When the main guides are checked, features match your mirror observation reasonably well, and you have erased or lightened construction lines. A rubric can help you decide.