Free original lessons
Mushroom Contour Drawing: Trace Edges and Gill Lines
Learn to draw a mushroom in contour line by tracing its outer edge and gill edges with a defined convention, clear steps, and self-checking practice.
Free lesson
Four exercises
Worked answers
Object Drawing Lessons
Contour drawing records the visible edge of a form without shading. For a mushroom, the key edges are the cap outline, the stem sides, the cap-to-stem junction, and the gill lines under the cap. This lesson defines a simple convention so your drawing can be checked fairly: draw only edges you can see, keep the line unbroken where the edge is continuous, and let gill lines stop at the cap rim and stem. Letter styles and hand pressure vary, so the rubric rewards consistent edge tracing rather than one universal look.
Practice materials: Printable downloads are not available for this lesson yet. Use the instructions and four exercises below.
Reference illustration
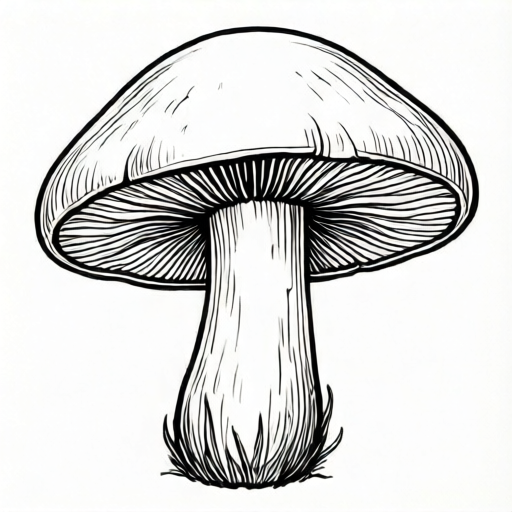
Use the stated measurements and conventions for each exercise.
Define the contour convention
Use one continuous line for the outer silhouette: start at the left stem base, go up the stem, around the cap, down the right stem, and close at the base. Where the cap meets the stem, the outer line follows the visible junction, not a hidden seam.
Gill lines are separate contour marks under the cap. Each gill line begins at the cap rim and ends at the stem surface. Do not cross the stem outline or continue a gill line through the cap. Keep spacing even enough to read as gills, but allow natural variation.
X-height is baseline to midline for any lettering you add; letter styles vary, so labels are optional and not graded for style. Measure your actual paper and pencil if you record sizes, and label any chosen numbers as hypothetical examples.
- Place the mushroom so the cap edge and gill area are visible.
- Trace the outer silhouette once, without lifting the pencil where the edge is continuous.
- Mark the cap rim as a short arc where gills attach.
- Draw gill lines from rim to stem, stopping at each boundary.
- Check that no gill line crosses the stem outline or cap edge.
Trace the outer edge in order
Begin with the stem base because it anchors the drawing. Move upward along one stem side, then follow the cap underside to the rim. Continue around the cap top and down the other side. This order keeps the silhouette connected and makes gaps easy to spot.
If the cap tilts, the rim arc changes shape but the rule stays the same: the outer line follows the visible edge. A tilted cap may hide part of the stem junction; draw only what is visible and leave the hidden part out.
- Draw the left stem side from base to cap junction.
- Follow the cap underside to the left rim.
- Trace the cap top from left to right.
- Return down the right cap underside and stem side.
- Close the silhouette at the base and check for unintended gaps.
Add gill edges without shading
Gill edges are short contour lines, not shaded areas. Start each line at the cap rim and end it at the stem. Keep lines separate; do not merge them into a dark band. If gills are partly hidden, draw only the visible segments.
Use the same pencil pressure as the outer edge so the drawing reads as one contour study. A common error is letting gill lines run past the stem or into the cap; the check is simple: every gill line must touch two boundaries and stop.
- Mark the visible rim arc under the cap.
- Draw the first gill line from rim to stem.
- Repeat across the visible gill area with even spacing.
- Stop each line at the stem surface.
- Compare line lengths and spacing for consistency.
Self-check and redraw from observation
After the first contour, compare it with the mushroom: does the silhouette close, do gill lines stop at boundaries, and is the cap-to-stem junction visible? Then redraw from observation in a blank panel without tracing the first drawing.
A blind-contour box can help: draw the mushroom while looking mostly at the object, not the paper. The result may look distorted, but the check is whether edges were followed, not whether the drawing is neat.
- Check silhouette closure and junction visibility.
- Check every gill line stops at rim and stem.
- Redraw in a blank panel from observation.
- Compare the two drawings for edge consistency.
- Record one improvement for the next attempt.
Worked example
A mushroom has a cap 6 cm wide, a stem 3 cm tall, and visible gills under the cap. Draw a contour line with gill edges using the convention: one outer silhouette, gill lines from cap rim to stem, no shading. Describe the order and one check.
Worked answer
Start at the left stem base, go up the stem to the cap junction, follow the cap underside to the left rim, trace the cap top to the right rim, return down the right underside and stem, and close at the base. Then mark the visible rim arc and draw gill lines from rim to stem, stopping at each boundary. Check that every gill line touches the rim and stem and stops; no line crosses the stem outline.
Four practice exercises
Exercise 1
A mushroom cap is 5 cm wide and the stem is 4 cm tall. The gill area shows 8 visible gill lines. Draw the outer silhouette and gill edges. State where each gill line starts and stops.
Show answer and check
The silhouette starts at the left stem base, goes up the stem, around the cap, down the right stem, and closes at the base. Each of the 8 gill lines starts at the cap rim and stops at the stem surface.
Why: The convention requires one outer contour and gill lines bounded by rim and stem. The 5 cm and 4 cm values are hypothetical examples for scale, not manufacturing standards.
Check: Count the gill lines: 8. Confirm each touches the rim and stem and stops. Confirm the silhouette closes at the base with no shading.
Exercise 2
A tilted mushroom hides the right half of the stem junction. Draw only visible edges. How many gill lines should cross the hidden junction?
Show answer and check
Zero gill lines should cross the hidden junction. Draw gill lines only where the rim and stem are visible, and stop them at the visible boundaries.
Why: Contour drawing records visible edges. A hidden junction is not drawn, so no gill line can cross it.
Check: Inspect the hidden area: no line should enter it. Confirm every drawn gill line has a visible start at the rim and a visible stop at the stem.
Exercise 3
A student draws 10 gill lines, but 3 continue past the stem outline. The cap is 7 cm wide. Identify the error and give the corrected count of valid gill lines.
Show answer and check
The error is that 3 gill lines cross the stem outline. The corrected count is 7 valid gill lines that stop at the stem.
Why: Each gill line must stop at the stem surface. Lines that pass the boundary violate the convention. The 7 cm width is a hypothetical example.
Check: Count lines that stop at the stem: 10 minus 3 equals 7. Confirm no line crosses the stem outline.
Exercise 4
Draw a blind-contour mushroom in a box while looking mostly at the object. Then redraw in a blank panel from observation. List two checks to compare the drawings.
Show answer and check
Check one: the outer silhouette closes at the base in both drawings. Check two: every gill line stops at the rim and stem in both drawings.
Why: Blind contour may distort shape, but the convention still applies: edges are traced and gill lines are bounded. The comparison focuses on edge rules, not neatness.
Check: Place the drawings side by side and verify silhouette closure and gill-line stopping in each. Note one improvement for the next attempt.
Common mistakes
- Gill lines cross the stem outline or continue into the cap. End each gill line at the stem surface and at the cap rim; redraw any line that passes a boundary.
- The outer silhouette has unintended gaps or double lines. Trace the silhouette in one order and close it at the base; erase duplicate marks before adding gills.
- Shading is added instead of contour lines. Remove shaded areas and replace them with single edge lines only.
- Gill spacing is wildly uneven, making the gill area unreadable. Space gill lines evenly enough to read as separate edges, allowing natural variation.
Self-check rubric
- Outer silhouette is a single continuous contour where the edge is continuous.
- Cap-to-stem junction follows the visible edge, not an invented seam.
- Gill lines begin at the cap rim and end at the stem surface.
- No gill line crosses the stem outline or continues into the cap.
- No shading is used; only contour lines appear.
- Gill spacing is even enough to read as separate edges, with natural variation allowed.
- Redrawn observation panel shows edge tracing rather than copied shading.
- Optional lettering uses x-height baseline to midline; style is not graded.
Questions and answers
Do I need to label the mushroom parts?
No. Labels are optional. If you letter, x-height is baseline to midline, and letter styles vary; labels are not graded for style.
Can I use a ruler for gill lines?
A ruler can help spacing, but gill lines should follow the visible edge direction. Measure your actual tools if you record sizes, and label chosen numbers as hypothetical examples.
What if the cap hides the stem junction?
Draw only the visible edge. Do not invent a hidden seam; the contour records what can be seen.
How many gill lines should I draw?
Draw enough to read as gills across the visible area. There is no fixed count; consistency and stopping at boundaries matter more.