Free original lessons
Colored Mushroom Drawing: Layered Cap, Gill, and Stem Shading
Learn to shade a colored mushroom with layered cap, gill, and stem tones. Build depth using base, mid, and highlight colors on a labeled plate.
Free lesson
Four exercises
Worked answers
Object Drawing Lessons
This lesson teaches colored shading of a mushroom cap, gills, and stem using layered color. You will work from a simple labeled plate that shows the cap dome, gill lines, and stem cylinder, then apply a three-layer color guide: base tone, mid tone, and highlight. The goal is believable volume, not mushroom identification. Use any colored pencils, markers, or crayons you have. Measure your own paper and tools; any numbers here are hypothetical examples. Work slowly, keep layers thin, and check your values against the plate before adding detail.
Practice materials: Printable downloads are not available for this lesson yet. Use the instructions and four exercises below.
Reference illustration
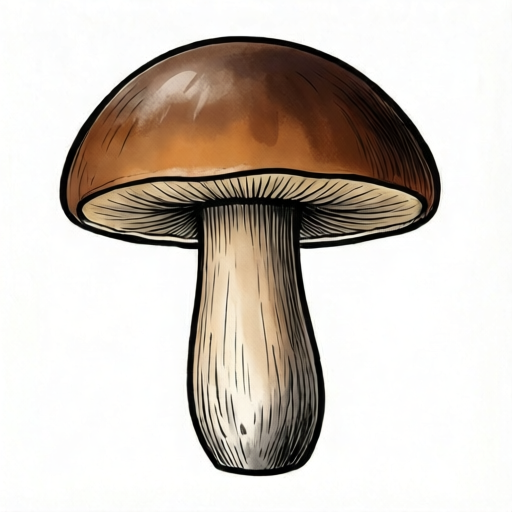
Use the stated measurements and conventions for each exercise.
Set up the labeled mushroom plate
Draw or trace a mushroom plate on your paper: a rounded cap dome on top, a set of curved gill lines underneath, and a stem cylinder below. Label the three zones lightly in pencil so you can erase the labels later. Keep the cap about twice as wide as the stem. This plate is your map for where each color layer goes.
Choose three colors for the cap and three for the stem. A simple convention is base tone (lightest), mid tone (medium), and highlight (a light accent placed on top of the base). If you use one color family, make the mid tone noticeably darker than the base. Test your colors on a scrap strip first so you know how they look dry.
- Draw the cap dome, gill lines, and stem cylinder on your paper.
- Label cap, gills, and stem lightly in pencil.
- Test your three cap colors and three stem colors on a scrap strip.
- Erase labels only after you have planned where each layer goes.
Layer the cap color
Start with the base tone over the whole cap dome, keeping the color even and light. Let it dry if you use markers. Next, add the mid tone along the lower edge of the dome and under any overhang, where the cap would be shadowed. Blend the mid tone upward with light strokes so it fades into the base.
Finally, add the highlight near the top of the dome where light would strike. Keep the highlight small and soft. If your highlight looks too strong, lift color with an eraser or soften it with a clean brush. The cap should read as a rounded form, not a flat circle.
- Apply base tone evenly across the cap dome.
- Add mid tone along the lower edge and under the overhang.
- Blend mid tone upward into the base with light strokes.
- Place a small highlight near the top of the dome.
Shade the gills and stem
The gills sit under the cap, so they are usually darker than the cap edge. Use a thin mid tone between the gill lines and a darker tone in the deepest gaps. Keep the lines curved and evenly spaced. Do not fill every gap with the same darkness; vary it slightly so the gills look natural.
For the stem cylinder, apply base tone first, then mid tone along one side to suggest a rounded column. Add a narrow highlight on the opposite side. Keep the stem lighter near the top where it meets the gills and slightly darker near the base. Check that the stem shadow direction matches the cap shadow direction.
- Draw curved gill lines and shade between them with mid tone.
- Darken the deepest gaps between gills slightly.
- Apply base tone to the stem cylinder.
- Add mid tone on one side and a narrow highlight on the other.
Check and refine the layers
Step back and compare your drawing to the plate. The cap should have a clear light-to-dark transition, the gills should look recessed, and the stem should look round. If any area looks flat, add a thin mid tone layer rather than a heavy one. Keep your layers thin so the paper does not buckle.
Use the rubric to score your work. Remember that letter styles and handwriting vary, and color choices are valid alternatives as long as the three-layer convention is followed. There is no single universal answer for color; the check is whether the layers create believable volume.
- Compare cap, gill, and stem values to the plate.
- Add thin mid tone where areas look flat.
- Confirm shadow directions match across cap and stem.
- Score your drawing with the rubric.
Worked example
A learner draws a cap dome 8 cm wide and a stem 4 cm wide. They apply base tone to the whole cap, mid tone along the lower edge, and a small highlight at the top. They shade the gills with mid tone and put stem mid tone on the left side with a highlight on the right. Check the shadow direction and layer order.
Worked answer
The layer order is correct: base, then mid, then highlight. The cap shadow is at the lower edge and the stem shadow is on the left, so both shadows point the same way. The stem highlight on the right is opposite the stem shadow, which is correct. The only check is whether the gills are darker than the cap edge; if not, add a thin mid tone between the gill lines.
Four practice exercises
Exercise 1
A learner draws a cap dome 10 cm wide and a stem 5 cm wide. They apply base tone to the cap, mid tone along the top edge, and a highlight at the bottom. They shade the gills lightly and put stem mid tone on the right with a highlight on the left. Identify the main shading error and state the fix.
Show answer and check
The cap mid tone and highlight are reversed: the mid tone should be along the lower edge and the highlight near the top. The stem shadow on the right and highlight on the left are consistent with each other, so keep them. Fix the cap by moving the mid tone to the lower edge and the highlight to the top.
Why: Light strikes the top of a dome, so the top is the highlight and the lower edge is shadowed. The stem already follows this logic on its own axis, so only the cap needs correction.
Check: Compare the cap and stem shadow directions. If the cap shadow is at the top while the stem shadow is on one side, the cap is reversed.
Exercise 2
A learner shades a mushroom with base tone on the cap, mid tone on the gills, and no highlight anywhere. The stem has base tone only. Describe two thin layers to add and where to place them.
Show answer and check
Add a small highlight near the top of the cap dome, and add mid tone along one side of the stem with a narrow highlight on the opposite side. Keep both layers thin. The gills already have mid tone, so no change is needed there unless the gaps look too light.
Why: The cap needs a highlight to read as rounded, and the stem needs a mid tone and highlight to read as a cylinder. Thin layers preserve the existing base tone.
Check: After adding the layers, confirm the cap has three values and the stem has three values. If either still looks flat, add one more thin mid tone layer.
Exercise 3
A learner uses a cap 12 cm wide and a stem 6 cm wide. They apply base tone, then a heavy mid tone that covers the whole cap, then a large bright highlight across the top half. The gills are left white. List three corrections using the three-layer convention.
Show answer and check
First, reduce the mid tone so it sits mainly along the lower edge and blends upward. Second, shrink the highlight to a small soft spot near the top. Third, shade the gills with mid tone between the lines and darken the deepest gaps slightly.
Why: A heavy mid tone over the whole cap removes the base tone, and a large highlight flattens the dome. White gills do not look recessed under a shaded cap.
Check: Check that base, mid, and highlight are each visible on the cap, and that the gills are darker than the cap edge.
Exercise 4
A learner draws a cap dome 9 cm wide and a stem 4.5 cm wide. They put stem mid tone on the left and a stem highlight on the right. They put cap mid tone along the lower edge and a cap highlight at the top. They shade the gills with mid tone but leave the deepest gaps the same as the rest. State one improvement and explain how to check it.
Show answer and check
Improve the gills by darkening the deepest gaps slightly more than the rest. Check by comparing the gaps to the cap edge: the gaps should be the darkest area under the cap. If they match the cap edge, add a thin darker layer in the gaps only.
Why: Varied depth between gill lines makes the gills look recessed. The cap and stem shadow directions are already consistent, so the gills are the remaining weak point.
Check: Squint at the drawing. The gill gaps should read as the darkest zone. If the cap edge is darker, adjust the gills.
Common mistakes
- Applying heavy color in one pass instead of thin layers. Build each tone with light strokes and let it dry before adding the next layer.
- Making the gills as light as the cap edge. Darken the gaps between gill lines with mid tone so the gills look recessed.
- Putting the stem highlight on the same side as the cap shadow. Keep highlight and shadow on opposite sides for both cap and stem.
- Using a highlight that is too large or too bright. Keep the highlight small and soft, and soften it with a clean brush or eraser.
Self-check rubric
- Cap shows three distinct layers: base, mid tone, and highlight.
- Gills are darker than the cap edge and show varied depth between lines.
- Stem shows a rounded form with mid tone on one side and highlight on the other.
- Shadow direction is consistent across cap and stem.
- Layers are thin and the paper is not buckled.
- Color choices are valid alternatives if the three-layer convention is followed.
Questions and answers
Do I need special colored pencils?
No. Any colored pencils, markers, or crayons work. Test your colors on scrap paper first so you know how they layer.
How dark should the mid tone be?
Noticeably darker than the base tone but not black. If you cannot see a clear difference on scrap paper, choose a darker mid tone.
Can I use more than three colors?
Yes, as long as you keep the base, mid, and highlight convention clear. Extra colors should support those three roles, not replace them.
What if my paper buckles?
Use thinner layers and let each layer dry. If buckling starts, stop adding color and press the paper flat under a heavy book.