Free original lessons
Pencil Mushroom Drawing: Hatching and Tonal Cap Shading
Learn to draw a mushroom in pencil using directional hatching for cap shading and simple texture strokes for the stem, with clear steps and checks.
Free lesson
Four exercises
Worked answers
Object Drawing Lessons
This lesson teaches a focused pencil study of a single mushroom: a rounded cap shaded with hatching that follows its form, and a stem given light texture. You will work from a simple outline, build tone in steps, and use a consistent convention for judging values. The aim is controlled, readable shading rather than a finished forest scene. All measurements are hypothetical examples; measure your own paper and pencil marks when checking.
Practice materials: Printable downloads are not available for this lesson yet. Use the instructions and four exercises below.
Reference illustration
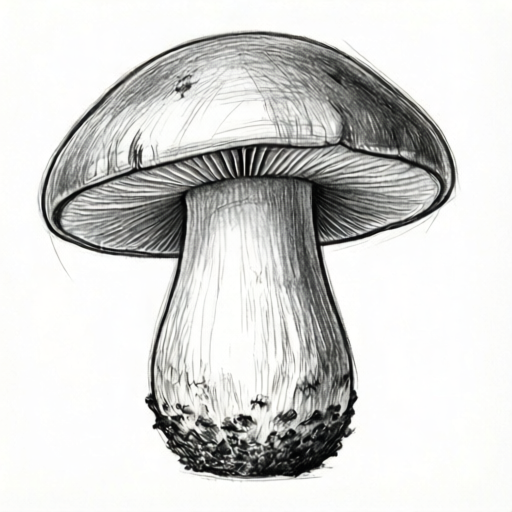
Use the stated measurements and conventions for each exercise.
Set up the outline and a tonal convention
Begin with a light outline: an oval cap about 6 cm wide and 4 cm tall, and a stem about 2 cm wide and 5 cm tall below it. Keep the outline faint so hatching can sit on top without looking muddy.
Define a simple value convention before shading: treat the paper as value 0 (lightest) and your darkest pencil layer as value 4. Midtones are 1, 2, and 3. This is a working scale, not a standard; it only needs to be consistent within your drawing.
Decide a light direction, for example from the upper left. The cap's lower right will then carry the darkest tone, and the upper left stays light.
- Draw the cap oval and stem rectangle lightly, then round the stem base.
- Mark a faint line across the cap where the lightest band will sit.
- Test your pencil on scrap paper to confirm values 1 to 4 are distinguishable.
Hatch the cap in tonal steps
Hatching means parallel pencil strokes. On a rounded cap, strokes should curve slightly to suggest the surface. Work in layers: first a light layer across the shaded half, then a second layer at a slightly different angle only where tone 3 or 4 is needed.
Keep stroke spacing even within each band. If strokes cross, cross them at a shallow angle so the texture stays calm. Avoid pressing hard; build value by layering.
Check the cap by squinting: the darkest band should sit opposite the light source, and the transition should show at least three visible steps.
- Hatch the shaded half with light strokes for value 1.
- Add a second layer in the darkest third for value 3.
- Add a small third layer at the lower right edge for value 4.
- Leave the upper left band as value 0 or a single light layer.
Texture the stem without overworking
The stem is usually lighter than the cap's dark side. Use short vertical or slightly diagonal strokes to suggest fibrous texture. Keep the strokes sparse near the top and slightly denser near the base where shadow gathers.
Do not outline the stem heavily. Let the texture strokes and a soft edge define it. If the stem looks flat, add one narrow band of value 2 along the shadow side rather than darkening the whole stem.
Compare cap and stem: the cap should read as the dominant tonal mass, the stem as a supporting texture.
- Add short texture strokes down the stem, spacing them wider at the top.
- Place a narrow value-2 band on the shadow side of the stem.
- Soften any hard outline with light erasing or gentle strokes.
Review and refine
Step back and check three things: the lightest band on the cap, the darkest band opposite it, and the stem texture density. Adjust by adding layers, not by pressing harder.
If the hatching looks striped, vary stroke length slightly and ensure adjacent bands share an edge rather than a gap. If the cap looks flat, increase the contrast between value 1 and value 3 by one layer.
Finish when the cap shows a clear tonal progression and the stem reads as textured but secondary.
- Squint to confirm three distinct cap values.
- Check that stem strokes are sparser at the top.
- Erase any stray outline marks and confirm the light band is clean.
Worked example
A learner draws a cap 6 cm wide and 4 cm tall with light from the upper left. They hatch the lower right half with one layer, then add a second layer in the darkest third. The stem has sparse vertical strokes and a narrow shadow band. Judge the result using the value convention 0 to 4.
Worked answer
The cap shows value 0 to 1 on the upper left, value 2 in the middle, and value 3 to 4 at the lower right edge. The stem reads as value 1 with a value-2 shadow band. This meets the convention: three visible cap steps, darkest opposite the light, and stem texture secondary. A valid alternative could place the light band slightly differently if the light direction is stated and the darkest band remains opposite.
Four practice exercises
Exercise 1
Draw a cap 5 cm wide and 3 cm tall with light from the upper right. Hatch the shaded half in two layers and state the values you used.
Show answer and check
The lower left half carries value 2 to 3, the upper right stays value 0 to 1, and the darkest edge is at the lower left. Two layers are visible in the shaded half.
Why: Light from the upper right places shadow on the lower left, so hatching layers concentrate there while the lit side stays light.
Check: Squint at the cap: confirm three steps and that the darkest band is opposite the stated light.
Exercise 2
Draw a stem 2 cm wide and 5 cm tall with sparse texture at the top and denser strokes at the base. Add one narrow shadow band.
Show answer and check
Texture strokes are wider apart in the top third and closer in the bottom third; a narrow value-2 band runs down one side.
Why: Density of strokes controls apparent texture and shadow without darkening the whole stem.
Check: Compare stroke spacing top versus bottom and confirm the shadow band is narrow, not covering the full width.
Exercise 3
A learner hatches a cap with one heavy layer and no light band. Identify the problem and describe a fix using the value convention.
Show answer and check
The cap lacks a light band and shows only one value. Fix by lifting tone in the upper lit area and adding a second light layer only in the darkest third to reach value 3.
Why: Heavy single layers flatten tone; layering in selected areas restores tonal steps.
Check: Check that at least three values are visible and that no area is pressed shiny.
Exercise 4
Draw a complete mushroom with cap 6 cm by 4 cm and stem 2 cm by 5 cm, light from the left. Use hatching on the cap and texture on the stem, then list the values at three cap points.
Show answer and check
Upper left cap is value 0 to 1, middle is value 2, lower right edge is value 3 to 4. Stem is value 1 with a value-2 shadow band on the right.
Why: Light from the left places shadow on the right; layering builds the darkest edge while the stem stays secondary.
Check: Verify the three listed cap values are distinguishable and that the darkest band is on the right.
Common mistakes
- Hatching in one uniform direction across the whole cap, making it look flat. Curve strokes slightly and change angle between tonal layers so the cap reads as rounded.
- Pressing hard to get dark tone, which creates shiny grooves. Build value with two or three light layers instead of one heavy layer.
- Outlining the stem heavily so it competes with the cap. Reduce the outline and let texture strokes and a narrow shadow band define the stem.
- Leaving gaps between tonal bands, causing stripes. Make adjacent bands share an edge and vary stroke length slightly.
Self-check rubric
- Cap shows at least three distinguishable values using the stated 0 to 4 convention.
- Hatching direction curves or changes angle to suggest the cap's rounded form.
- Darkest cap band sits opposite the stated light direction.
- Stem texture strokes are present and sparser near the top.
- Stem does not compete with the cap as the dominant tonal mass.
- No heavy outline undermines the hatching.
- Valid alternatives are accepted if the light direction is stated and tonal steps remain clear.
Questions and answers
Do I need special pencils?
No. A single graphite pencil works if you can produce at least three distinguishable values by layering. Test on scrap paper first.
How large should the drawing be?
The 6 cm by 4 cm cap is a hypothetical example. Any size works if you keep the tonal steps visible and the stem proportionate.
Can I use cross-hatching instead of parallel hatching?
Yes, if the crossing angle stays shallow and the tonal steps remain clear. The convention is consistent values, not one fixed stroke pattern.
What if my cap looks too dark overall?
Erase lightly or lift tone with a soft eraser, then rebuild only the darkest third. Keep the light band untouched.