Free original lessons
Draw a Paw: Pad and Toe Construction Practice
Learn to build a paw from simple shapes: main pad, toe pads, and claws. Includes a practice plate plan, common fixes, and four self-checked exercises.
Free lesson
Four exercises
Worked answers
Object Drawing Lessons
This lesson focuses only on paw pad and toe construction, not full animal drawings or fur. You will use a simple convention: the paw is a rounded main pad with four toe pads arranged in an arc above it, and each toe ends in a small claw. All measurements are hypothetical examples; measure your own paper and tools. Work lightly first, then darken final lines. The goal is a clear, balanced construction you can repeat from memory.
Practice materials: Printable downloads are not available for this lesson yet. Use the instructions and four exercises below.
Reference illustration
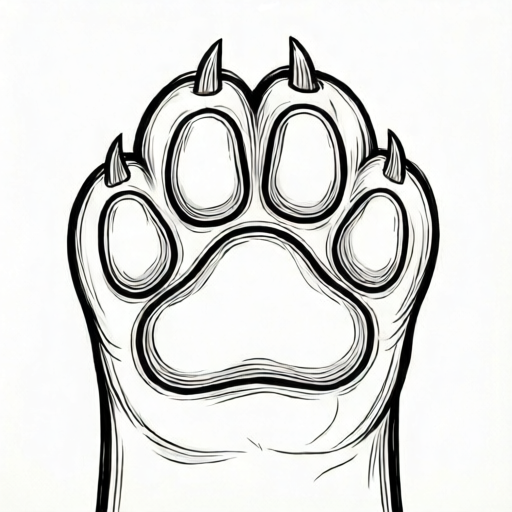
Use the stated measurements and conventions for each exercise.
Set Up and Define Your Convention
Choose a drawing surface and a pencil or pen. Mark a baseline and a midline for the paw area. X-height here means the distance from baseline to midline; use it as your unit for proportion. For example, if baseline to midline is 20 mm, call that 1 unit. This is a hypothetical example, not a standard.
Define your paw convention before drawing: main pad is a wide rounded triangle or kidney shape; four toe pads sit in an arc above it; each toe has a small claw at the top. Letter styles and pad shapes vary, so treat this as one valid convention, not the only answer.
- Mark baseline and midline; measure the distance and record it as 1 unit.
- Lightly sketch a horizontal oval for the main pad, about 2 units wide and 1.2 units tall.
- Mark four toe positions in an arc above the main pad, spaced evenly.
- Draw each toe pad as a small oval, about 0.6 units wide.
- Add a short claw line at the top of each toe, angled slightly outward.
- Check symmetry and spacing before darkening lines.
Build the Main Pad and Toe Arc
Start with the main pad because it anchors the whole paw. Keep it wider than tall. The toe arc should sit above the main pad with a small gap, roughly 0.3 units. Even spacing matters more than perfect circles.
Use light construction lines. If a toe pad looks too large, erase and redraw rather than stacking lines. Keep the claw short and simple; it is a marker, not a detailed nail.
- Draw the main pad oval centered on the midline.
- Draw a faint arc above the main pad for toe placement.
- Place four toe pads along the arc, checking equal gaps.
- Add claws at the top of each toe pad.
- Compare left and right sides for balance.
Refine, Check, and Repeat
Refinement is about clarity, not realism. Darken the main pad outline, then the toe pads, then the claws. Leave the construction arc faint or erase it. Check that the main pad is wider than tall and that toe pads do not overlap the main pad.
Repeat the construction on a blank paw outline. The outline is a planned printable resource, not yet built; for now, draw a large rounded rectangle or oval as your practice boundary and fit the paw inside it.
- Erase or lighten construction lines.
- Darken main pad, then toe pads, then claws.
- Check spacing, symmetry, and gap between pad and toes.
- Label your unit measurement on the page for reference.
- Redraw once from memory to test recall.
Worked example
Using a 20 mm baseline-to-midline unit, construct a paw with a main pad 2 units wide and 1.2 units tall, four toe pads 0.6 units wide in an arc with a 0.3 unit gap above the main pad.
Worked answer
Main pad: 40 mm wide, 24 mm tall. Toe pads: 12 mm wide each, centered on an arc 6 mm above the main pad. Four toe centers spaced evenly across the arc. Claws short, angled outward. Check: main pad wider than tall; toe pads do not overlap main pad; left and right spacing balanced.
Four practice exercises
Exercise 1
Draw a paw using a 15 mm unit. Main pad 2 units wide, 1.2 units tall. Four toe pads 0.6 units wide, arc gap 0.3 units. Record measurements.
Show answer and check
Main pad 30 mm wide, 18 mm tall. Toe pads 9 mm wide each. Arc gap 4.5 mm above main pad. Four toe centers evenly spaced.
Why: Multiply each unit value by 15 mm. Keep the main pad wider than tall and maintain the gap so toe pads do not overlap.
Check: Measure main pad width and height; confirm width is greater. Measure gap; confirm about 4.5 mm. Count four toe pads and check even spacing.
Exercise 2
A student draws a main pad 25 mm wide and 30 mm tall, with toe pads touching the main pad. Identify two fixes using this lesson's convention.
Show answer and check
Fix 1: redraw main pad wider than tall, for example 30 mm wide and 18 mm tall. Fix 2: move toe arc up to leave about 0.3 units gap, so toe pads do not touch the main pad.
Why: The convention requires a wide main pad and a visible gap. Correcting proportions and spacing resolves both issues.
Check: Measure new main pad width and height; confirm width is greater. Check gap between main pad and toe pads is visible.
Exercise 3
Using a 10 mm unit, place four toe pads 0.6 units wide along an arc. Calculate total toe pad width if placed side by side with no gaps, then explain why spacing matters.
Show answer and check
Each toe pad is 6 mm wide; four side by side total 24 mm. Spacing matters because toe pads should sit in an arc with even gaps, not touch, so the construction stays clear.
Why: Multiply 0.6 by 10 mm to get 6 mm per pad, then multiply by four. Even spacing prevents overlap and keeps balance.
Check: Measure one toe pad; confirm about 6 mm. Count four pads. Check gaps are roughly equal and pads do not overlap.
Exercise 4
Draw a paw inside a 60 mm by 40 mm rounded rectangle boundary using a 10 mm unit. Main pad 2 units wide, 1.2 units tall; toe arc gap 0.3 units. Check fit.
Show answer and check
Main pad 20 mm wide, 12 mm tall. Toe pads 6 mm wide each. Arc gap 3 mm. The paw fits within 60 mm by 40 mm with room for claws and margins.
Why: Convert units to millimeters and compare total height and width to the boundary. The main pad plus toe arc and claws should remain inside.
Check: Measure main pad and toe pads; confirm sizes. Check all parts stay inside the 60 mm by 40 mm boundary with visible margin.
Common mistakes
- Making the main pad taller than wide. Measure width and height; keep width about 1.5 to 2 times the height.
- Toe pads overlapping the main pad. Leave a small gap, about 0.3 units, between the main pad and toe arc.
- Uneven toe spacing. Mark toe centers first, then draw pads around those marks.
- Claws too long or detailed. Keep claws short and simple; they are position markers.
Self-check rubric
- Main pad is wider than tall and clearly defined.
- Four toe pads are present and arranged in a balanced arc.
- Toe pads do not overlap the main pad; gap is visible.
- Claws are short, simple, and consistently placed.
- Construction lines are light or erased; final lines are clear.
- Measurements or unit notes are recorded and consistent.
- Valid alternative pad shapes are accepted if balance and spacing are clear.
Questions and answers
Do I need a real paw reference?
No. This lesson uses a defined construction convention. You can check proportions with simple measurements.
How many toes should I draw?
This convention uses four toe pads above one main pad. Other conventions exist, but stay consistent within one drawing.
What if my pad shape is different?
That is valid. The rubric checks balance, spacing, and clear construction, not one exact shape.
Can I use a pen instead of pencil?
Yes, but work lightly and plan spacing first. Measure your actual tools and paper.