Free original lessons
Draw a Poodle: Curl Texture and Leg Construction
Learn to draw a poodle with structured legs and curly coat texture using a simple convention, clear steps, and checkable practice tasks.
Free lesson
Four exercises
Worked answers
Object Drawing Lessons
This lesson teaches a repeatable method for drawing a poodle that emphasizes two defining features: the curly coat and the leg structure. You will use a simple curl convention—small overlapping C-shapes that follow the body contour—and a leg construction sequence that builds from a centerline and joint landmarks. The approach is designed for pencil and paper, uses no specialized tools, and allows stylistic variation. All measurements are hypothetical examples; measure your own paper and tools if you adapt them. The goal is not a single correct poodle but a coherent, checkable drawing process you can apply consistently.
Practice materials: Printable downloads are not available for this lesson yet. Use the instructions and four exercises below.
Reference illustration
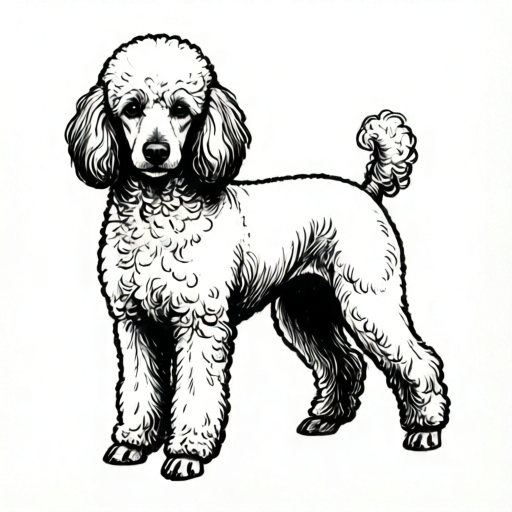
Use the stated measurements and conventions for each exercise.
Set Up the Drawing Space and Curl Convention
Choose a sheet of paper and a pencil. Lightly mark a drawing area about 15 cm wide and 20 cm tall; these numbers are hypothetical examples, so adjust to your paper. The poodle will stand in a three-quarter view facing left. Define the curl convention before drawing: each curl is a small C-shape, roughly 1 cm tall, with the opening facing the direction of growth. Curls overlap by about one-third of their height and follow the body contour. This convention is not a universal standard; it is a consistent visual language for this lesson. You may vary curl size and spacing as long as the overlap and contour-following rules remain.
- Mark a light rectangular frame for the poodle; label the top as head area and the bottom as paw area.
- Draw three sample curls in a row: C-shapes about 1 cm tall, overlapping by one-third, openings facing right.
- Draw a second row below, offset by half a curl, to see how rows interlock.
- Decide your curl size for the drawing (for example, 1 cm) and keep it consistent across the coat.
Build the Leg Structure Before the Coat
Legs are drawn first as simple structures so the curly coat does not hide poor anatomy. Use a centerline for each leg, then mark joint landmarks: shoulder or hip, elbow or knee, wrist or hock, and paw. For the front legs, the centerline runs from the shoulder down to the paw with a slight bend at the elbow. For the back legs, the centerline has a more pronounced angle at the knee and hock. Keep the front legs roughly vertical and the back legs angled to suggest a standing pose. These are construction guides, not final outlines; they will be covered by curls later.
- Draw a light vertical centerline for the near front leg, about 8 cm long (hypothetical).
- Mark the shoulder at the top, elbow at about 45 percent down, wrist at about 80 percent down, and paw at the bottom.
- Draw the far front leg slightly behind and shorter to show depth.
- For the near back leg, draw a centerline angled back at the hip, then forward at the knee, then down at the hock.
- Mark hip, knee, hock, and paw; repeat for the far back leg with less detail.
Add the Body Outline and Curl Rows
With leg guides in place, draw a light body outline: a rounded chest, a slight waist, and a rounded rear. The head is a rounded shape above the chest, with a muzzle and ears indicated lightly. Now apply the curl convention row by row, starting at the back and working forward. Each curl should touch or overlap the previous one and follow the local contour. On the legs, use smaller curls (about 0.5 cm, hypothetical) and keep the leg centerline visible as a guide until the final pass. Avoid filling every gap; leave small breathing spaces so the texture reads as curls rather than a solid mass.
- Draw the body outline lightly, keeping the leg guides visible.
- Start curl rows at the rear, working forward along the back and flank.
- Use smaller curls on the legs, following the leg centerline and joint landmarks.
- Add a topknot of larger curls on the head and smaller curls on the ears.
- Check that curls overlap by about one-third and that openings follow the direction of growth.
Refine, Shade, and Check the Drawing
Refine by darkening the final outline where curls meet the body edge, but keep interior curls lighter to suggest volume. Add simple shading under the belly and behind the legs using light pencil strokes; do not blend heavily. Check the leg structure by tracing each centerline with your finger: the joints should feel plausible and the paws should sit on a consistent ground line. Check the curl texture by scanning rows: overlaps should be consistent, and no row should abruptly change curl size without a reason. Remember that letter styles and curl styles vary; the rubric rewards consistency and contour-following, not a single universal look.
- Darken the outer contour selectively where curls define the silhouette.
- Add light shading under the belly and behind the far legs.
- Trace each leg centerline to confirm joint placement and ground line.
- Scan curl rows for consistent overlap and contour-following.
- Erase remaining construction lines only after the final check.
Worked example
A poodle stands in three-quarter view facing left. The near front leg centerline is 8 cm long (hypothetical). The elbow is marked at 45 percent down and the wrist at 80 percent down. Draw the leg guide, place three joint landmarks, and add five small curls along the lower half of the leg using the C-shape convention with one-third overlap.
Worked answer
The centerline is drawn vertically. The shoulder is at 0 cm, elbow at 3.6 cm (45 percent of 8 cm), wrist at 6.4 cm (80 percent of 8 cm), and paw at 8 cm. Five curls of about 0.5 cm each are placed starting at about 4 cm; with one-third overlap they add 0.5 cm + 4 × (2/3 × 0.5 cm) = 0.5 cm + 1.33 cm ≈ 1.8 cm of new coverage, ending near 5.8 cm. The curls open toward the paw, follow the centerline, and do not obscure the joint marks.
Four practice exercises
Exercise 1
On a blank area, draw a near front leg guide 10 cm long (hypothetical). Mark the elbow at 40 percent down and the wrist at 75 percent down. Add six curls of 0.6 cm each along the lower half, overlapping by one-third.
Show answer and check
Elbow at 4.0 cm, wrist at 7.5 cm, paw at 10 cm. Six curls of 0.6 cm each, with one-third overlap, add about 2.6 cm of new coverage: the first curl contributes its full 0.6 cm, and each of the five following curls adds about 0.4 cm (two-thirds of 0.6 cm), so 0.6 + 5 × 0.4 = 2.6 cm. Place the first curl at about 4.5 cm; the run then ends near 7.1 cm, keeping it within the lower half of the leg and clear of the wrist at 7.5 cm.
Why: Percentages convert to distances by multiplying the leg length: 40 percent of 10 cm is 4.0 cm, and 75 percent of 10 cm is 7.5 cm. With one-third overlap, the first curl adds its full height and each later curl adds about two-thirds of its height, so six 0.6 cm curls add 0.6 cm + 5 × 0.4 cm = 2.6 cm of new coverage. Starting at about 4.5 cm, the run ends near 7.1 cm, which fits inside the lower half (5 cm to 10 cm) and leaves the wrist and paw marks clear.
Check: Measure the marked distances with a ruler and confirm the elbow at 4.0 cm and wrist at 7.5 cm. Count six curls, check that each overlaps the previous by about one-third, and confirm the curl run spans about 2.6 cm of new coverage within the lower half of the leg.
Exercise 2
Draw a back leg guide with a hip at the top, a knee 5 cm down, a hock 3 cm further down, and a paw 2 cm below the hock. Add four curls of 0.5 cm along the hock-to-paw section, following the centerline.
Show answer and check
The guide has four landmarks in order: hip, knee at 5 cm, hock at 8 cm, paw at 10 cm. Place the first curl at about 8.2 cm. Four curls of 0.5 cm with one-third overlap add 0.5 cm + 3 × (2/3 × 0.5 cm) = 0.5 cm + 1.0 cm = 1.5 cm of new coverage, so the run ends near 9.7 cm, within the 2 cm hock-to-paw section. Curls open toward the paw and follow the centerline.
Why: The distances are additive: 5 cm plus 3 cm plus 2 cm gives a 10 cm guide. The hock-to-paw section is 2 cm long, so four 0.5 cm curls with overlap fit if spaced carefully; the overlap rule keeps the texture continuous.
Check: Verify the landmark order and distances with a ruler. Confirm that the four curls stay within the hock-to-paw section and overlap consistently.
Exercise 3
Draw a small body outline 12 cm wide and 8 cm tall (hypothetical). Apply two rows of curls: top row five curls of 1 cm, bottom row four curls of 1 cm offset by half a curl. Check that each curl overlaps its neighbor by about one-third.
Show answer and check
Place the top row starting at the left edge of the outline; five 1 cm curls with one-third overlap span about 3.7 cm (1 cm + 4 × 2/3 cm ≈ 3.67 cm). Place the bottom row offset by half a curl, starting about 0.5 cm from the left edge; four 1 cm curls span about 3.0 cm (1 cm + 3 × 2/3 cm). Both rows fit within the 12 cm width, but they cover only the left portion; additional rows would be needed to cover the full outline. The outline remains visible at the edges where curls define the silhouette.
Why: With one-third overlap, the first curl adds its full height and each additional curl adds about two-thirds of its height. Five 1 cm curls add 1 cm + 4 × (2/3 cm) ≈ 3.67 cm; four 1 cm curls add 1 cm + 3 × (2/3 cm) = 3.0 cm. The offset row creates interlocking texture, and the exact span depends on spacing.
Check: Count five curls in the top row and four in the bottom row. Check the offset visually and confirm that overlaps are about one-third of a curl height.
Exercise 4
Draw a poodle head with a topknot of three large curls (1.2 cm each) and two ears with three small curls each (0.6 cm). Use the C-shape convention and keep the muzzle clear of curls.
Show answer and check
The topknot has three overlapping 1.2 cm curls following the head contour. Each ear has three 0.6 cm curls following the ear edge. The muzzle area remains open, and the curls do not cross the eye line.
Why: Larger curls on the topknot and smaller curls on the ears create intentional size variation. Keeping the muzzle clear preserves the poodle's facial structure and prevents the texture from obscuring key features.
Check: Count three topknot curls and three curls per ear. Confirm that the muzzle is clear and that each curl follows the local contour with consistent overlap.
Common mistakes
- Drawing curls as random scribbles that do not follow the body contour. Use the C-shape convention and draw row by row, checking that each curl opening follows the local direction of growth.
- Hiding the leg structure under curls before the joints are placed. Complete the leg centerlines and joint landmarks first, then apply smaller curls along those guides.
- Making all curls the same size across the body and legs. Use larger curls on the body and topknot, smaller curls on the legs and ears, and keep the overlap rule consistent.
- Letting the paws float above or sink below a consistent ground line. Mark a light ground line before drawing paws and check each paw against it.
Self-check rubric
- Leg structure: centerlines and joint landmarks are present and plausible; paws align to a consistent ground line.
- Curl convention: C-shapes overlap by about one-third and follow the body contour; size variation is intentional.
- Texture coverage: curls cover the body and legs without becoming a solid mass; small breathing spaces remain.
- Shading: light shading supports volume under the belly and behind the far legs without heavy blending.
- Consistency: the chosen curl size and overlap rule are maintained across the drawing.
- Alternative styles: valid variations in curl shape or letter style are accepted if the convention remains consistent.
Questions and answers
Do I need special paper or tools?
No. A pencil and ordinary paper are enough. If you adapt the hypothetical measurements, measure your own paper and pencil to keep the scale consistent.
Can I use a different curl shape?
Yes. The C-shape is a convention for this lesson, not a universal rule. Any curl style is valid if it overlaps consistently and follows the body contour.
How do I know the legs are correct?
Trace each leg centerline and confirm that the joint landmarks are placed in a plausible order and that the paws sit on a consistent ground line.
Should I erase all construction lines?
Erase them only after the final check. Keeping them visible during curl placement helps maintain leg structure.