Free original lessons
Realistic Airplane Drawing: Fuselage and Wing Construction
Learn to construct a realistic airplane with a centerline fuselage, tapered wings, tail placement, and shading that suggests cylindrical form.
Free lesson
Four exercises
Worked answers
Object Drawing Lessons
This lesson teaches a repeatable method for drawing a realistic airplane by building the fuselage around a centerline, placing wings with a planform that tapers toward the tips, and adding shading that reads as a rounded body. You will work in side and three-quarter views, using simple measured proportions rather than copying a specific aircraft. All measurements are hypothetical examples; measure your own paper and tools. The convention for shading is a single light source from the upper left, with highlights along the fuselage top and shadows beneath the wing root. Lettering and handwriting are not assessed here; any legible labels are acceptable.
Practice materials: Printable downloads are not available for this lesson yet. Use the instructions and four exercises below.
Reference illustration
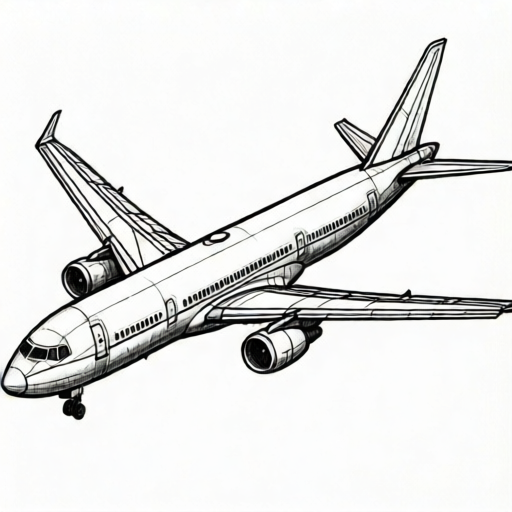
Use the stated measurements and conventions for each exercise.
Set the centerline and fuselage envelope
Begin with a horizontal centerline across the page. Mark a nose point and a tail point, then divide the span into thirds to locate the cockpit area and the wing root. The fuselage is drawn as a long rounded form that narrows toward the tail; keep the top and bottom curves roughly parallel near the cockpit and gently converging behind the wing.
Use a light pencil for construction lines. Check symmetry by folding the paper or by measuring equal distances above and below the centerline at three stations: nose, wing root, and tail. Adjust before darkening any contour.
- Draw a horizontal centerline and mark nose and tail points.
- Divide the centerline into three equal parts to place cockpit and wing root.
- Sketch upper and lower fuselage curves that converge toward the tail.
- Measure symmetry at nose, wing root, and tail, then refine.
Place the wing planform and tail
The wing planform is a tapered shape: wider at the root, narrower at the tip, with a slight sweep if you choose. Draw the near wing first in three-quarter view, then mirror the far wing using the centerline as a guide. The horizontal tail is smaller and sits behind the wing; the vertical fin rises from the tail section.
Keep wing thickness consistent: a thin band at the tip and a thicker band at the root. This thickness band is what later receives shading to show the wing's curvature.
- Mark wing root on the fuselage and draw a tapered planform outward.
- Mirror the far wing using measured distances from the centerline.
- Add horizontal tail and vertical fin behind the wing.
- Draw a thickness band along the wing edge, thicker at the root.
Shade for cylindrical form
With a single light source from the upper left, the fuselage top receives a highlight and the lower right side falls into shadow. Use a shading band: lightest along the top curve, mid-tone on the side, darkest beneath the wing root and along the bottom. Blend with short strokes that follow the fuselage curve.
For the wing, shade the underside more darkly than the top surface. A soft transition at the leading edge suggests curvature without hard lines. Keep highlights narrow so the form reads as rounded rather than flat.
- Define light direction and mark highlight along fuselage top.
- Apply mid-tone on the side and darker tone beneath the wing root.
- Shade wing underside darker than top surface.
- Blend strokes along the curve and soften the leading edge.
Check proportions and finish
Compare the fuselage length to the wingspan. A common hypothetical ratio is wingspan about equal to fuselage length, but adjust to your chosen design. Check that the tail is roughly one-third the wing span and that the cockpit sits ahead of the wing root.
Erase construction lines lightly, darken final contours, and add a few panel lines only where they support form. Avoid inventing technical markings; the goal is realistic construction, not a branded aircraft.
- Measure wingspan against fuselage length and adjust.
- Check tail size and cockpit position relative to wing root.
- Erase construction lines and darken contours.
- Add minimal panel lines that follow the form.
Worked example
On a sheet 20 cm wide, draw a side-view airplane with fuselage length 12 cm and wingspan 12 cm. Place the wing root at two-thirds of the fuselage length from the nose. Shade with light from upper left.
Worked answer
Centerline 12 cm; nose at 0 cm, tail at 12 cm. Wing root at 8 cm. Fuselage width 2 cm at cockpit, 1 cm at tail. Wing drawn as tapered band from root to tip, thickness 0.6 cm at root and 0.2 cm at tip. Highlight along top curve; shadow beneath wing root and along lower right side. Check: wingspan equals fuselage length; wing root at 8 cm; shading follows one light source.
Four practice exercises
Exercise 1
Draw a side-view airplane on a 15 cm centerline. Place the wing root at 10 cm from the nose. Fuselage width 1.8 cm at cockpit and 0.9 cm at tail. Describe your shading plan.
Show answer and check
Centerline 15 cm; wing root at 10 cm; widths 1.8 cm and 0.9 cm. Shade highlight along top, mid-tone on side, dark beneath wing root.
Why: Two-thirds of 15 cm is 10 cm, so the wing root sits at the rear third boundary. Tapered widths create a realistic fuselage envelope.
Check: Measure wing root distance and widths; confirm highlight and shadow placement match upper-left light.
Exercise 2
In three-quarter view, the near wing appears longer than the far wing. If the near wing measures 6 cm from root to tip, what should the far wing measure if perspective shortens it by one-third? State the shading difference.
Show answer and check
Far wing 4 cm. Near wing top lighter; far wing slightly darker due to angle; both undersides darker than tops.
Why: One-third of 6 cm is 2 cm, so 6 minus 2 equals 4 cm. Perspective shortens the far wing.
Check: Verify 6 minus 2 equals 4; check that far wing is shorter and shading follows light direction.
Exercise 3
A fuselage is 18 cm long. You want wingspan equal to fuselage length and tail span one-third of wingspan. Give tail span and place wing root at two-thirds of fuselage length.
Show answer and check
Wingspan 18 cm; tail span 6 cm; wing root at 12 cm from nose.
Why: One-third of 18 cm is 6 cm. Two-thirds of 18 cm is 12 cm.
Check: Confirm 18 divided by 3 equals 6 and 18 times two-thirds equals 12; measure on drawing.
Exercise 4
Your shading band is 1 cm wide on a 2 cm fuselage. Where should the darkest part sit, and how wide should the highlight be? Use the upper-left light convention.
Show answer and check
Darkest beneath wing root and lower right side; highlight narrow, about 0.3 cm along top curve.
Why: A single upper-left light creates a narrow top highlight and broader shadow on the lower right; wing root casts shadow beneath.
Check: Measure highlight width and check darkest area is opposite the light source; adjust if even.
Common mistakes
- Drawing the fuselage as a straight tube with equal width at nose and tail. Taper the tail section and keep the cockpit area fuller; measure width at three stations.
- Making both wings identical in three-quarter view without accounting for perspective. Use the centerline and measured distances; the far wing appears shorter and narrower.
- Shading the fuselage evenly so it looks flat. Apply a highlight along the top and a darker band beneath the wing root, following the curve.
- Placing the wing root too far forward or too far back. Divide the centerline into thirds and place the wing root near the rear third boundary.
Self-check rubric
- Fuselage built around a centerline with visible taper toward the tail.
- Wing planform tapered and mirrored using measured distances.
- Tail placed behind wing with horizontal and vertical surfaces.
- Shading consistent with a single upper-left light source.
- Proportions checked: wingspan and fuselage length compared; wing root position measured.
- Valid alternative styles accepted if construction and shading logic are clear.
Questions and answers
Do I need a specific aircraft to draw realistically?
No. The method uses generic proportions and construction lines; avoid branded or military specifics.
How do I know my shading is correct?
Check that the lightest band follows the fuselage top and the darkest area sits beneath the wing root, consistent with one light source.
Can I use a ruler for measurements?
Yes. Measure your actual paper and tools; label any numerical values as hypothetical examples.
What if my wings look too thin?
Increase the thickness band at the root and taper it toward the tip; check that the underside shading is darker.