Free original lessons
Realistic Apple Tree Drawing: Fruit, Leaves, and Bark Shading
Learn to draw a realistic apple tree with balanced fruit placement, clustered leaves, and textured bark shading using a clear, checkable method.
Free lesson
Four exercises
Worked answers
Object Drawing Lessons
This lesson guides you through drawing a realistic apple tree study, focusing on three skills: building a believable branch structure, placing fruit naturally, and shading bark to show texture and form. You will use a simple convention for leaf and fruit placement, and a rubric that allows valid stylistic variation. All measurements are hypothetical examples; measure your own paper and tools. The method is self-contained and uses only pencil, paper, and an eraser.
Practice materials: Printable downloads are not available for this lesson yet. Use the instructions and four exercises below.
Reference illustration
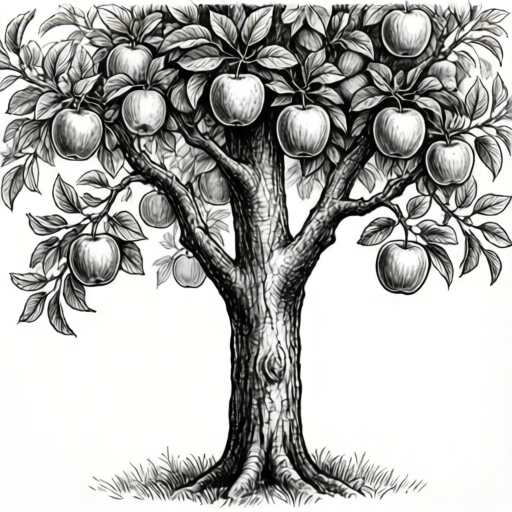
Use the stated measurements and conventions for each exercise.
Branch Structure and Proportions
Start by drawing the trunk as a slightly tapered vertical line, then add three to five main branches that fork outward and upward. Keep the trunk width about one-eighth of the tree's total height as a hypothetical guide; adjust to your paper size. Branches should thin as they extend, and forks should form Y-shapes rather than perfect T-shapes.
Use light pencil strokes to sketch the overall canopy as an irregular oval or rounded triangle. The canopy should be wider than the trunk is tall in a mature apple tree, but avoid a perfect circle. Mark the horizon line lightly so the trunk base sits naturally.
- Draw a light vertical line for the trunk, tapering from base to first fork.
- Add three to five main branches, each forking into two smaller branches.
- Sketch an irregular canopy outline around the branch tips.
- Check that branch thickness decreases from trunk to twig.
Fruit Placement and Leaf Clusters
Place apples in small groups of two or three rather than evenly spaced. Use a simple convention: each fruit sits at the end of a short stem attached to a twig, and each group is surrounded by a leaf cluster. Draw leaf clusters as overlapping oval shapes with pointed tips, varying size and angle. Avoid drawing every leaf; suggest clusters with five to seven leaf shapes per group.
Fruit should hang slightly below the leaf cluster, not on top. Vary fruit size slightly to suggest depth: larger apples in front, smaller behind. Keep stems short and angled downward. This convention is a guide, not a rule; you may adjust for style as long as fruit and leaves remain connected to twigs.
- Mark three to five fruit groups on different branches.
- Draw a short stem from twig to fruit center for each apple.
- Add five to seven leaf shapes around each fruit group.
- Vary leaf angles and fruit sizes to suggest depth.
Bark Shading and Texture
Shade bark using short, broken strokes that follow the trunk's curve. Use a darker pencil for the shadow side and lighter strokes for the lit side. Add a few horizontal cracks and vertical ridges, but keep them irregular. Avoid uniform hatching; vary stroke length and spacing.
For branches, reduce shading detail as they thin. Use a light touch on twigs. Check that the darkest shading is on the side opposite your imagined light source, and that bark texture does not overwhelm the fruit and leaves.
- Choose a light direction and mark it lightly outside the drawing.
- Shade the shadow side of the trunk with short curved strokes.
- Add irregular cracks and ridges on the trunk only.
- Lighten shading on thinner branches and twigs.
Checking and Refining
Step back and check three things: branch connections, fruit attachment, and shading consistency. Every fruit should connect to a twig via a stem; every leaf cluster should overlap a twig. Shading should be darker on one side of the trunk and lighter on the other.
Erase any stray lines and strengthen the darkest accents. If a fruit looks floating, add a short stem or adjust the leaf cluster. Keep the drawing simple and readable rather than crowded.
- Trace each fruit stem back to a twig.
- Check that leaf clusters overlap twigs.
- Confirm shading direction is consistent.
- Erase stray lines and strengthen key accents.
Worked example
Draw a small apple tree study on a 15 cm by 20 cm paper. Use three main branches, two fruit groups of two apples each, and bark shading on the trunk only. Label your light direction.
Worked answer
A completed drawing shows a tapered trunk about 2 cm wide at base, three main branches forking into thinner twigs, two fruit groups each with two apples attached by short stems, leaf clusters of five to seven leaf shapes around each group, and short curved shading strokes on the shadow side of the trunk. Light direction is marked with a small arrow outside the drawing.
Four practice exercises
Exercise 1
Sketch a trunk 12 cm tall on paper. Draw three main branches, each forking once. Make the trunk 1.5 cm wide at base and 1 cm wide at the first fork. Check that branch thickness decreases.
Show answer and check
A trunk sketch with three forking branches and visibly thinner twigs.
Why: Tapering trunk and thinning branches create a believable structure. The fork count keeps the drawing simple and checkable.
Check: Measure trunk width at base and first fork with a ruler; confirm each branch is thinner than its parent.
Exercise 2
On a 10 cm by 10 cm area, place two fruit groups of two apples each. Draw a short stem from each apple to a twig and add five leaf shapes around each group. Vary apple sizes slightly.
Show answer and check
Two fruit groups with stems connecting apples to twigs and leaf clusters around each group.
Why: Grouping fruit and attaching stems prevents floating apples. Leaf clusters suggest foliage without drawing every leaf.
Check: Trace each stem to a twig; count five leaf shapes per group; confirm apples are not evenly spaced.
Exercise 3
Draw a 10 cm tall trunk section. Shade the left side with short curved strokes and leave the right side lighter. Add three irregular cracks. Mark your light direction with an arrow.
Show answer and check
A trunk section with darker shading on the left, lighter on the right, three cracks, and a light-direction arrow.
Why: Consistent shading direction and irregular cracks suggest bark texture and form.
Check: Compare shading density on left and right; count three cracks; confirm arrow points away from the darker side.
Exercise 4
Combine your trunk, branches, fruit groups, and leaf clusters into one drawing on 15 cm by 20 cm paper. Use three fruit groups of two apples each. Check that every apple connects to a twig and every leaf cluster overlaps a twig.
Show answer and check
A complete apple tree study with connected fruit and leaf clusters.
Why: Combining elements tests whether structure, placement, and shading work together. Connection checks catch floating fruit or leaves.
Check: Trace each apple stem to a twig; confirm each leaf cluster overlaps a twig; check shading is darker on one side of trunk.
Common mistakes
- Drawing apples evenly spaced like dots on a grid. Group fruit in twos and threes on different branches, varying size and height.
- Making all branches the same thickness. Taper branches from trunk to twig; thinner branches should have less shading detail.
- Shading bark with uniform parallel lines. Use short, broken strokes that follow the trunk curve and vary in length and spacing.
- Drawing leaves as a solid outline without clusters. Suggest leaf clusters with five to seven overlapping leaf shapes around fruit groups.
Self-check rubric
- Branch structure: trunk tapers and branches fork into thinner twigs; connections are clear.
- Fruit placement: apples are grouped, attached by stems to twigs, and vary slightly in size.
- Leaf clusters: foliage is suggested with overlapping leaf shapes around fruit groups.
- Bark shading: short broken strokes follow trunk curve; shading is darker on one side.
- Overall readability: drawing is not crowded; fruit and leaves connect to branches.
Questions and answers
How many apples should I draw?
Aim for three to five fruit groups, each with two or three apples. This keeps the drawing readable and avoids crowding.
Do I need to draw every leaf?
No. Use leaf clusters of five to seven leaf shapes to suggest foliage. This is faster and looks more natural.
What if my tree looks flat?
Vary fruit size and leaf angle, and ensure bark shading is darker on one side of the trunk. These cues suggest depth.
Can I use a different leaf shape?
Yes. The convention is a guide. Any leaf shape is valid if clusters overlap twigs and fruit stems connect to branches.