Free original lessons
Realistic Tree Drawing: Bark, Branch Taper, and Leaf-Mass Shading
Learn to draw a realistic tree by building bark ridges, tapering branches, and shaded leaf masses with clear steps, checks, and practice tasks.
Free lesson
Four exercises
Worked answers
Object Drawing Lessons
This lesson teaches a repeatable method for drawing a realistic tree using three linked skills: bark texture, branch taper, and leaf-mass shading. You will work from a simple trunk-and-branch skeleton, add bark ridges that follow the trunk's form, taper every branch from thick base to thin tip, and shade leaf masses as grouped volumes rather than individual leaves. All width and height measurements use one consistent unit, and taper is checked as base width divided by tip width. All measurements are checkable with simple arithmetic. The resources described are planned and free; they are not yet built, so no downloads or files are claimed.
Practice materials: Printable downloads are not available for this lesson yet. Use the instructions and four exercises below.
Reference illustration
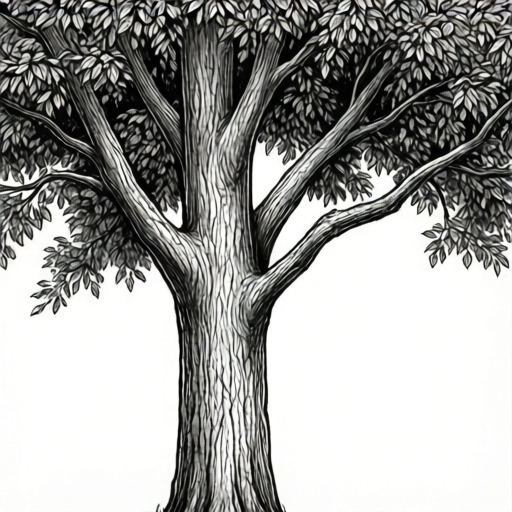
Use the stated measurements and conventions for each exercise.
Bark ridges that follow form
Bark is not a flat pattern. Ridges run roughly parallel to the trunk's long axis and curve around cylindrical form. Begin with a light centerline and two edge lines that define the trunk's width. Mark the trunk's midline and baseline so trunk width can be measured consistently at each height.
Draw ridges as interrupted lines that narrow at the top and bottom of the trunk. Vary spacing: tighter ridges near edges suggest curvature, wider spacing near the center suggests a flatter facing surface. Keep ridge depth consistent by using the same pencil pressure for all ridge lines before shading.
- Mark baseline and midline on the trunk; measure trunk width at three heights and record the values in the same unit.
- Draw five to seven ridge lines from base to first branch, curving them slightly around the trunk edges.
- Break each ridge into two or three segments with small gaps to suggest bark plates.
- Add short cross-ridges only where a branch meets the trunk, not across the whole trunk.
Branch taper from base to tip
Every branch tapers. A branch that starts at 12 mm wide should not end at 12 mm; it should narrow gradually to about 3 mm at the tip in this hypothetical example. Taper is checkable: divide the base width by the tip width to get a taper ratio, and keep that ratio similar across branches of the same order.
Draw the branch centerline first, then place width marks at the base, midpoint, and tip. Connect the marks with smooth edge lines. Where a branch forks, the two child branches together should be slightly narrower than the parent branch at the fork.
- Draw the centerline of each branch from trunk to tip.
- Mark base, midpoint, and tip widths using a consistent unit; label hypothetical values such as 12 mm, 7 mm, and 3 mm.
- Connect width marks with smooth edges, checking that midpoint width is between base and tip width.
- At forks, compare the sum of child base widths to the parent width at the fork and adjust so children are slightly narrower.
Leaf-mass shading as grouped volumes
Shade leaf masses as groups, not individual leaves. Treat each mass as a rounded volume with a light side, a core shadow, and a cast shadow onto lower masses. Use three tone values: light, middle, and dark. Keep the lightest tone on the side facing the light source and the darkest tone at the mass's lower edge and where masses overlap.
Check shading by squinting: the mass should read as one shape with internal variation, not as scattered dots. Leave small gaps at the mass edge to suggest leaf clusters without drawing every leaf.
- Outline each leaf mass with a soft, irregular boundary.
- Block in the middle tone across the whole mass.
- Add dark tone at the lower edge and under overlapping masses.
- Lift or leave light tone on the upper light-facing side; check that three distinct values are visible.
Combining trunk, branches, and leaf masses
Build the tree in order: trunk skeleton, branch taper, bark ridges, then leaf masses. Keep the trunk's baseline and midline visible until bark is complete. Check that every branch tip ends inside or at the edge of a leaf mass, and that bark ridges stop where leaf masses begin.
Use the same unit for all width and height measurements. If trunk width is 30 mm at baseline and 20 mm at first branch, the taper ratio is 1.5; record it and compare with branch ratios to keep the tree consistent.
- Draw trunk and main branches with centerlines and width marks.
- Add bark ridges to trunk and visible branches.
- Place leaf masses over branch tips, leaving some branch structure visible.
- Shade leaf masses with three tones and check taper ratios and ridge spacing.
Worked example
A trunk is 30 mm wide at baseline and 20 mm wide at the first branch. One branch starts at 12 mm and ends at 3 mm. Calculate the trunk taper ratio and branch taper ratio, then state one check for bark ridge spacing.
Worked answer
Trunk taper ratio is 30 divided by 20 equals 1.5. Branch taper ratio is 12 divided by 3 equals 4. A check for bark ridge spacing is that ridges are tighter near the trunk edges and wider near the center, with consistent pencil pressure.
Four practice exercises
Exercise 1
Draw a trunk 24 mm wide at baseline and 16 mm wide at the first branch. Add five bark ridges that curve around the trunk edges. State the trunk taper ratio.
Show answer and check
Trunk taper ratio is 24 divided by 16 equals 1.5. Five ridges curve around the edges with tighter spacing near edges.
Why: The ratio checks that the trunk narrows consistently; ridge curvature shows cylindrical form.
Check: Measure baseline and first-branch widths in the same unit, divide, and confirm five ridges with edge curvature.
Exercise 2
Draw a branch from 10 mm at base to 2 mm at tip with a midpoint width of 6 mm. At a fork, the parent is 10 mm wide; child bases are 6 mm and 5 mm. Check whether the children are slightly narrower than the parent.
Show answer and check
Branch taper ratio is 10 divided by 2 equals 5, and midpoint 6 mm is between 10 mm and 2 mm. Child sum is 6 plus 5 equals 11 mm, which is wider than the 10 mm parent, so reduce child bases to about 5 mm and 4 mm.
Why: Midpoint must lie between base and tip; child sum should be slightly less than parent width at the fork.
Check: Compare midpoint to base and tip, then add child base widths and compare to parent width.
Exercise 3
Shade one leaf mass using three tones. The mass is 40 mm wide and 30 mm high. State where the light, middle, and dark tones go, and give one check that the mass reads as a group.
Show answer and check
Light tone on the upper light-facing side, middle tone across the center, dark tone at the lower edge and under overlaps. Check by squinting: the mass should read as one shape with three visible values.
Why: Grouped shading uses value placement to show volume rather than individual leaves.
Check: Confirm three distinct values are visible and the mass boundary reads as one irregular shape.
Exercise 4
Combine a trunk 20 mm wide at baseline and 14 mm at first branch with two branches tapering from 8 mm to 2 mm. Place leaf masses over branch tips. State one arithmetic check and one placement check.
Show answer and check
Trunk taper ratio is 20 divided by 14, approximately 1.43; branch taper ratio is 8 divided by 2 equals 4. Placement check: every branch tip ends at or inside a leaf-mass boundary.
Why: Arithmetic checks keep taper consistent; placement check keeps leaf masses connected to branch structure.
Check: Divide widths in the same unit for ratios, then trace each branch tip to its leaf-mass boundary.
Common mistakes
- Drawing bark as a flat repeating pattern across the whole trunk. Curve ridges around the trunk edges and vary spacing so the trunk reads as cylindrical.
- Keeping branch width constant from base to tip. Mark base, midpoint, and tip widths and connect them with smooth tapering edges.
- Shading individual leaves instead of leaf masses. Block in three tones across each mass and reserve detail for the mass edges.
- Letting branch tips extend far beyond leaf masses. End branch tips at or inside the leaf-mass boundary and check each tip against the mass outline.
Self-check rubric
- Bark ridges follow trunk form and vary in spacing without a flat repeating pattern.
- Branch widths taper from base to tip, with midpoint width between base and tip width.
- Leaf masses use three distinct tone values and read as grouped volumes.
- Baseline and midline are marked, and all measurements use one consistent unit.
- Valid alternative ridge patterns are accepted when proportions and relationships remain consistent.
Questions and answers
Do I need to identify the tree species?
No. This lesson excludes species identification and focuses on bark ridges, branch taper, and leaf-mass shading.
Must I use millimeters?
No. Any single consistent unit is acceptable; the numerical values in this lesson are hypothetical examples.
Are the numerical widths required?
No. The values such as 12 mm and 3 mm are hypothetical examples. Measure your own drawing and keep units consistent.
How many tone values should leaf masses use?
Three values are enough: light, middle, and dark. Check that all three are visible on each mass.