Free original lessons
Realistic Ear Drawing: Cartilage Folds and Tonal Shading
Learn to draw a realistic ear by mapping cartilage folds and applying stepped tonal shading, with a printable ear plate, tonal strip, and blank outline planned.
Free lesson
Four exercises
Worked answers
Object Drawing Lessons
Drawing a realistic ear depends on two linked skills: understanding the cartilage folds that create the ear's form, and translating those forms into consistent tonal shading. This lesson breaks the ear into observable ridges and valleys, then shows how to shade them so the ear reads as three-dimensional. You will work from a labeled ear plate and a tonal-step strip, then apply both to a blank ear outline. The convention used here is simple: x-height means the distance from baseline to midline in your own handwriting, and letter styles vary, so measurements are given as proportions of the ear's total height rather than fixed millimeters. All numerical values are hypothetical examples to be checked against your actual paper and pencil.
Practice materials: Printable downloads are not available for this lesson yet. Use the instructions and four exercises below.
Reference illustration
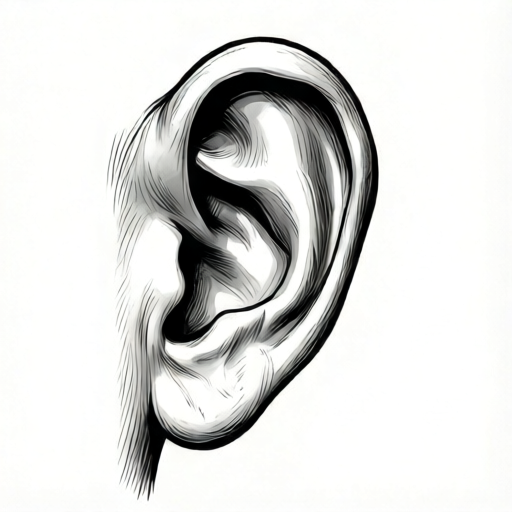
Use the stated measurements and conventions for each exercise.
Mapping the Cartilage Folds
The outer ear is not a flat oval. It is a shell of cartilage with a raised rim, a deep central bowl, and a series of folds that catch light and cast shadow. Begin by drawing the overall outline as a slightly tilted teardrop: wider at the top, narrowing toward the lobe. Mark the total height and width lightly so you can compare proportions as you add folds.
The helix is the outer rim, running from the top front around to the lobe. The antihelix is the inner ridge that runs roughly parallel to the helix, splitting near the top into two branches. Between them lies the scapha, a shallow groove. The concha is the deep bowl leading toward the ear canal. The tragus is the small flap in front of the concha, and the antitragus sits opposite it above the lobe. Draw these as continuous ridges and valleys, not as isolated lines.
- Lightly block the ear outline as a tilted teardrop, marking total height and width.
- Draw the helix rim as one continuous curve from top-front to lobe.
- Add the antihelix ridge inside the helix, splitting into two branches near the top.
- Indicate the scapha groove between helix and antihelix.
- Draw the concha bowl and the tragus flap in front of it.
- Add the antitragus above the lobe and check that all folds connect logically.
Building a Tonal Step Strip
Before shading the ear, make a tonal-step strip on scrap paper. Divide a small rectangle into five equal bands and fill them from lightest to darkest using only pencil pressure and hatching direction. Label them 1 through 5, where 1 is the paper white and 5 is your darkest achievable tone without smudging. This strip becomes your reference so that shading on the ear stays consistent.
Keep the strip beside your drawing. When you shade a fold, compare it to the strip and decide which step it belongs to. The raised helix usually sits at step 1 or 2, the scapha groove at step 3 or 4, and the deepest part of the concha at step 4 or 5. These are hypothetical starting points; adjust them to your pencil and paper after testing the strip.
- Draw a rectangle and divide it into five equal bands.
- Fill band 1 with paper white, band 2 with light hatching, band 3 with medium hatching.
- Fill band 4 with dense hatching and band 5 with your darkest controlled tone.
- Label each band and keep the strip beside the ear drawing for reference.
Applying Tonal Shading to the Ear
Shade in the direction of the form. On the helix rim, hatch along the curve so the strokes follow the ridge. In the scapha groove, hatch across the groove to deepen it. In the concha bowl, use denser hatching and a darker step to suggest depth. Leave the highest points of the helix and tragus at step 1 or 2 so they catch light.
Build tone in layers. Start with step 2 across the whole ear except the brightest highlights, then add step 3 in the scapha and concha, then step 4 in the deepest concha area. Check the drawing by squinting: the ear should still read as a shell with a rim, a groove, and a bowl. If any fold disappears, adjust its tone by one step rather than adding a hard outline.
- Lay a light step-2 tone over the ear, leaving highlights on the helix and tragus.
- Add step-3 tone in the scapha groove and the upper concha.
- Deepen the concha to step 4, keeping the transition gradual.
- Squint at the drawing and adjust any fold that has lost its tonal separation.
Checking Proportions and Fold Logic
A realistic ear depends on folds that connect logically and proportions that match your reference. Measure the ear's total height and width on your drawing and compare the ratio to your reference. As a hypothetical example, many ears are roughly two-thirds as wide as they are tall, but measure your own reference rather than assuming this value.
Trace each fold with your finger: the helix should connect to the lobe, the antihelix should branch near the top, and the tragus should sit in front of the concha. If a fold stops without meeting another form, redraw it so it continues into a valley or ridge. This logical connection is what makes the ear read as cartilage rather than as flat lines.
- Measure total height and width and compare the ratio to your reference.
- Trace each fold to confirm it connects to a ridge or valley.
- Check that the tragus sits in front of the concha and the antitragus above the lobe.
- Redraw any fold that stops without meeting another form.
Worked example
A learner draws an ear outline 60 mm tall and 40 mm wide, then shades the helix at step 2, the scapha at step 3, and the concha at step 4. Check the width-to-height ratio and explain whether the tonal steps follow the fold logic.
Worked answer
The width-to-height ratio is 40 divided by 60, which equals 0.67, or about two-thirds. This is a hypothetical example ratio; the learner should compare it to their own reference. The tonal steps follow the fold logic because the raised helix is lightest at step 2, the scapha groove is darker at step 3, and the deep concha is darkest at step 4. The progression from raised rim to groove to bowl is consistent with the form.
Why: Dividing width by height gives a simple checkable ratio. Assigning lighter tones to raised forms and darker tones to grooves and the bowl confirms that shading supports the cartilage structure rather than flattening it.
Check: Re-measure height and width with a ruler, divide width by height, and compare to the reference. Compare each shaded area to the tonal strip to confirm the step labels match the intended fold.
Four practice exercises
Exercise 1
An ear drawing is 50 mm tall and 30 mm wide. Calculate the width-to-height ratio and state whether it is greater or less than 0.6.
Show answer and check
30 divided by 50 equals 0.6, so the ratio is equal to 0.6, not greater or less.
Why: Width divided by height gives the ratio. Thirty divided by fifty is exactly 0.6.
Check: Re-measure both dimensions and divide width by height again; confirm the result is 0.6.
Exercise 2
A learner shades the helix at step 1, the scapha at step 2, and the concha at step 5, skipping steps 3 and 4. Describe one adjustment that would make the shading more gradual.
Show answer and check
Add step 3 in the scapha and step 4 in the upper concha so the progression from helix to concha passes through intermediate tones.
Why: Skipping from step 2 to step 5 creates an abrupt jump. Inserting steps 3 and 4 between them makes the transition gradual and keeps the bowl readable.
Check: Compare the shaded areas to the tonal strip and confirm that adjacent areas differ by only one step.
Exercise 3
A drawing shows the antihelix as a single ridge with no branch near the top, and the scapha is missing. Describe how to correct the fold structure using the named folds.
Show answer and check
Split the antihelix into two branches near the top and draw the scapha as a groove between the helix and the antihelix, then shade the groove one step darker than the helix.
Why: The antihelix branches near the top, and the scapha is the groove between helix and antihelix. Adding the branch and the groove restores the logical fold structure.
Check: Trace the antihelix to confirm two branches near the top and confirm a visible groove runs between helix and antihelix.
Exercise 4
An ear is drawn 45 mm tall. Using the hypothetical example that width is two-thirds of height, calculate the expected width and state the unit.
Show answer and check
Two-thirds of 45 mm is 30 mm, so the expected width is 30 mm.
Why: Multiply height by two-thirds: 45 times 2 divided by 3 equals 30. The unit is millimeters because the height was given in millimeters.
Check: Multiply the calculated width by 1.5 and confirm it returns 45 mm; check that the unit is stated as mm.
Common mistakes
- Drawing the ear as a flat oval with isolated lines for folds. Draw folds as continuous ridges and valleys that connect to the rim, bowl, or lobe, and shade them to show depth.
- Using uniform shading across the whole ear. Assign each fold a tonal step from your strip, keeping highlights on raised areas and darker tones in grooves and the concha.
- Making the concha too shallow or too dark without transition. Build the concha in layers from step 3 to step 4, keeping the transition gradual so the bowl reads as depth rather than a hole.
- Ignoring the antihelix branch near the top. Draw the antihelix as a ridge that splits into two branches near the top, and shade the scapha groove between it and the helix.
Self-check rubric
- Ear outline is a tilted teardrop with measurable height and width recorded.
- Helix, antihelix, scapha, concha, tragus, and antitragus are drawn as connected ridges and valleys.
- Antihelix branches near the top and the scapha groove is visible between helix and antihelix.
- Tonal strip has five labeled steps from lightest to darkest using the learner's own pencil.
- Shading assigns lighter steps to raised forms and darker steps to grooves and the concha.
- Transitions between tonal steps are gradual, with no hard outlines replacing shading.
- Proportions are checked against the learner's reference and any chosen numerical values are labeled as hypothetical examples.
- Valid alternative ear shapes are accepted if fold logic and tonal consistency are maintained.
Questions and answers
Do I need a specific pencil grade?
No. Use whatever pencil you have and make your tonal strip with that pencil. The five steps are relative to your own darkest controlled tone, not to a fixed grade.
How do I know if my shading is consistent?
Compare each shaded area to your tonal strip and label it mentally as step 1 through 5. If two areas that should match are different steps, adjust one to match the other.
Can I use a different ear shape?
Yes. The fold structure is the same even when proportions vary. Measure your own reference and adjust the outline, but keep the helix, antihelix, scapha, concha, tragus, and antitragus logically connected.
What does x-height mean here?
X-height is the distance from baseline to midline in your own handwriting. It is used only as a familiar unit for comparing proportions; letter styles vary, so treat any numerical value as a hypothetical example to check against your paper.