Free original lessons
Realistic Frog Drawing: Body Shape and Leg Construction
Learn to draw a realistic frog by building body shape, folded hind legs, front-leg placement, and skin texture with clear steps and checks.
Free lesson
Four exercises
Worked answers
Object Drawing Lessons
This lesson teaches a reliable way to draw a realistic frog, focusing on body shape and leg construction rather than cartoon styling. You will use simple geometric guides to place the head, torso, and limbs, then refine the folded hind leg and the front-leg support. A texture band helps you practice skin shading. All measurements are hypothetical examples; measure your own paper and tools. The convention for line placement is explicit: x-height means the distance from baseline to midline, and letter styles may vary, so treat proportions as adjustable guides rather than fixed rules.
Practice materials: Printable downloads are not available for this lesson yet. Use the instructions and four exercises below.
Reference illustration
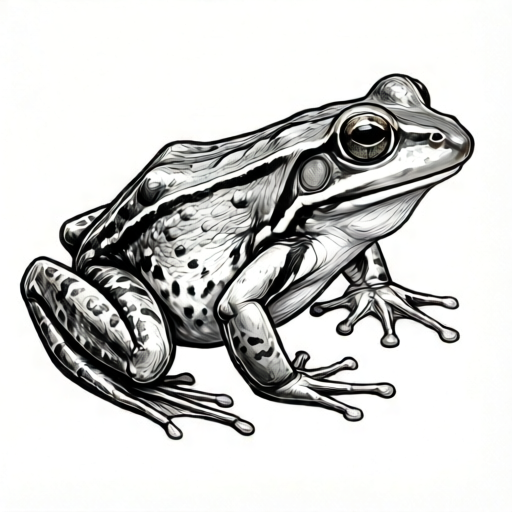
Use the stated measurements and conventions for each exercise.
Building the Body Shape
Start with a light oval for the torso, wider at the rear than at the shoulders. Add a smaller oval for the head, overlapping the front of the torso. The frog’s body is compact and low, so keep the torso height roughly two-thirds of its width. Mark a baseline and a midline on your paper; the x-height convention means the distance from baseline to midline is your reference unit for comparing parts.
Place the eyes as two small bumps on top of the head oval, not at the sides. The mouth line runs from the front of the head oval back toward the shoulders. Keep the head width about equal to the shoulder width. These are proportional guides, not fixed measurements.
- Draw a light baseline and midline; label the baseline-to-midline distance as one x-height unit.
- Sketch a torso oval about 3 x-height units wide and 2 x-height units tall.
- Add a head oval about 2 x-height units wide, overlapping the front third of the torso.
- Mark two eye bumps on the top edge of the head oval.
- Draw a gentle mouth curve from the front of the head back toward the shoulder line.
Constructing the Folded Hind Leg
The hind leg is the most distinctive part of a realistic frog. It folds in a Z shape: thigh, shin, and foot. Begin at the rear of the torso and draw the thigh angling down and back. Then draw the shin folding forward, and finally the foot pointing forward or slightly outward. The knee joint sits high and close to the body; the ankle joint sits lower and farther back.
Use the x-height unit to compare segment lengths. A hypothetical example: thigh 1.5 units, shin 1.5 units, foot 1 unit. Adjust to your frog’s pose. Keep the folded leg close to the body so the frog looks compact, not stretched.
- Mark the hip point at the rear side of the torso oval.
- Draw the thigh from hip down and back, about 1.5 x-height units.
- Draw the shin from knee forward and down, about 1.5 x-height units.
- Draw the foot from ankle forward, about 1 x-height unit, with three or four toe lines.
- Check that the knee is higher than the ankle and that the folded leg stays close to the torso.
Placing the Front Legs and Feet
Front legs are shorter and more vertical than hind legs. Place the shoulder joint just behind the head oval. Draw the upper front leg down and slightly forward, then the lower leg down to the wrist. The foot rests on the ground line with toes spread forward. Keep both front legs roughly symmetrical unless the pose is leaping.
For a sitting pose, the front feet sit under the shoulders. For a leaping pose, the front legs extend forward and the hind legs push back. Use the same joint order: shoulder, elbow, wrist, toes.
- Mark shoulder points on both sides of the torso, just behind the head.
- Draw upper front legs down and slightly forward, about 1 x-height unit.
- Draw lower front legs down to the wrist, about 1 x-height unit.
- Add three or four toe lines spreading forward from each wrist.
- Check that the feet meet the ground line and that the legs are not longer than the hind leg segments.
Skin Texture Practice
Realistic frog skin is not perfectly smooth. Use a texture band on your practice paper: draw a row of small ovals and short curved lines to suggest bumps and folds. Vary spacing and direction. Shade lightly along the lower sides of the body and under the legs to suggest roundness. Keep highlights on the top of the head and back.
Texture should follow the body form. On the torso, draw short curved lines that wrap around the oval. On the legs, draw lines that follow the segment direction. Avoid uniform dots; mix small bumps, short dashes, and soft shading.
- Draw a practice band of three squares, each about 2 x-height units wide.
- In square one, practice small oval bumps with varied spacing.
- In square two, practice short curved lines that follow a rounded form.
- In square three, combine bumps and shading, keeping highlights on top.
- Apply the best texture pattern lightly to the frog’s back and upper legs.
Worked example
Draw a sitting frog using a torso oval 3 x-height units wide and 2 units tall, a head oval 2 units wide, and a folded hind leg with thigh 1.5 units, shin 1.5 units, and foot 1 unit. Place front legs with 1-unit upper and lower segments.
Worked answer
The finished drawing shows a compact frog: torso wider at the rear, head overlapping the front third, eye bumps on top, hind leg folded in a Z shape with knee higher than ankle, front legs vertical and shorter than hind legs, and light texture on the back and upper legs.
Four practice exercises
Exercise 1
A student draws a torso oval 4 x-height units wide and 2 units tall, then adds a head oval 3 units wide. Is the frog likely to look compact or stretched? Explain using the lesson’s proportion guide.
Show answer and check
It is likely to look stretched because the torso is twice as wide as it is tall and the head is wider than the shoulder guide. The lesson suggests a torso about 3 units wide and 2 units tall, with head width about equal to shoulder width.
Why: The proportion guide compares torso width to height and head width to shoulder width. A 4-by-2 torso is very wide, and a 3-unit head is large relative to the suggested 2-unit head.
Check: Measure the drawn torso width and height in x-height units. Divide width by height. If the result is greater than about 1.5, the torso is stretched compared with the guide.
Exercise 2
A hind leg is drawn with thigh 2 units, shin 1 unit, and foot 1 unit. The knee is lower than the ankle. Identify two problems and state how to fix them.
Show answer and check
Problem one: the thigh is longer than the shin, which can make the fold look unbalanced. Problem two: the knee is lower than the ankle, which reverses the expected fold. Fix by making thigh and shin closer in length and raising the knee above the ankle.
Why: The lesson’s hypothetical example uses thigh 1.5, shin 1.5, and foot 1. The knee should sit higher than the ankle to create the Z fold.
Check: Compare thigh and shin lengths in x-height units. Then compare the vertical positions of knee and ankle on the drawing; the knee should be higher.
Exercise 3
You are drawing a leaping frog. The front legs extend forward and the hind legs push back. List three checks to confirm the leg construction is still realistic.
Show answer and check
Check that the hind leg still shows hip, knee, ankle, and toe points in order; check that the front legs are shorter than the hind legs; check that the body remains compact and the joints are not reversed.
Why: Changing the pose should not change the joint order or the relative segment lengths. The frog should still look balanced.
Check: Trace each leg from body to toe and label the joints. Measure front and hind segment lengths in x-height units and compare.
Exercise 4
A texture practice square uses only evenly spaced dots. Suggest two changes to make the texture more realistic and explain how to check the result.
Show answer and check
Change one: vary the spacing and size of the bumps. Change two: add short curved lines and soft shading that follow the body form. Check by comparing the square to the lesson’s texture band and confirming that highlights remain on top.
Why: Realistic frog skin is not uniform. Varied bumps and form-following lines suggest natural texture.
Check: Count the different mark types in the square. A realistic practice square should include at least two mark types and shading, with highlights on the upper area.
Common mistakes
- Drawing the hind leg as a straight line instead of a folded Z shape. Mark hip, knee, ankle, and toe points first, then connect them with the thigh, shin, and foot segments.
- Making the front legs longer than the hind legs. Compare segment lengths to the x-height unit; front leg segments should be shorter than hind leg segments.
- Placing the eyes on the sides of the head like a mammal. Put the eye bumps on the top edge of the head oval, close to the midline.
- Using uniform dots for skin texture. Mix small bumps, short curved lines, and soft shading that follows the body form.
Self-check rubric
- Body shape is compact and low, with torso wider at the rear than at the shoulders.
- Head oval overlaps the front of the torso and is about the same width as the shoulders.
- Eye bumps sit on the top edge of the head, not at the sides.
- Hind leg shows a clear Z fold with hip, knee, ankle, and toe points.
- Knee is higher than the ankle and the folded leg stays close to the torso.
- Front legs are shorter than hind legs and meet the ground line.
- Skin texture follows the body form and includes varied bumps, lines, and shading.
- Proportions are checked against the x-height unit; valid alternative proportions are accepted if the frog still looks compact and balanced.
Questions and answers
Do I need to measure exactly?
No. The x-height unit is a proportional guide. Measure your own paper and adjust the unit to fit. Numerical values in this lesson are hypothetical examples.
Can I draw the frog in a leaping pose?
Yes. Keep the same joint order but extend the front legs forward and push the hind legs back. Check that the body still looks compact.
How do I know the hind leg is folded correctly?
The knee should be higher than the ankle, and the foot should point forward or slightly outward. The folded leg should stay close to the torso.
What if my frog looks too stretched?
Shorten the torso oval and bring the hind leg closer to the body. Compare the torso width to the head width; they should be similar.