Free original lessons
Draw a Realistic Marigold: Layered Ruffled Petals
Learn to draw a marigold bloom with ruffled, layered petals using a clear anatomy guide, sequencing steps, and tonal shading checks.
Free lesson
Four exercises
Worked answers
Object Drawing Lessons
A marigold bloom reads as realistic when its dense, ruffled petal layers are drawn in a believable order and shaded to show depth. This lesson defines a simple drawing convention, breaks the bloom into concentric petal bands, and gives checkable steps for shape, overlap, and tone. You will use a baseline-to-midline x-height convention for lettering labels only; the flower itself is drawn freehand. All measurements are hypothetical examples unless you measure your own paper and tools. The goal is a coherent bloom with ruffled edges, clear layer separation, and shading that suggests a rounded, packed center.
Practice materials: Printable downloads are not available for this lesson yet. Use the instructions and four exercises below.
Reference illustration
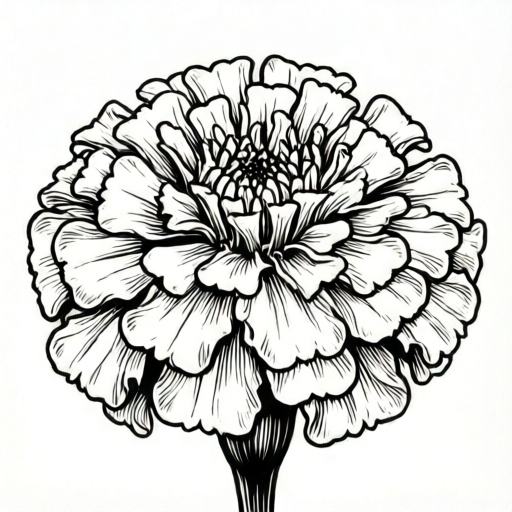
Use the stated measurements and conventions for each exercise.
Marigold bloom anatomy and drawing convention
Treat the bloom as a shallow dome. The center is a tight cluster of small, curled petals; outer layers are broader, ruffled bands that overlap like shingles. Draw a light circle for the bloom boundary and a smaller circle for the center. Divide the outer circle into four to six radial guides; these are placement aids, not final lines.
Use a consistent convention: pencil lines are construction lines and are erased or lightened later; final petal edges are drawn with a slightly darker line. For any lettering labels, x-height is measured from baseline to midline, and letter styles may vary. Numerical examples such as a 10 cm bloom circle or 2 cm center circle are hypothetical; measure your actual paper and choose values that fit.
- Draw a light circle for the bloom boundary, for example 10 cm diameter on a 15 cm square area.
- Draw a smaller center circle, for example 2 cm diameter, and mark four to six radial guides.
- Sketch the center as a tight cluster of small C-shaped curls, keeping marks light.
- Block the outer petal bands as broad, overlapping arcs that follow the radial guides.
Sequencing ruffled petal layers
Draw from the center outward. Each band should overlap the previous band slightly, so the bloom looks packed rather than flat. Ruffles are not random zigzags: make each petal edge with two or three gentle waves, then add a small notch or fold where two petals meet. Keep petal widths varied but plausible; a marigold has many narrow inner petals and fewer, wider outer petals.
Work in three passes: placement, shape, and refinement. In placement, mark petal tips and overlap points. In shape, connect tips with curved edges and show which petal is in front. In refinement, add ruffled folds and erase construction lines that no longer help.
- Place inner petal tips around the center circle, spacing them unevenly but evenly enough to avoid gaps.
- Draw the middle band as overlapping arcs, each arc crossing the previous petal near its base.
- Draw the outer band with broader petals and two or three gentle waves per edge.
- Add fold lines only where a petal curls or where two petals overlap; keep folds short and curved.
Tonal shading for depth and ruffle
Shade to show that the bloom is a dome. The center is usually the darkest because petals pack tightly and cast small shadows. Outer petals catch more light, but the shadow under each overlapping petal edge is important. Use three tones: light, middle, and dark. Keep the lightest tone on the upper outer petals and the darkest tone in the center and under overlaps.
A simple check is to squint at the drawing: the bloom should read as a rounded mass, not a flat disc. If the center looks empty, add small dark curls. If the outer edge looks flat, darken the shadow just inside the bloom boundary. Avoid inventing printer tolerances or hardware standards; measure your own pencil and paper if you need numerical examples.
- Lightly shade the center with small curved strokes that follow the curl direction.
- Add middle tone under each overlapping petal edge, keeping the shadow narrow.
- Leave the upper outer petals light and darken the lower outer petals slightly.
- Blend only if your paper allows it; otherwise keep strokes visible and consistent.
Checking the finished bloom
Check layer order first: every petal should clearly sit in front of or behind its neighbor. Check ruffles second: each outer petal edge should have gentle waves, not sharp spikes. Check tone third: the center should be darkest and the dome should read as rounded. Finally, check that construction lines are light or erased and that the bloom boundary is not a perfect hard circle unless you intended it.
Because letter styles and handwriting vary, label checks are judged by the stated convention, not by a single universal look. Valid alternatives include different petal counts, slightly different ruffle shapes, and different shading directions, provided the layer order and dome logic remain clear.
- Trace each petal from tip to base and confirm its overlap is visible.
- Confirm the center is a tight cluster, not a blank circle.
- Confirm shadows sit under overlaps and the bloom reads as a dome.
- Confirm any labels follow the baseline-to-midline x-height convention.
Worked example
Draw a marigold bloom on a 15 cm square area using a 10 cm bloom circle and a 2 cm center circle. Show three petal bands, ruffled outer edges, and three-tone shading.
Worked answer
Lightly draw the 10 cm circle and 2 cm center circle. Mark five radial guides. In the center, draw eight small C-shaped curls. Draw a middle band of six overlapping arcs, each crossing the previous petal near its base. Draw an outer band of five broader petals, each edge with two gentle waves. Add short fold lines at three overlaps. Shade the center dark, add middle tone under each overlap, and leave the upper outer petals light. Erase construction lines except the faint bloom boundary. Check that every petal has a clear front or back and that the center reads as a tight cluster.
Four practice exercises
Exercise 1
Draw only the center cluster of a marigold inside a 2 cm circle. Use eight small C-shaped curls and shade the cluster dark. Describe the result in one sentence.
Show answer and check
A dense dark center cluster with eight overlapping curls that fills the 2 cm circle without gaps.
Why: The center is the darkest and tightest part of the bloom; drawing it first establishes the dome and gives later petal bands something to overlap.
Check: Confirm the curls overlap, the circle is filled, and the tone is darker than the surrounding paper.
Exercise 2
Draw a middle petal band of six overlapping arcs around a 2 cm center circle. Each arc should cross the previous petal near its base. Do not shade.
Show answer and check
Six arcs forming a continuous band with visible overlap points near the base of each petal.
Why: Overlap near the base creates the shingled look of a marigold and prevents the band from reading as separate spokes.
Check: Trace each arc and confirm it crosses its neighbor; count six arcs and check that no gap reaches the center circle.
Exercise 3
Draw one outer petal with two gentle waves on each edge and one short fold line. Then draw a second petal overlapping it by about one third of its width.
Show answer and check
Two broad petals with soft wavy edges, a short curved fold, and a clear overlap where the second petal sits in front.
Why: Ruffles come from gentle waves, while overlap shows layer order; the fold line should follow the curl, not cut across the petal.
Check: Confirm the waves are soft, the fold is short and curved, and the overlap is visible without erasing the front petal's edge.
Exercise 4
Using a three-tone plan, shade a completed bloom sketch: dark center, middle tone under overlaps, light upper outer petals. State one check you would use.
Show answer and check
The center is darkest, narrow shadows sit under each overlap, and the upper outer petals remain light; a squint check shows a rounded dome.
Why: Three tones separate the packed center from the lighter outer petals and make overlaps readable without uniform shading.
Check: Squint at the drawing: the center should look dense, overlaps should show narrow shadows, and the bloom should not look flat.
Common mistakes
- Drawing all petals as identical teardrops. Vary petal width and length by layer: narrow inner curls, broader outer petals with gentle waves.
- Making ruffles as sharp zigzags. Use two or three soft waves per edge and add a small fold only where the petal curls.
- Shading the whole bloom evenly. Keep the center darkest, add narrow shadows under overlaps, and leave upper outer petals light.
- Letting construction lines dominate the final drawing. Lighten or erase construction lines after the petal shapes are confirmed.
Self-check rubric
- Bloom boundary and center are placed clearly and proportionally.
- Three petal bands are visible and overlap in a believable order.
- Outer petal edges show gentle ruffles rather than sharp zigzags.
- Center is a tight cluster of small curls, not a blank circle.
- Shading uses at least three tones and places shadows under overlaps.
- Construction lines are lightened or erased in the final drawing.
- Any labels follow the baseline-to-midline x-height convention; valid letter-style alternatives are accepted.
Questions and answers
How many petal layers should I draw?
Three visible bands are enough: a tight center cluster, a middle band, and an outer band. You may add a fourth partial band if the bloom looks sparse.
Do I need to measure the bloom?
No. Measurements are optional placement aids. If you use numbers, treat them as hypothetical examples and measure your own paper.
Can I use a different petal count?
Yes. Valid alternatives are allowed if the layer order, ruffled edges, and dome shading remain clear.
How do I know the shading is working?
Squint at the drawing. The center should look dense and dark, overlaps should show narrow shadows, and the bloom should read as rounded.