Free original lessons
Realistic Sea Turtle Drawing: Shell Scutes and Flipper Construction
Learn to draw a realistic sea turtle by mapping shell scute rows, shaping front and rear flippers, and checking head-to-shell proportion with simple measurements.
Free lesson
Four exercises
Worked answers
Object Drawing Lessons
A realistic sea turtle drawing depends less on shading tricks than on correct structure: the shell dome, the arrangement of scutes, the flipper outlines, and the head-to-shell proportion. This lesson defines a clear drawing convention so you can build the turtle in layers, check your work with arithmetic, and accept valid stylistic variation. All measurements are hypothetical examples; measure your own paper and reference photo before drawing.
Practice materials: Printable downloads are not available for this lesson yet. Use the instructions and four exercises below.
Reference illustration
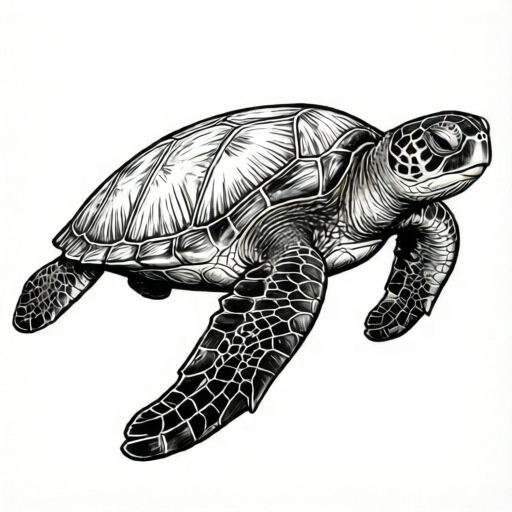
Use the stated measurements and conventions for each exercise.
Set the shell dome and head-to-shell proportion
Begin with a light oval for the carapace (top shell). For a sea turtle, the shell is flatter and wider than a tortoise dome. Draw the oval so its width is about 1.4 times its height; this is a hypothetical starting ratio, not a fixed rule. Mark the midline and the front and rear edges.
Place the head forward of the shell. A useful convention is that the head length, from snout tip to the rear of the skull, is roughly one-third of the shell width. If your shell width is 12 cm on paper, the head length is about 4 cm. Adjust after comparing with your reference.
Draw a centerline from the head through the shell to the tail area. This keeps the body symmetrical and helps you place scutes and flippers consistently.
- Draw a light oval for the carapace with width about 1.4 times height.
- Mark the shell midline and the front and rear edges.
- Draw the head forward of the shell with length about one-third of shell width.
- Add a body centerline from snout to tail area.
Lay out shell scutes in rows
Sea turtle scutes are arranged in rows. A practical convention is to draw five central scutes along the midline, then four pairs of costal scutes on each side, then a rim of marginal scutes around the edge. These counts are a drawing convention for this lesson; check your reference because species differ.
Draw the central row first as a series of rounded polygons along the midline. Then draw costal scutes as larger polygons flanking the central row. Finally, add marginal scutes as smaller blocks around the rim. Keep gaps small and consistent so the pattern reads clearly.
Use a light pencil for the scute grid, then darken only the outlines you want to keep. This lets you correct row spacing without erasing heavily.
- Draw five central scutes along the midline as rounded polygons.
- Add four costal scutes on each side, flanking the central row.
- Add marginal scutes around the rim as smaller blocks.
- Check that gaps are small and consistent, then darken chosen outlines.
Construct front and rear flippers
Front flippers are long and paddle-like. Draw each front flipper as a tapered shape from the shell edge outward, with a rounded tip. A hypothetical proportion is that front flipper length is about half the shell width. If shell width is 12 cm, front flipper length is about 6 cm. Note that front flippers attach near the front of the shell and sweep forward and outward, while rear flippers sit farther back.
Rear flippers are shorter and more rounded. Draw them behind the shell edge, angled slightly outward. A hypothetical proportion is that rear flipper length is about one-quarter of shell width, so about 3 cm for a 12 cm shell. Because front flippers are about twice the rear length, the two pairs should look clearly different in size.
Add a light line inside each flipper to suggest thickness, and keep the flipper edges smooth. Avoid sharp corners unless your reference shows them.
- Draw front flippers as tapered paddles from the shell edge, length about half shell width.
- Draw rear flippers as shorter rounded shapes, length about one-quarter shell width.
- Add a light interior line for thickness.
- Smooth the flipper edges and compare left and right for balance.
Check proportion and refine the drawing
Measure your drawing with a ruler or by counting grid squares. Check shell width, shell height, head length, front flipper length, and rear flipper length. Write the numbers beside the drawing and compare ratios.
If the head looks too large, reduce it toward one-third of shell width. If a front flipper looks short, extend it toward half shell width. Make one correction at a time and re-measure.
Finish by darkening the final outlines and adding subtle scute divisions. Keep the scute-row convention consistent across the whole shell so the pattern reads as one system rather than separate patches.
- Measure shell width, shell height, head length, and flipper lengths.
- Compare ratios to the hypothetical targets and note differences.
- Correct one proportion at a time and re-measure.
- Darken final outlines and add subtle scute divisions.
Worked example
A student draws a sea turtle with shell width 10 cm and shell height 8 cm. The head length is 4 cm, front flipper length is 4 cm, and rear flipper length is 2 cm. Using the lesson's hypothetical targets, identify which proportions need adjustment and give corrected target lengths.
Worked answer
Shell width-to-height ratio is 10 divided by 8, or 1.25, which is taller than the target 1.4; to match the target, height would be about 7.1 cm (10 divided by 1.4). Head target is one-third of 10 cm, about 3.3 cm, so 4 cm is slightly large. Front flipper target is half of 10 cm, 5 cm, so 4 cm is short. Rear flipper target is one-quarter of 10 cm, 2.5 cm, so 2 cm is slightly short. Corrected targets: shell height about 7.1 cm, head about 3.3 cm, front flippers about 5 cm, rear flippers about 2.5 cm.
Four practice exercises
Exercise 1
A drawing has shell width 12 cm and shell height 9 cm. Calculate the width-to-height ratio and state whether it is flatter or taller than the lesson's hypothetical target of 1.4.
Show answer and check
12 divided by 9 equals about 1.33. This is slightly taller than the target 1.4 (a lower ratio means the shell is relatively taller), but close.
Why: Divide width by height to get the ratio, then compare to 1.4. A ratio below 1.4 means the shell is relatively taller than the target; a ratio above 1.4 means it is flatter.
Check: Recompute 12 divided by 9 with a calculator or long division, confirm the result is about 1.33, and note that 1.33 is less than 1.4, so the shell is taller than the target.
Exercise 2
A shell is 14 cm wide. Using the lesson's hypothetical proportions, find the target head length, front flipper length, and rear flipper length.
Show answer and check
Head length about 4.7 cm, front flipper length about 7 cm, rear flipper length about 3.5 cm.
Why: Head is one-third of shell width: 14 divided by 3 is about 4.7. Front flipper is half: 14 divided by 2 is 7. Rear flipper is one-quarter: 14 divided by 4 is 3.5.
Check: Multiply each result back: 4.7 times 3 is about 14.1, 7 times 2 is 14, and 3.5 times 4 is 14.
Exercise 3
A student draws five central scutes, three costal scutes on the left, and four costal scutes on the right. Using the lesson's convention of four costal scutes per side, how many costal scutes are missing or extra?
Show answer and check
One costal scute is missing on the left; the right side matches the convention.
Why: The convention calls for four per side. Left has three, so one is missing. Right has four, so no change.
Check: Count each side separately and compare to four; total costal scutes should be eight under the convention.
Exercise 4
A drawing has front flipper length 6 cm and rear flipper length 3 cm on a shell 12 cm wide. Check both against the lesson's hypothetical targets and state whether each is correct, short, or long.
Show answer and check
Front flipper target is 6 cm, so 6 cm is correct. Rear flipper target is 3 cm, so 3 cm is correct.
Why: Front target is half of 12, which is 6. Rear target is one-quarter of 12, which is 3. Both match exactly.
Check: Recompute half and one-quarter of 12, then compare to the given lengths.
Common mistakes
- Drawing a tall tortoise-like dome instead of a flatter sea turtle shell. Reduce shell height so width is about 1.4 times height, then re-check with a ruler.
- Making the head too large relative to the shell. Set head length to about one-third of shell width and compare before darkening.
- Scattering scutes randomly instead of in rows. Draw central, costal, and marginal rows in order, keeping gaps small and consistent.
- Drawing front flippers as short as rear flippers. Make front flippers about half shell width and rear flippers about one-quarter shell width.
Self-check rubric
- Shell dome is flatter than a tortoise dome and width-to-height ratio is recorded.
- Scutes are arranged in central, costal, and marginal rows with consistent gaps.
- Front flippers are longer than rear flippers and both are tapered smoothly.
- Head length is compared to shell width using simple arithmetic.
- Final outlines are clear and the scute-row convention is applied consistently across the whole shell.
Questions and answers
Do all sea turtles have the same scute count?
No. Species differ. This lesson uses five central, four costal pairs, and marginal scutes as a drawing convention; check your reference for the species you draw.
Can I change the proportions?
Yes. The ratios here are hypothetical starting points. Measure your reference and adjust while keeping your own drawing consistent.
How do I check my drawing without an image?
Use a ruler or grid to measure shell width, head length, and flipper lengths, then compare the ratios in simple arithmetic.
How do I keep the scute pattern consistent across the shell?
Choose one row convention (for example, five central scutes, four costal scutes per side, and marginal scutes around the rim) and apply it to the whole shell. Keep gaps between scutes small and even, and check each side against the other before darkening outlines.