Free original lessons
Roundabout Drawing: Island, Lanes, and Arrows
Learn to draw a clear roundabout layout with a circular island, lane arrows, and entry and exit points using a simple measured convention.
Free lesson
Four exercises
Worked answers
Object Drawing Lessons
This lesson teaches a repeatable way to draw a roundabout layout on paper. You will place a circular central island, draw a surrounding ring of lanes, add directional arrows, and mark entry and exit points. The convention is explicit: use a pencil, a ruler, and a compass or a round object to trace circles. Measure your own paper and tools, then choose simple numerical values for your drawing. Any values used here are hypothetical examples, not standards. The goal is a readable diagram, not a perfect engineering plan. You will practice proportion, arrow direction, and clear labeling, then check your work with arithmetic and a short rubric.
Practice materials: Printable downloads are not available for this lesson yet. Use the instructions and four exercises below.
Reference illustration
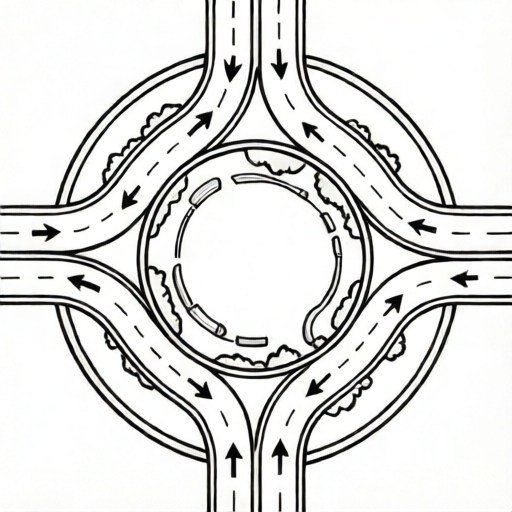
Use the stated measurements and conventions for each exercise.
Set the drawing convention
Before drawing, define your convention on the page. Write a small key: one arrow means traffic direction, a dashed line means a lane boundary, and a solid circle means the central island edge. Choose a scale that fits your paper. For example, if your paper is 20 cm wide, you might use a 4 cm island radius and a 2 cm lane width. These are hypothetical example values; measure your actual paper and adjust.
Use a compass or trace a round object for the island. Mark the center point lightly. Draw the island circle first, then measure outward for the lane ring. Keep all distances in the same unit, such as centimeters. Label the center point C and the island radius r. This makes later checks simple.
- Write a key for arrow direction, lane boundary, and island edge.
- Mark a center point C and draw the island circle with radius r.
- Measure lane width w outward from the island edge and draw the outer lane circle.
- Add entry and exit points at four evenly spaced positions around the ring.
Draw the island and lane ring
The central island is a circle. The lane ring is the space between the island edge and the outer lane circle. If the island radius is 4 cm and the lane width is 2 cm, the outer circle radius is 6 cm. Check: 4 + 2 = 6. Keep the ring width even all the way around by measuring from the island edge, not from the center.
Draw lane boundaries as dashed arcs inside the ring. For a two-lane ring, place one dashed arc halfway across the lane width. If the lane width is 2 cm, the dashed arc sits 1 cm from the island edge. Check: 2 ÷ 2 = 1. Use light pencil so you can adjust.
- Draw the island circle and label its radius r.
- Measure lane width w outward and draw the outer circle with radius r + w.
- Draw a dashed arc at w ÷ 2 from the island edge for a two-lane ring.
- Check that the ring width is the same at the top, bottom, left, and right.
Add lane arrows and entry and exit points
Arrows show traffic direction around the ring. Choose one direction, such as counterclockwise, and keep it consistent. Draw arrows along the dashed lane boundaries, not across them. Each arrow should be short and clear, with a solid head. Place entry points where traffic joins the ring and exit points where traffic leaves. Use small labeled gaps in the outer circle for entries and exits.
For four entries and four exits, space them evenly. If the outer circle radius is 6 cm, the circumference is about 2 × 3.14 × 6 = 37.68 cm. Four equal gaps are about 37.68 ÷ 4 = 9.42 cm apart along the circle. These are hypothetical example values; measure your own drawing. Label entries E1 to E4 and exits X1 to X4.
- Choose one traffic direction and draw short arrows along the ring.
- Mark four entry gaps and four exit gaps on the outer circle.
- Label entries and exits clearly with a key.
- Check that every arrow points the same way around the island.
Check and refine the layout
Check proportions with simple arithmetic. If r = 4 cm and w = 2 cm, the outer radius is 6 cm. The island diameter is 8 cm and the outer diameter is 12 cm. Check: 2 × 4 = 8 and 2 × 6 = 12. The ring width should equal w everywhere. Use a ruler to spot-check four directions.
Check arrow direction by tracing one full loop with your finger. Every arrow should agree. Check labels: each entry and exit should have a unique name. Erase stray lines and darken final lines. A valid alternative is to use a different island radius or lane width, as long as the arithmetic and labels stay consistent.
- Measure the island radius and outer radius and confirm r + w.
- Trace one full loop and confirm all arrows agree.
- Confirm each entry and exit has a unique label.
- Erase construction lines and darken final lines.
Worked example
Draw a roundabout with island radius 3 cm and lane width 1.5 cm. Add four evenly spaced entries and exits and one direction of arrows. Show the arithmetic for the outer radius and the halfway lane boundary.
Worked answer
Outer radius = 3 + 1.5 = 4.5 cm. Halfway lane boundary = 1.5 ÷ 2 = 0.75 cm from the island edge. Island diameter = 6 cm; outer diameter = 9 cm. Draw the island circle, the outer circle, one dashed arc at 0.75 cm from the island edge, four labeled entry gaps, four labeled exit gaps, and short arrows all pointing the same way around the ring.
Four practice exercises
Exercise 1
A drawing has island radius 5 cm and lane width 2 cm. What is the outer radius, and where should a single dashed lane boundary sit if the ring has two lanes?
Show answer and check
Outer radius = 7 cm. The dashed boundary sits 1 cm from the island edge.
Why: Add island radius and lane width: 5 + 2 = 7 cm. For two lanes, divide lane width by two: 2 ÷ 2 = 1 cm.
Check: Measure the outer circle from the center and confirm it is 7 cm. Measure the dashed arc from the island edge and confirm it is 1 cm.
Exercise 2
An outer circle has radius 6 cm. Estimate the circumference using 3.14 for pi, then divide by four to find the spacing for four equal entry gaps.
Show answer and check
Circumference is about 37.68 cm; each gap is about 9.42 cm apart along the circle.
Why: Circumference = 2 × 3.14 × 6 = 37.68 cm. Four equal spacings: 37.68 ÷ 4 = 9.42 cm.
Check: Use a string or flexible ruler along the outer circle, mark four equal lengths, and confirm each is about 9.42 cm.
Exercise 3
A student draws arrows clockwise on the top half and counterclockwise on the bottom half. Describe the fix and the check.
Show answer and check
Choose one direction, redraw every arrow to match it, then trace one full loop with a finger to confirm all arrows agree.
Why: A roundabout drawing needs one consistent traffic direction. Mixed arrows make the layout unreadable.
Check: Trace the ring once and confirm each arrow points the same way as the next.
Exercise 4
A drawing uses island radius 4 cm and lane width 3 cm, but the outer circle is drawn at 6 cm. Find the error and state the correct outer radius.
Show answer and check
The outer radius should be 7 cm, not 6 cm.
Why: Outer radius = island radius + lane width = 4 + 3 = 7 cm. The drawn value 6 cm is 1 cm too small.
Check: Measure the island radius and lane width, add them, and compare with the measured outer radius.
Common mistakes
- Measuring lane width from the center instead of the island edge. Measure outward from the island edge so the ring width stays even.
- Drawing arrows in both directions around the ring. Choose one direction and redraw every arrow to match it.
- Using different units for radius and lane width. Convert all measurements to one unit, such as centimeters, before drawing.
- Placing entries and exits unevenly without labeling them. Space them evenly or state your spacing rule, and label each one uniquely.
Self-check rubric
- Island is a clear circle with a labeled center and radius.
- Outer circle radius equals island radius plus lane width, checked by arithmetic.
- Lane boundaries are dashed and evenly spaced within the ring.
- All arrows show one consistent direction around the island.
- Four entries and four exits are labeled uniquely and placed clearly.
- Final drawing is neat, with construction lines erased and a written key.
Questions and answers
Do I need a compass?
No. You can trace a round object, but measure its radius first so your arithmetic stays consistent.
Can I use different numerical values?
Yes. The values here are hypothetical examples. Measure your paper and choose values that fit, then check r + w.
How many lanes should the ring have?
Two lanes are enough for this lesson. If you draw more, add dashed boundaries at equal spacing and check the arithmetic.
What if my arrows are not perfectly curved?
Short straight arrows along the ring are acceptable if they clearly show one consistent direction.