Free original lessons
Flower Shading Drawing: Light Source, Petal Gradient, Cast Shadow
Learn to shade a flower from a defined light source, build a petal gradient, and place a believable cast shadow using simple, checkable steps.
Free lesson
Four exercises
Worked answers
Object Drawing Lessons
This lesson teaches flower shading drawing with one clearly defined light source. You will place a light-source arrow, divide each petal into light, mid and dark zones, blend a smooth gradient, and add a cast shadow that agrees with the arrow. The convention is simple: light travels in straight lines from the arrow, so surfaces facing the arrow are lighter and surfaces turned away are darker. Petal shapes and lettering styles vary, so the rubric rewards consistent logic rather than one universal drawing. All measurements below are hypothetical examples; measure your own paper and tools before relying on any number.
Practice materials: Printable downloads are not available for this lesson yet. Use the instructions and four exercises below.
Reference illustration
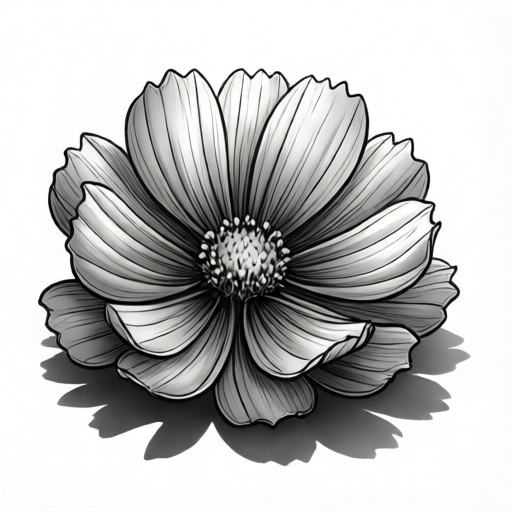
Use the stated measurements and conventions for each exercise.
Set the light source and petal zones
Draw or trace a flower outline with five to eight petals on plain paper. Place a small arrow at the top-left of the page pointing toward the flower; this is the only light source for the drawing. Keep the arrow visible so every shading decision can be checked against it.
For each petal, mark three zones with light pencil: a light zone on the edge facing the arrow, a mid zone across the middle, and a dark zone on the edge turned away. On a petal facing the arrow directly, the light zone is wide; on a petal turned sideways, the light zone narrows to a thin strip. This is the petal gradient plan.
- Draw the flower outline and the light-source arrow.
- Mark light, mid and dark zones on every petal with light pencil.
- Check that each light zone faces the arrow and each dark zone faces away.
- Label one petal L, M and D as a reference key.
Build the petal gradient
Shade the dark zone first with gentle pressure, then the mid zone, then the light zone, leaving the lightest area almost untouched. Blend where zones meet by shading in small overlapping strokes rather than rubbing hard. The goal is a gradual change from light to dark across each petal, not three separate stripes.
Keep the direction of your strokes consistent within a petal, following the petal's length. If a petal curls, the curl's outer edge catches more light, so adjust the light zone to follow the curl. Compare neighbouring petals: petals closer to the arrow should generally be lighter overall than petals farther away.
- Shade the dark zone with light pressure.
- Shade the mid zone and overlap slightly into the dark zone.
- Leave the light zone mostly clear, adding only faint tone near the mid zone.
- Blend the boundaries with small strokes and recheck against the arrow.
Add the cast shadow
A cast shadow falls on the surface beneath the flower, opposite the light source. If the arrow points from the top-left, the cast shadow extends toward the bottom-right. Draw its outline lightly, then shade it darkest where the flower meets the surface and lighter as it spreads outward.
The cast shadow should not touch the light zone of any petal. Leave a small gap of unshaded surface between the flower's light side and the shadow. Check the shadow's direction against the arrow: a straight line from the arrow through the flower should continue into the shadow.
- Draw a light outline for the cast shadow opposite the arrow.
- Shade darkest at the flower base and fade outward.
- Keep a clear gap on the light side of the flower.
- Recheck the shadow direction with a straight edge.
Refine and self-check
Step back and squint at the drawing. The light side should read as a group of lighter petals and the dark side as a group of darker petals. If one petal looks reversed, its light zone is probably facing away from the arrow; correct the zone rather than adding more shading.
Finally, strengthen the darkest accents only where petals overlap or curl away from the light. Avoid dark outlines around every petal, which flatten the flower. A useful check is to cover the arrow and ask whether a viewer could still guess the light direction from the shading alone.
- Squint to compare light and dark groups of petals.
- Fix any petal whose zones face the wrong way.
- Add dark accents only at overlaps and curls.
- Cover the arrow and test whether the light direction is still readable.
Worked example
A flower with six petals sits on a page. The light-source arrow is at the top-left pointing down-right. Petal A faces the arrow directly, petal B is turned sideways, and petal C faces away. Describe the zones and the cast shadow direction.
Worked answer
Petal A has a wide light zone on its upper-left edge, a mid zone across the middle and a narrow dark zone on its lower-right edge. Petal B has a thin light strip on its upper-left edge, a broad mid zone and a dark zone on its lower-right side. Petal C has a very narrow light edge, a small mid zone and a wide dark zone facing away from the arrow. The cast shadow extends toward the bottom-right, darkest at the flower base and fading outward, with a clear gap on the upper-left light side.
Four practice exercises
Exercise 1
A flower has four petals. The light-source arrow is at the top-right pointing down-left. Petal 1 faces the arrow, petal 2 is sideways, petal 3 faces away, and petal 4 is partly hidden behind petal 1. State where the light zone of each visible petal should be and which direction the cast shadow extends.
Show answer and check
Petal 1: light zone on its upper-right edge. Petal 2: thin light strip on its upper-right edge. Petal 3: very narrow light edge on its upper-right side, with a wide dark zone facing away. Petal 4: light zone on its upper-right edge where visible, but its lower-left area is darkened by petal 1's shadow. The cast shadow extends toward the bottom-left.
Why: Light travels from the arrow, so surfaces facing the top-right are lighter. The cast shadow falls opposite the arrow, toward the bottom-left. A petal hidden behind another receives less light on the side facing the front petal.
Check: Draw a straight line from the arrow through the flower centre; confirm the cast shadow continues on the opposite side. Then check that each light zone faces the arrow.
Exercise 2
A student shades a flower with the arrow at the top-left but draws the cast shadow toward the top-left. They also give every petal a wide light zone on its top-left edge. Identify two errors and give one correction for each.
Show answer and check
Error 1: the cast shadow points toward the light source. Correction: redraw it toward the bottom-right, opposite the arrow. Error 2: every petal has the same wide light zone, even petals turned away. Correction: narrow the light zone on petals turned away and widen the dark zone on their far side.
Why: The cast shadow must fall opposite the light source. A petal turned away from the arrow presents less surface to the light, so its light zone should be narrower than a petal facing the arrow.
Check: Use a straight edge from the arrow through the flower to verify shadow direction. Compare each petal's light-zone width with its orientation to the arrow.
Exercise 3
A flower is drawn on a page 20 cm wide and 25 cm tall. The flower outline occupies a 10 cm by 10 cm square in the upper-left area. The light-source arrow is at the top-left. Describe a sensible placement for the cast shadow and state one measurement you would check on your own paper before finalising it.
Show answer and check
The cast shadow should extend from the flower base toward the bottom-right, staying within the page. A sensible placement is a shadow roughly 8 cm long and 5 cm wide, fading outward, with a clear gap on the flower's upper-left side. Before finalising, measure the actual distance from the flower base to the page edge on your own paper to confirm the shadow fits.
Why: The shadow must lie opposite the top-left arrow, so bottom-right is correct. The 8 cm by 5 cm size is a hypothetical example; the real check is whether the shadow fits the measured page.
Check: Measure the flower base to page edge distance with a ruler and compare it with your planned shadow length. Confirm the shadow does not cross the flower's light side.
Exercise 4
A flower has five petals. The arrow is at the top-left. Petal 1 is nearest the arrow, petal 5 is farthest. A student makes petal 5 lighter overall than petal 1. Is this consistent with the light source? Explain and give a correction.
Show answer and check
No. Petal 1 is nearer the arrow and should generally be lighter overall than petal 5. Correction: lighten petal 1's light and mid zones and darken petal 5's mid and dark zones so the overall tone increases with distance from the arrow.
Why: With one light source, surfaces closer to and facing the light receive more light. A farther petal turned away should read darker overall, even if it has a small light edge.
Check: Squint at the drawing: the group of petals nearest the arrow should read lighter than the group farthest away. If not, adjust the overall tone of the two groups.
Common mistakes
- Shading every petal with the same light-to-dark direction regardless of the arrow. Re-mark each petal's light zone so it faces the arrow, then rebuild the gradient from that zone.
- Making the cast shadow point toward the light source. Draw a straight line from the arrow through the flower; the shadow must continue on the opposite side.
- Creating three hard stripes instead of a gradient. Overlap the zones and blend with small strokes so the transition is gradual.
- Outlining every petal with a dark line. Remove or soften outlines and use darker tone only at overlaps and curled edges.
Self-check rubric
- Light-source arrow is drawn and visible.
- Every petal has a light zone facing the arrow and a dark zone facing away.
- Each petal shows a gradual gradient rather than three hard stripes.
- The cast shadow lies opposite the arrow and is darkest at the flower base.
- A clear gap separates the cast shadow from the flower's light side.
- Dark accents appear only at overlaps or curled edges, not as outlines around every petal.
- Valid alternatives are accepted when the light logic is consistent, even if petal shapes or stroke styles differ.
Questions and answers
How many petals should the flower have?
Five to eight petals is manageable for a first attempt. More petals mean more zones to check, but the same light-source logic applies.
Can I use a different light direction?
Yes. Choose any direction, draw the arrow, and keep every zone and the cast shadow consistent with it. The rubric checks consistency, not a fixed direction.
Do I need special pencils?
No. One pencil and a blending tool such as a fingertip or soft paper will work. Measure your own paper size before planning the layout.
How dark should the cast shadow be?
Darkest at the flower base and lighter outward. It should be clearly darker than the surface but not darker than the darkest petal accents.