Free original lessons
Shelter Drawing: Front and Side Views with Roof and Door
Learn to draw a simple shelter in front and side views, placing roof and door correctly using a clear convention and checkable steps.
Free downloads
Letter & A4
PDF & SVG
Object Drawing Lessons
This lesson teaches a reliable method for drawing a simple shelter in two orthographic views: front and side. You will use a defined convention for scale and alignment, place the roof and door consistently, and check your work with simple arithmetic. The focus is on construction logic, not artistic style, so valid alternatives are allowed when they follow the stated convention.
Practice materials: Download the free reference pages, practice sheets and separate answer keys below, in A4 and US Letter PDF and SVG formats.
Set the convention and plan the layout
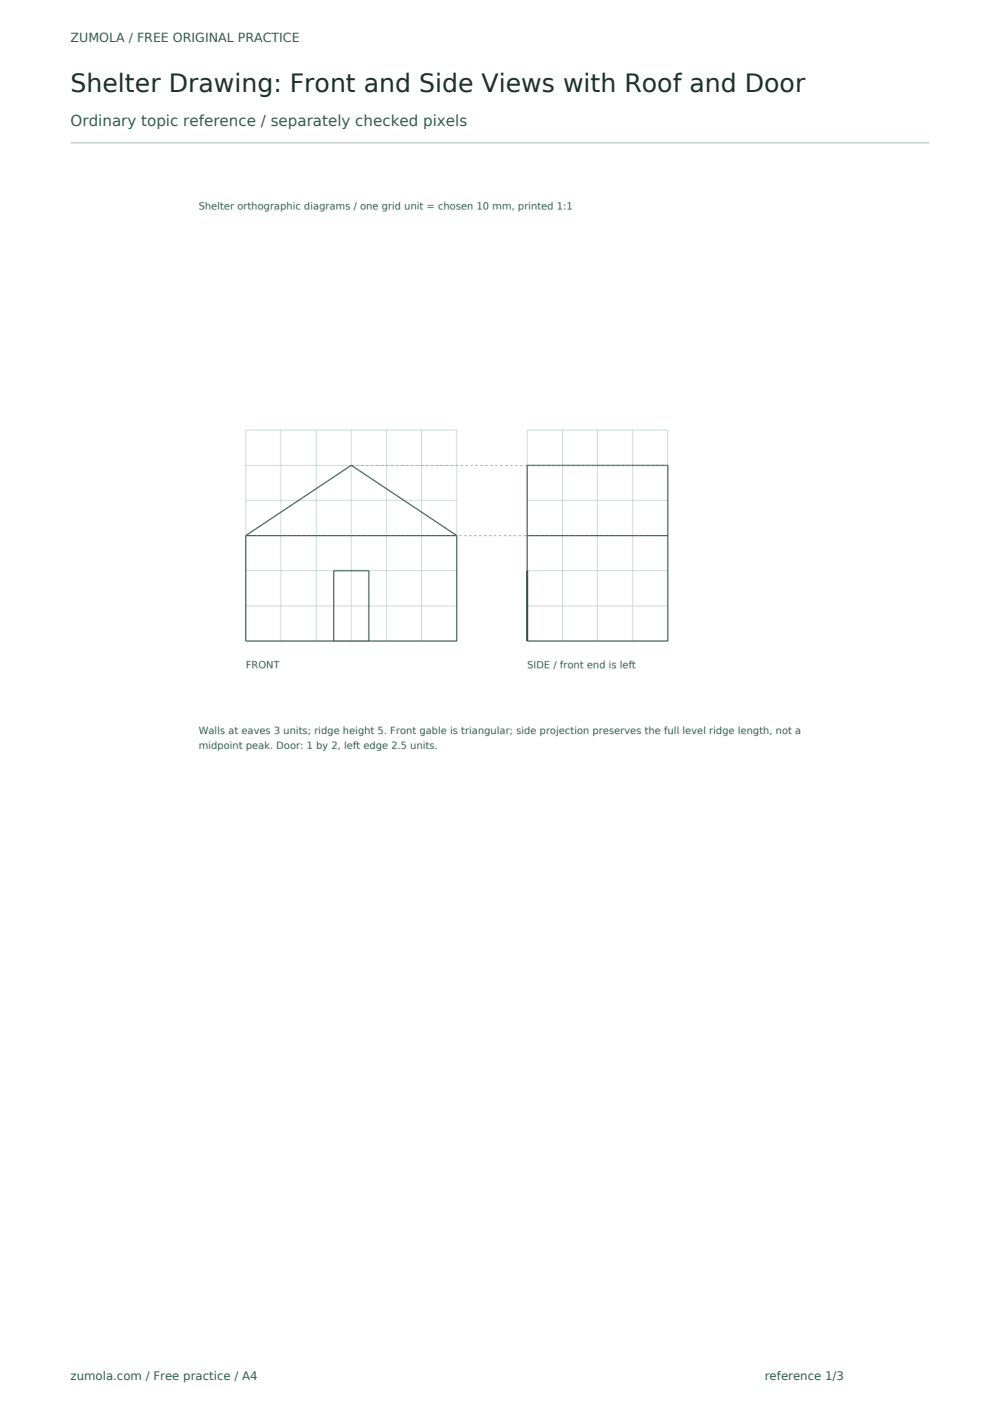
Use a single scale for both views. For this lesson, treat one grid square as one unit. A hypothetical example shelter is 6 units wide (front view), 4 units deep (side view), 3 units tall to the eaves, and the roof rises 2 units above the eaves. These numbers are examples only; measure your own equipment if you print later.
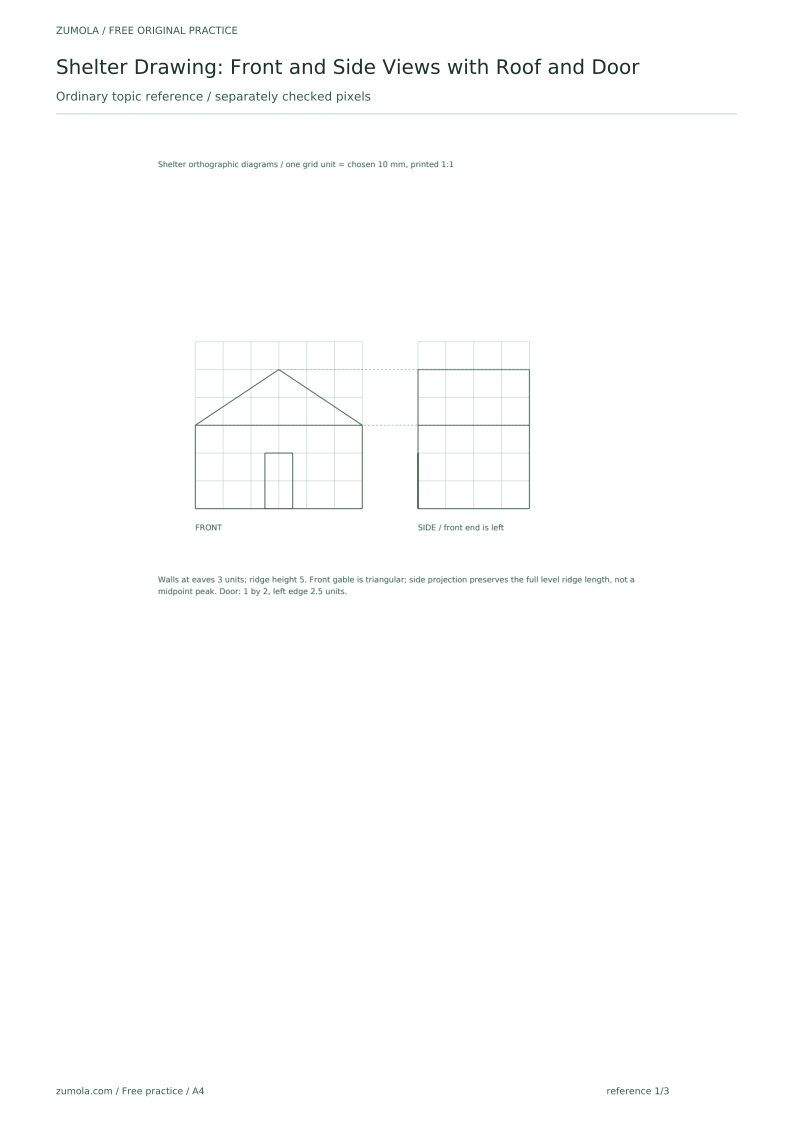
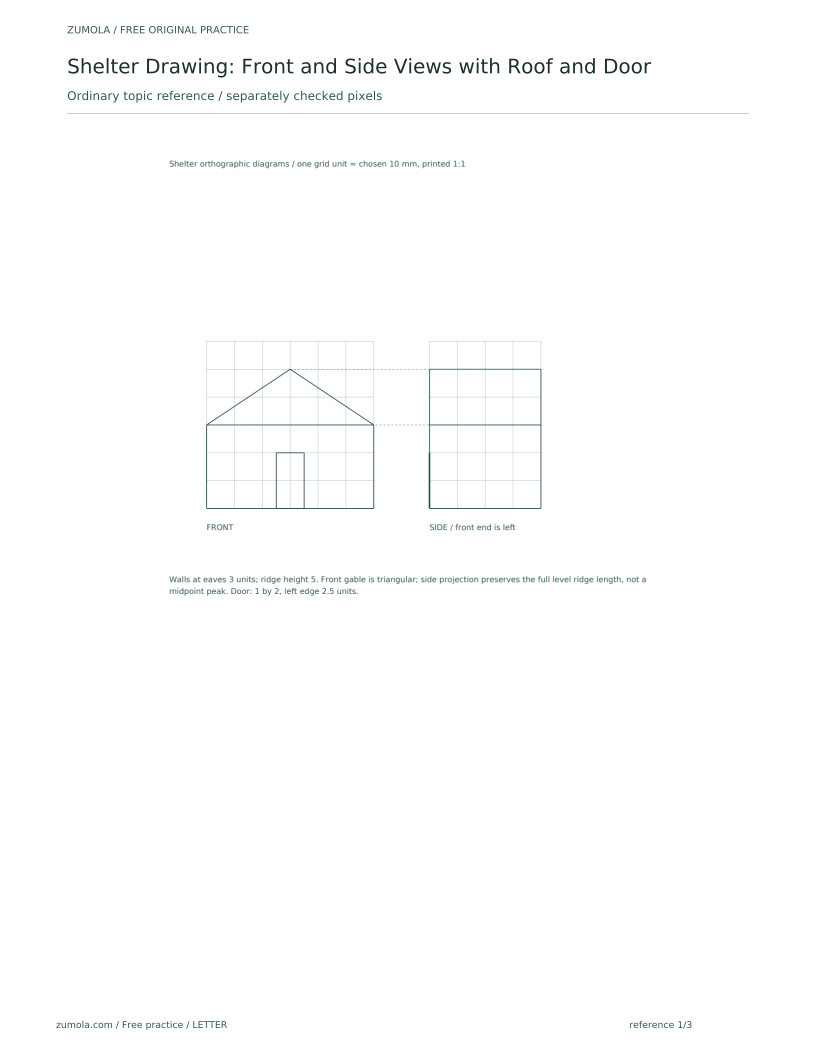
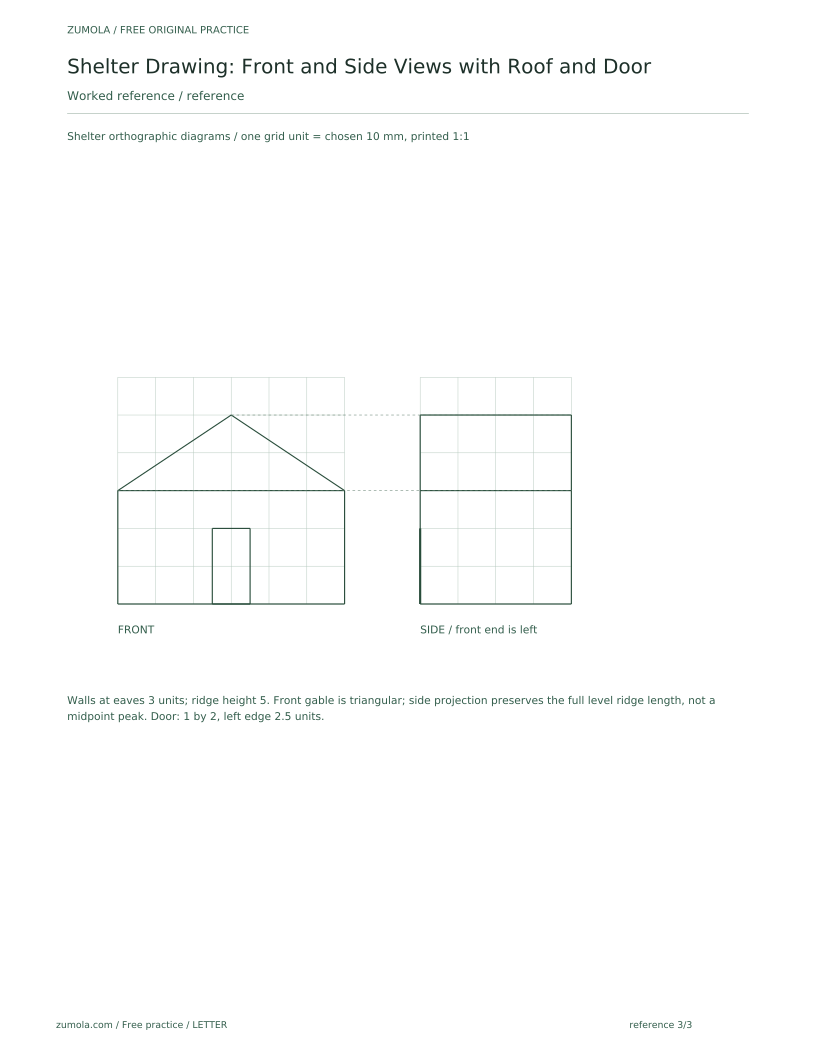
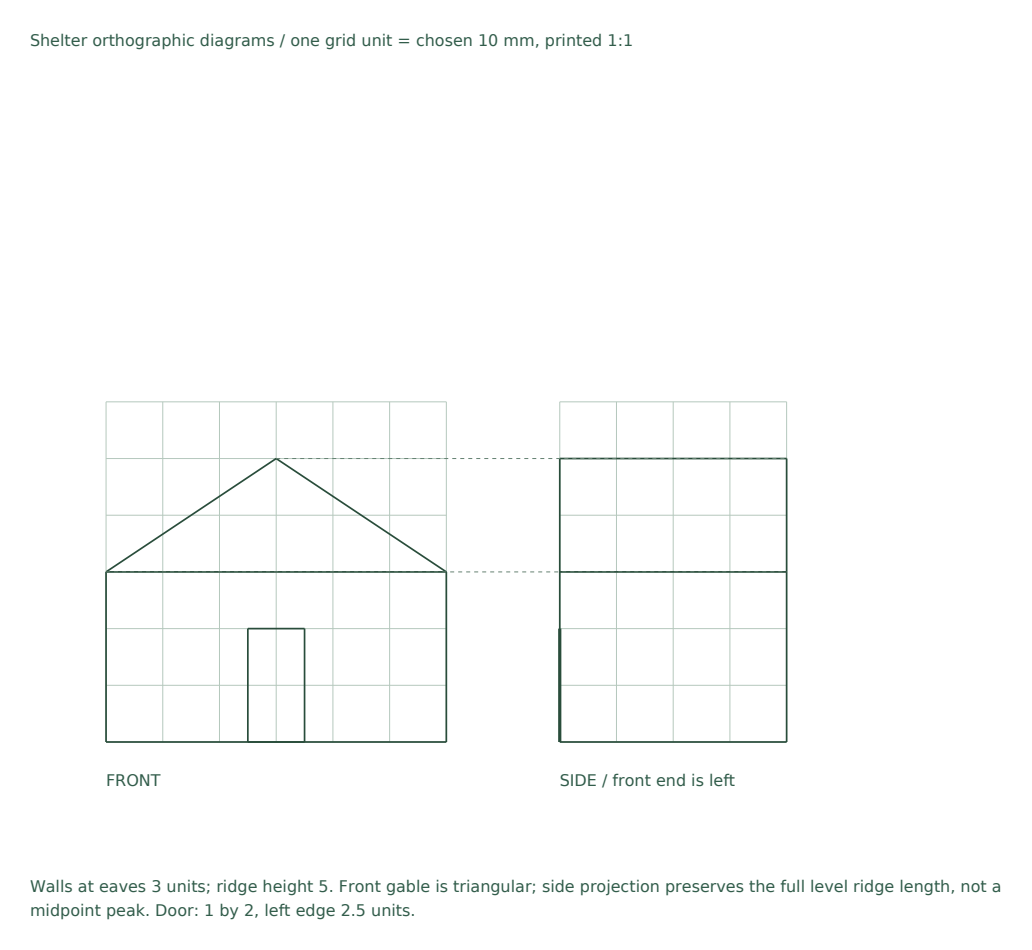
Place the front view on the left and the side view on the right, separated by at least 2 units. Align the ground line across both views so heights match. The front view shows width and height; the side view shows depth and height. For a gable roof with the ridge running front-to-back, the front view looks along the ridge and shows the triangular gable. The side view looks across the ridge: its two ridge endpoints remain separated by the shelter depth, giving a horizontal ridge at eaves height plus roof rise. The side roof profile is a rectangle from eaves to ridge, not another triangle.
- Draw a horizontal ground line across the page.
- Mark the front view width (6 units) and the side view depth (4 units) on the ground line.
- Draw vertical height lines at 3 units for the eaves in both views.
- Add the roof rise of 2 units above the eaves, keeping the peak centered in the front view.
Draw the front view: walls, roof, and door
The front view is a rectangle 6 units wide and 3 units tall, with a roof above. For a simple gable roof, draw a triangle with its base equal to the wall width and its peak 2 units above the eaves. The door is a rectangle on the front wall. A hypothetical door is 1 unit wide and 2 units tall, centered on the wall, with its bottom on the ground line.
Check alignment: the door’s center should match the roof peak’s center. The door height (2 units) must be less than the wall height (3 units). The roof base must equal the wall width (6 units). These checks catch common placement errors.
- Draw the 6 by 3 rectangle for the front wall.
- Draw the roof triangle with base 6 and peak 2 units above the eaves.
- Mark the door center at 3 units from either side.
- Draw the door 1 unit wide and 2 units tall, bottom on the ground line.
Draw the side view: depth, horizontal ridge, and door edge
The side wall is 4 units deep and 3 units tall. With the gable ridge running front-to-back, the side projection retains that 4-unit ridge length: draw a horizontal ridge 2 units above the eaves, at total height 5 units, with a vertical roof end at each end of the depth. The side roof profile is a rectangle, not a triangular peak at the depth midpoint. A door on the front wall projects as a vertical edge at the front end of the side view; its widthwise offset is not a depth coordinate and does not move that edge away from the front end.
Keep heights consistent: the eaves line in the side view must match the eaves line in the front view. The door’s top edge in the side view should align with the door’s top edge in the front view. Use the same scale for both views.
- Draw the 4 by 3 rectangle for the side wall.
- Draw a horizontal ridge across the 4-unit depth, 2 units above the eaves.
- Connect each ridge endpoint vertically to its corresponding eaves endpoint, forming the side roof rectangle.
- Draw the door edge as a vertical line at the front edge, 2 units tall.
Check and refine with arithmetic
Verify all dimensions with simple arithmetic. Front wall area: 6 times 3 equals 18 square units. Door area: 1 times 2 equals 2 square units. Roof triangle area: half of 6 times 2 equals 6 square units. Side wall area: 4 times 3 equals 12 square units. These checks confirm your drawing matches the stated convention.
If your roof peak is not centered, measure from each side to the peak; the two distances should be equal. If the door is not centered, measure from each side to the door; the two distances should be equal. Valid alternatives include a flat roof or a door offset to one side, as long as you state the convention and keep both views consistent.
- Measure the front width and confirm it equals 6 units.
- Measure the door width and height and confirm 1 and 2 units.
- Measure the roof rise and confirm 2 units above the eaves.
- Confirm the side depth is 4 units and the eaves height matches the front view.
Worked example
Draw a simple shelter with a gable roof in front and side views. Use a scale of one grid square per unit. The shelter is 6 units wide, 4 units deep, 3 units tall to the eaves, and the roof rises 2 units. The door is 1 unit wide and 2 units tall, centered on the front wall. Describe the drawing and check the dimensions.
Worked answer
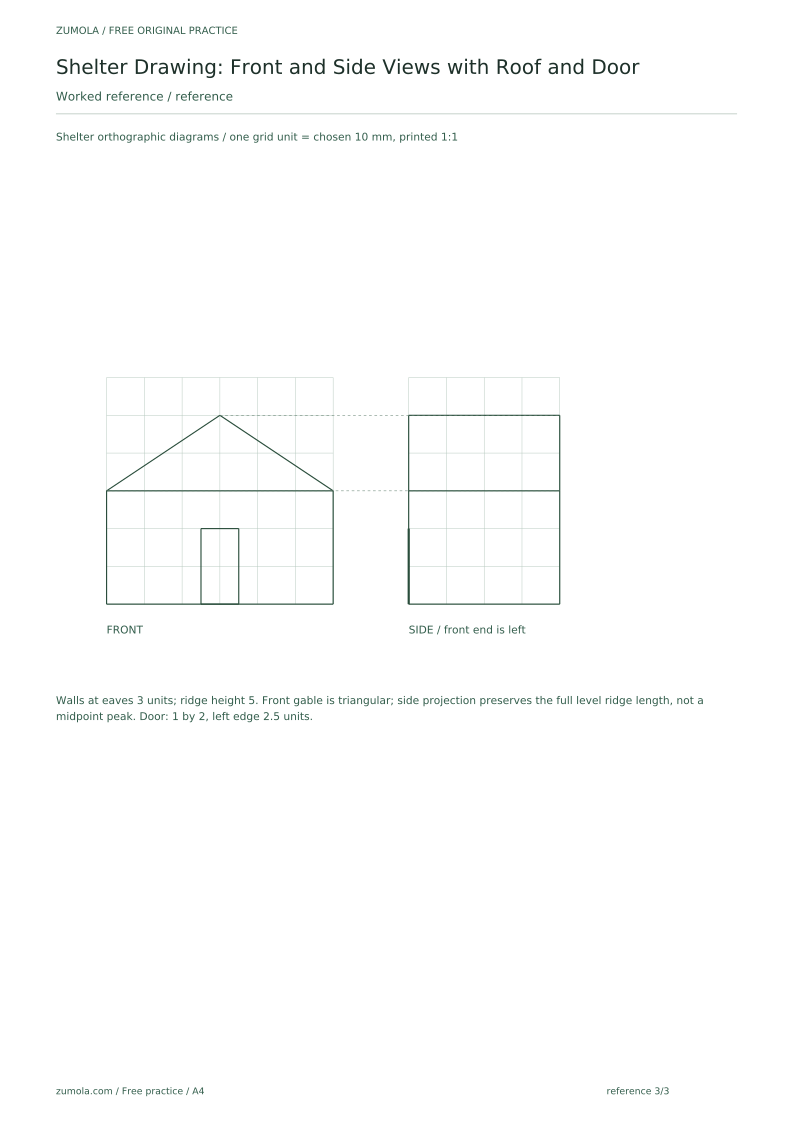
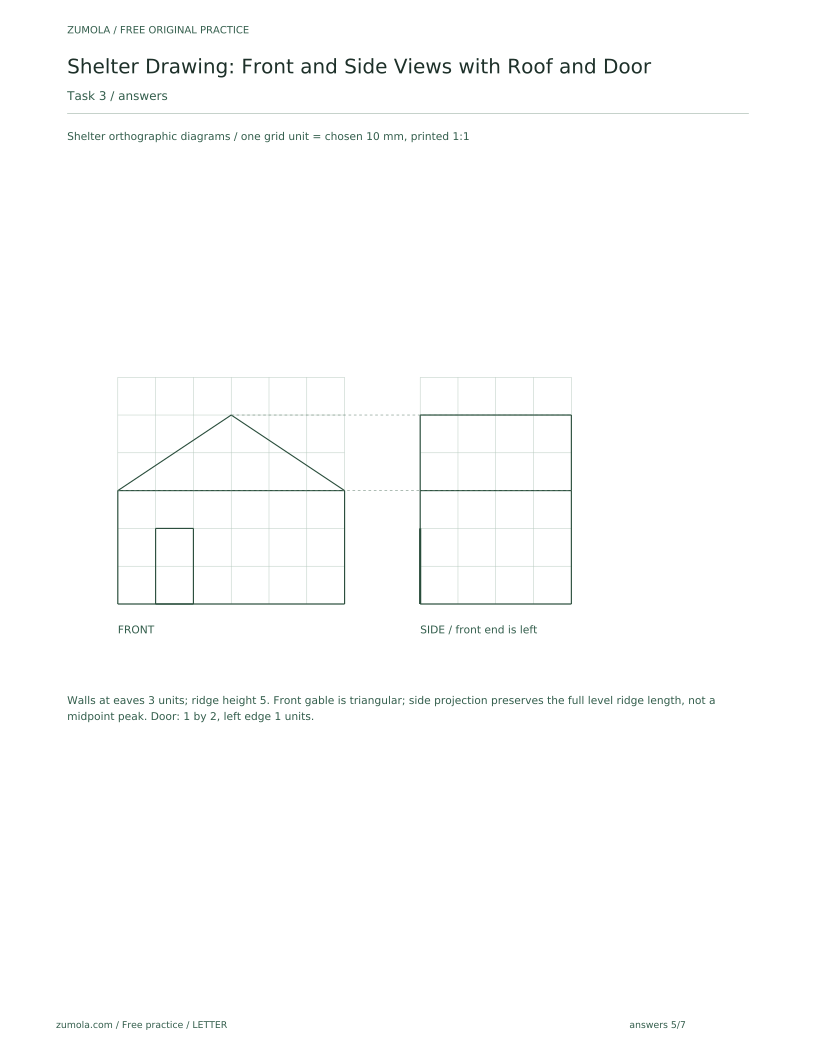
Front view: a 6 by 3 wall rectangle, triangular gable of base 6 and rise 2, and a centered 1 by 2 door with bottom on the ground. Side view: a 4 by 3 wall rectangle; above its eaves, a rectangular roof profile 4 units long and 2 units high, with a horizontal ridge at total height 5. The front-wall door is a vertical edge at the front end. Check front wall area 18, door area 2, front roof triangle area 6 and side wall area 12; the door center aligns with the front gable center, and both views have eaves height 3 and ridge height 5.
Four practice exercises
Exercise 1
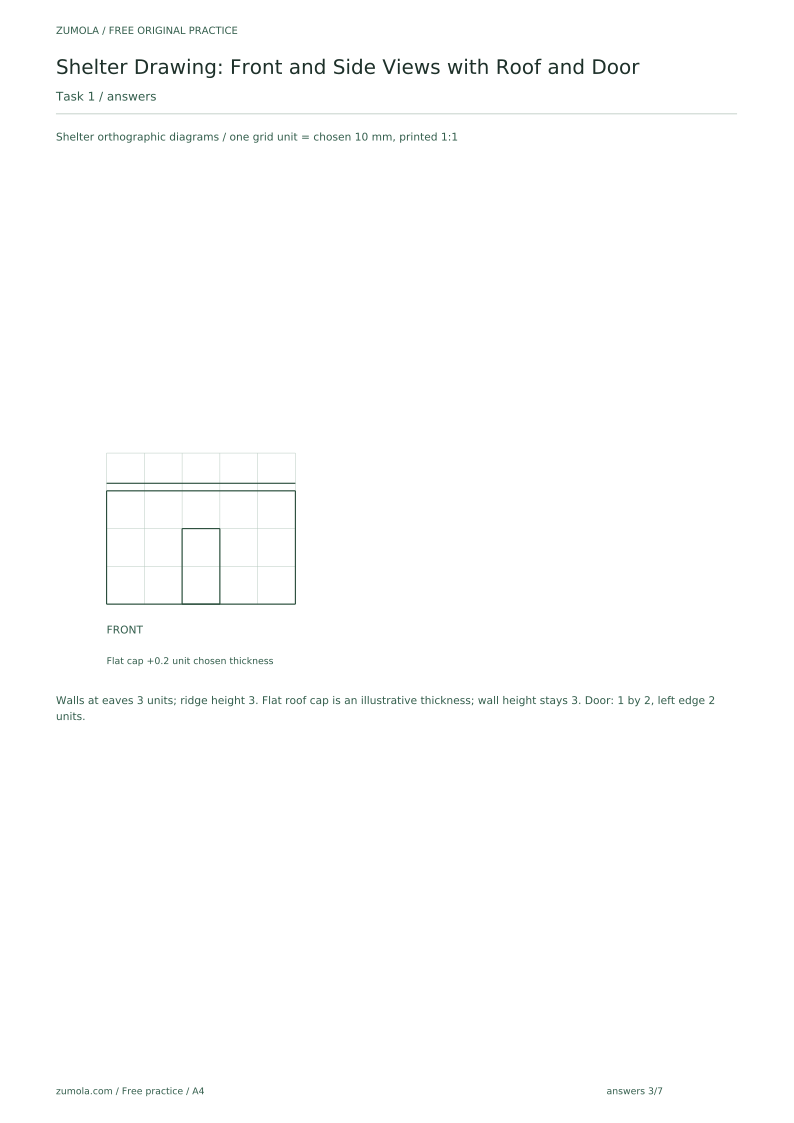
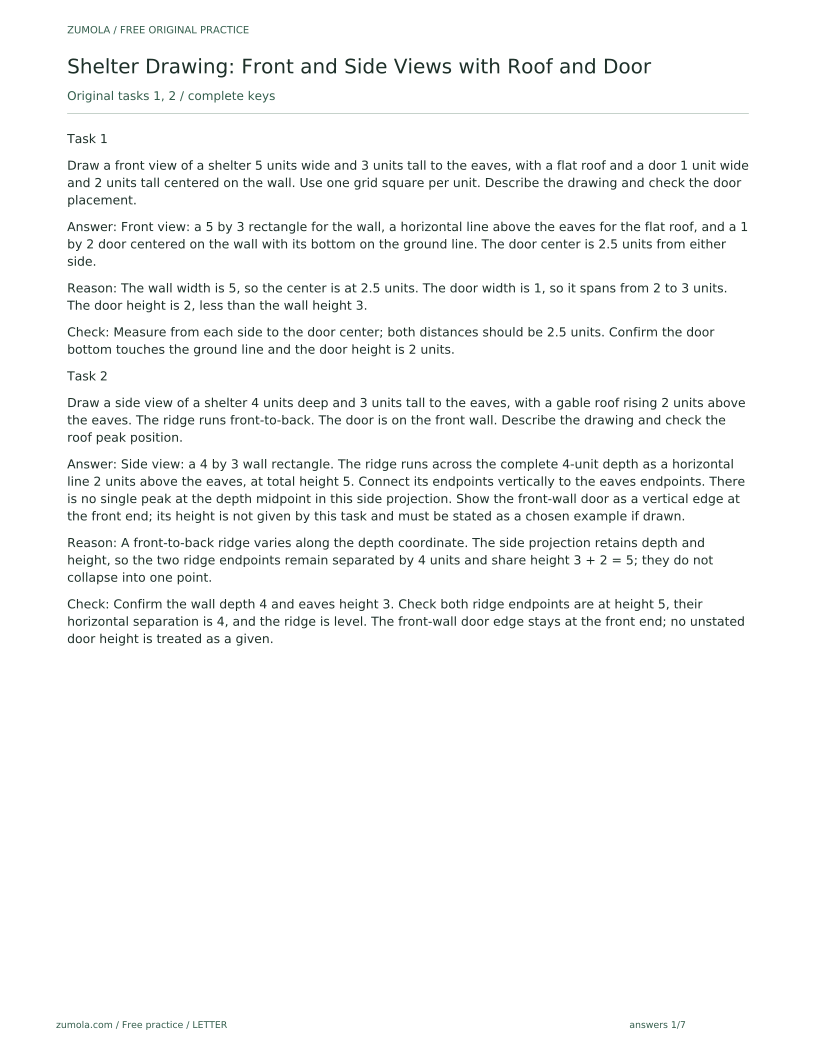
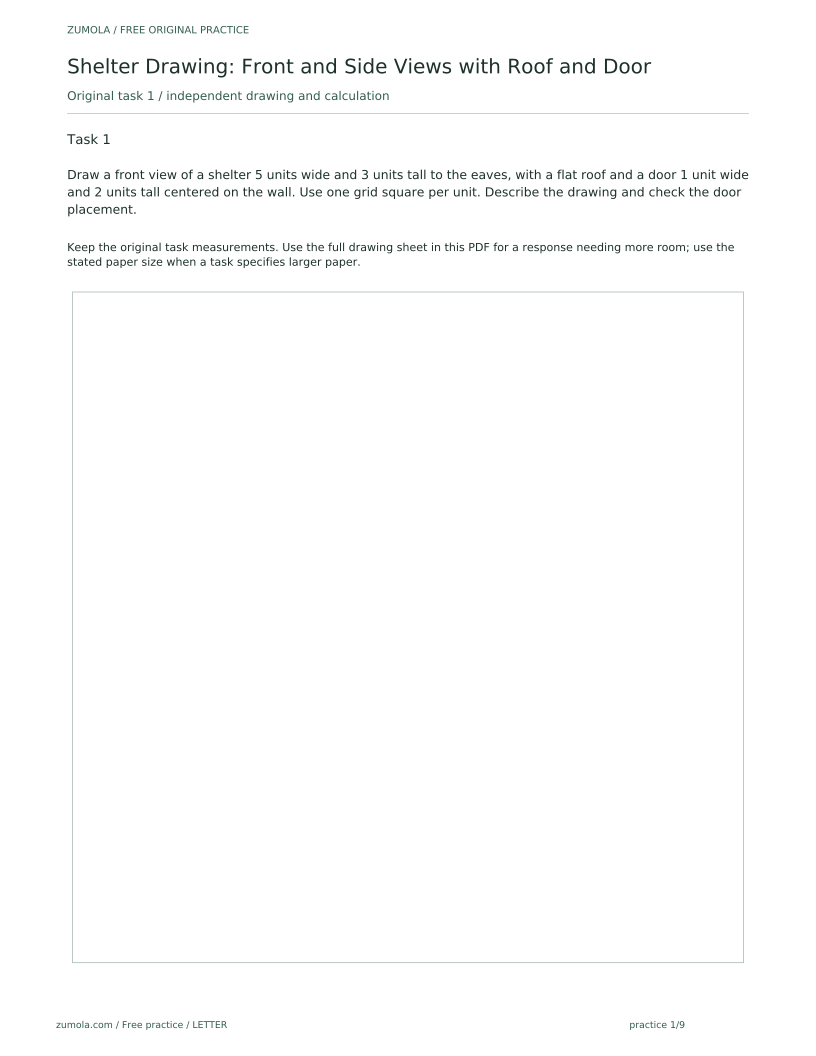
Draw a front view of a shelter 5 units wide and 3 units tall to the eaves, with a flat roof and a door 1 unit wide and 2 units tall centered on the wall. Use one grid square per unit. Describe the drawing and check the door placement.
Show answer and check
Front view: a 5 by 3 rectangle for the wall, a horizontal line above the eaves for the flat roof, and a 1 by 2 door centered on the wall with its bottom on the ground line. The door center is 2.5 units from either side.
Why: The wall width is 5, so the center is at 2.5 units. The door width is 1, so it spans from 2 to 3 units. The door height is 2, less than the wall height 3.
Check: Measure from each side to the door center; both distances should be 2.5 units. Confirm the door bottom touches the ground line and the door height is 2 units.
Exercise 2
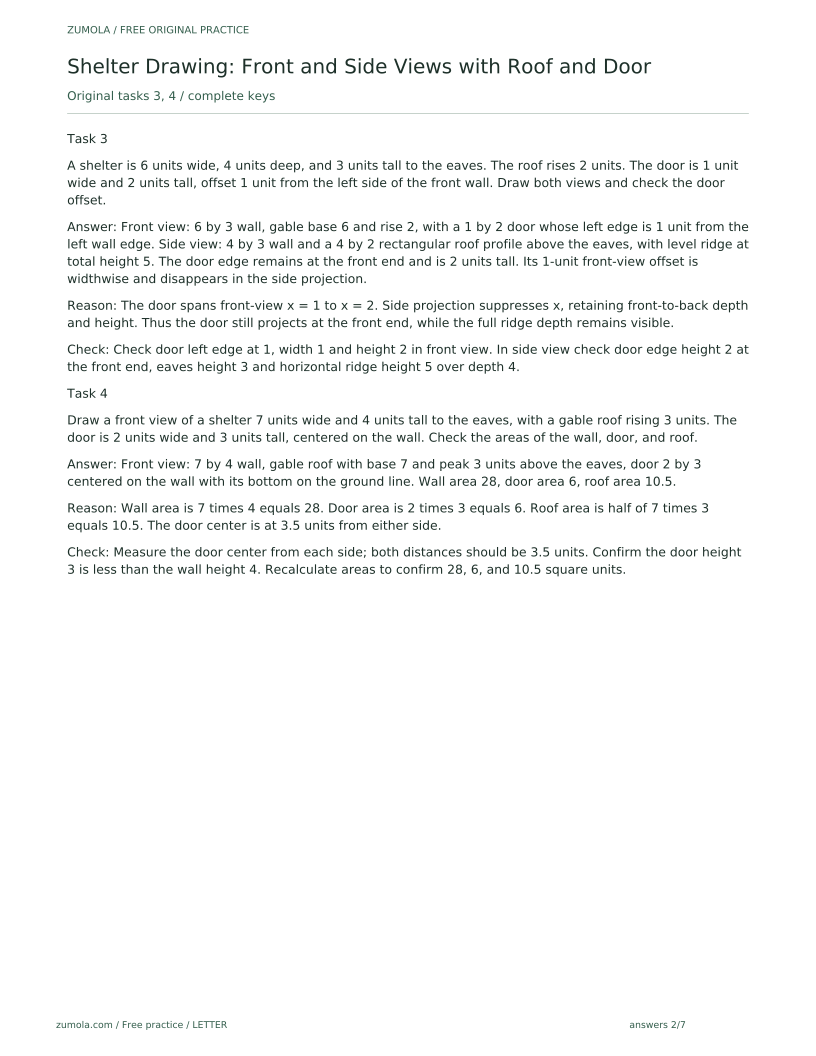
Draw a side view of a shelter 4 units deep and 3 units tall to the eaves, with a gable roof rising 2 units above the eaves. The ridge runs front-to-back. The door is on the front wall. Describe the drawing and check the roof peak position.
Show answer and check
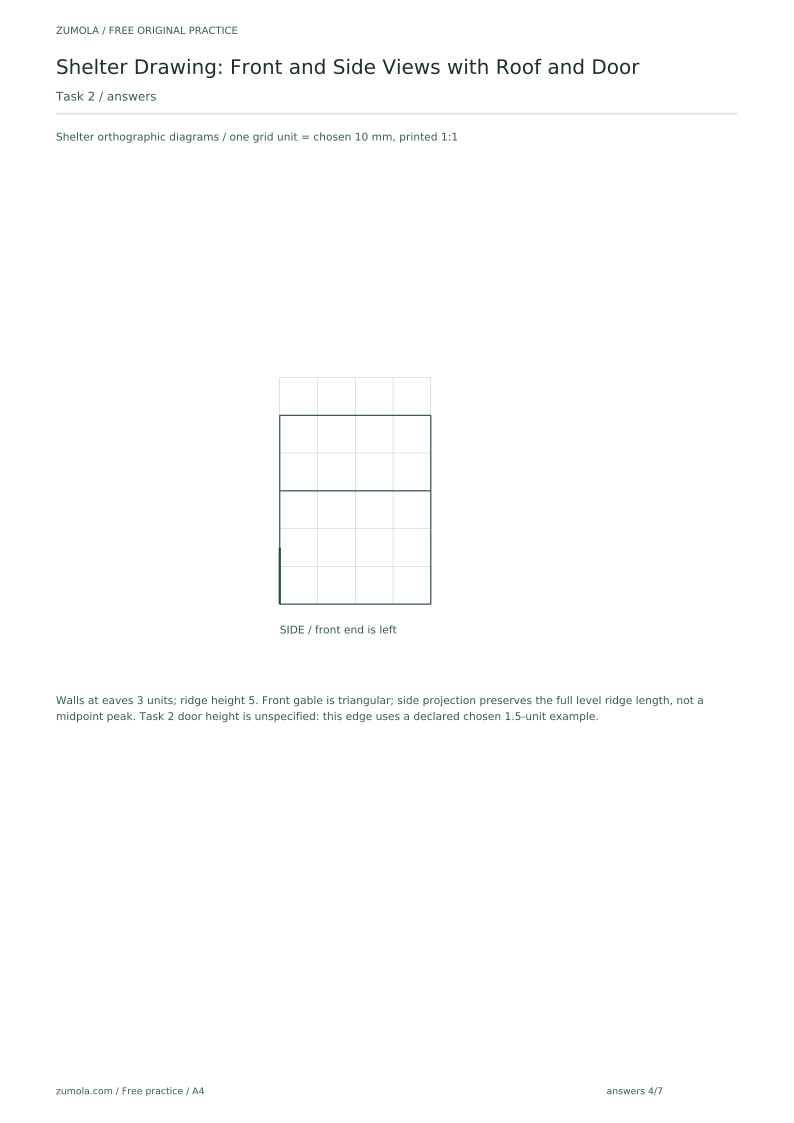
Side view: a 4 by 3 wall rectangle. The ridge runs across the complete 4-unit depth as a horizontal line 2 units above the eaves, at total height 5. Connect its endpoints vertically to the eaves endpoints. There is no single peak at the depth midpoint in this side projection. Show the front-wall door as a vertical edge at the front end; its height is not given by this task and must be stated as a chosen example if drawn.
Why: A front-to-back ridge varies along the depth coordinate. The side projection retains depth and height, so the two ridge endpoints remain separated by 4 units and share height 3 + 2 = 5; they do not collapse into one point.
Check: Confirm the wall depth 4 and eaves height 3. Check both ridge endpoints are at height 5, their horizontal separation is 4, and the ridge is level. The front-wall door edge stays at the front end; no unstated door height is treated as a given.
Exercise 3
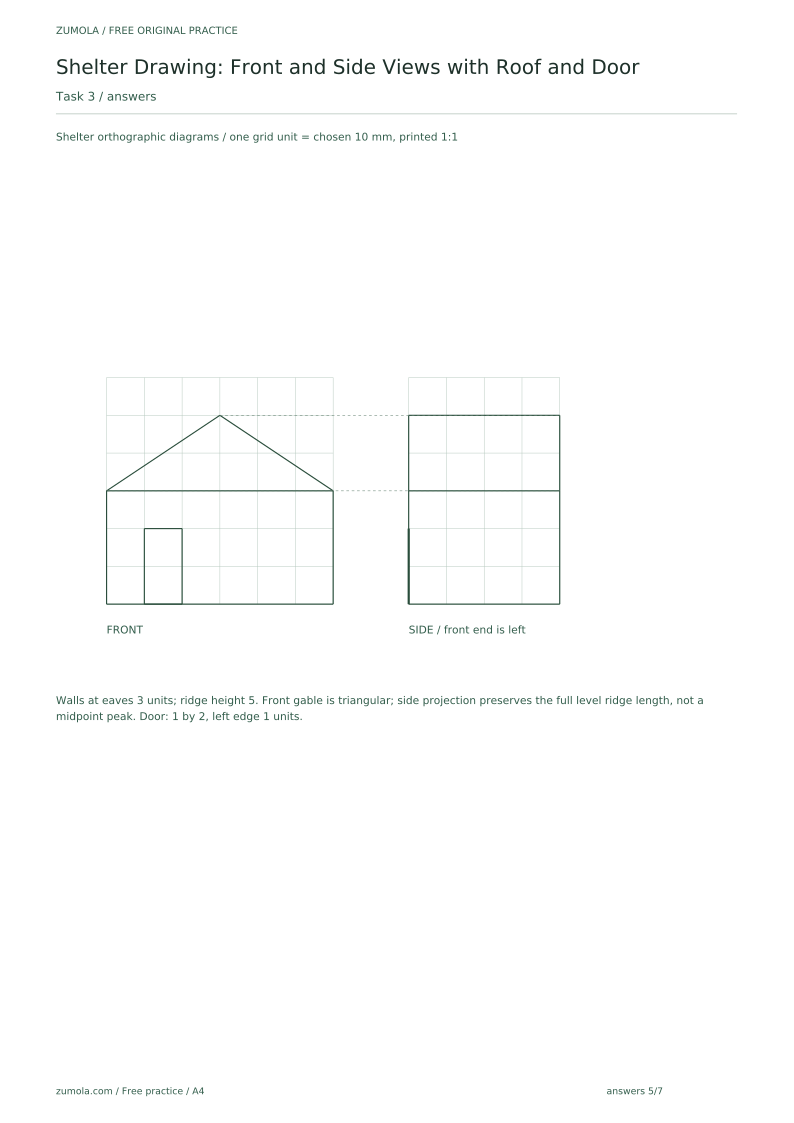
A shelter is 6 units wide, 4 units deep, and 3 units tall to the eaves. The roof rises 2 units. The door is 1 unit wide and 2 units tall, offset 1 unit from the left side of the front wall. Draw both views and check the door offset.
Show answer and check
Front view: 6 by 3 wall, gable base 6 and rise 2, with a 1 by 2 door whose left edge is 1 unit from the left wall edge. Side view: 4 by 3 wall and a 4 by 2 rectangular roof profile above the eaves, with level ridge at total height 5. The door edge remains at the front end and is 2 units tall. Its 1-unit front-view offset is widthwise and disappears in the side projection.
Why: The door spans front-view x = 1 to x = 2. Side projection suppresses x, retaining front-to-back depth and height. Thus the door still projects at the front end, while the full ridge depth remains visible.
Check: Check door left edge at 1, width 1 and height 2 in front view. In side view check door edge height 2 at the front end, eaves height 3 and horizontal ridge height 5 over depth 4.
Exercise 4
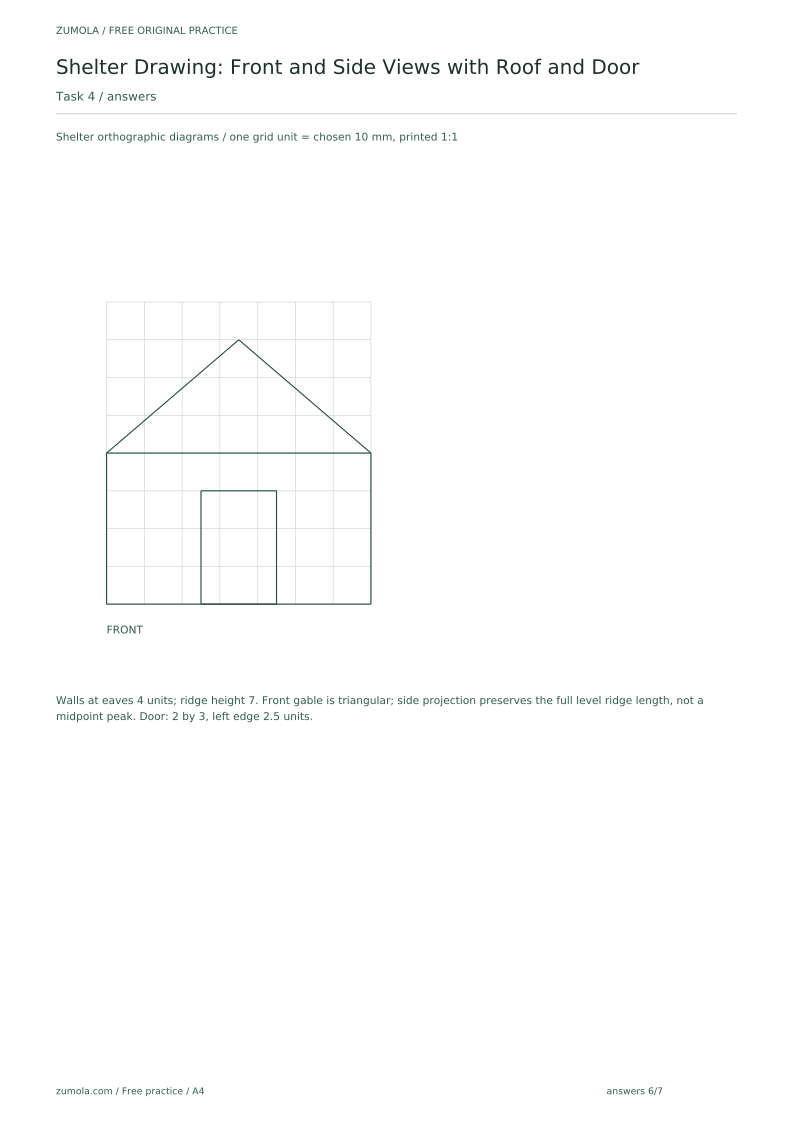
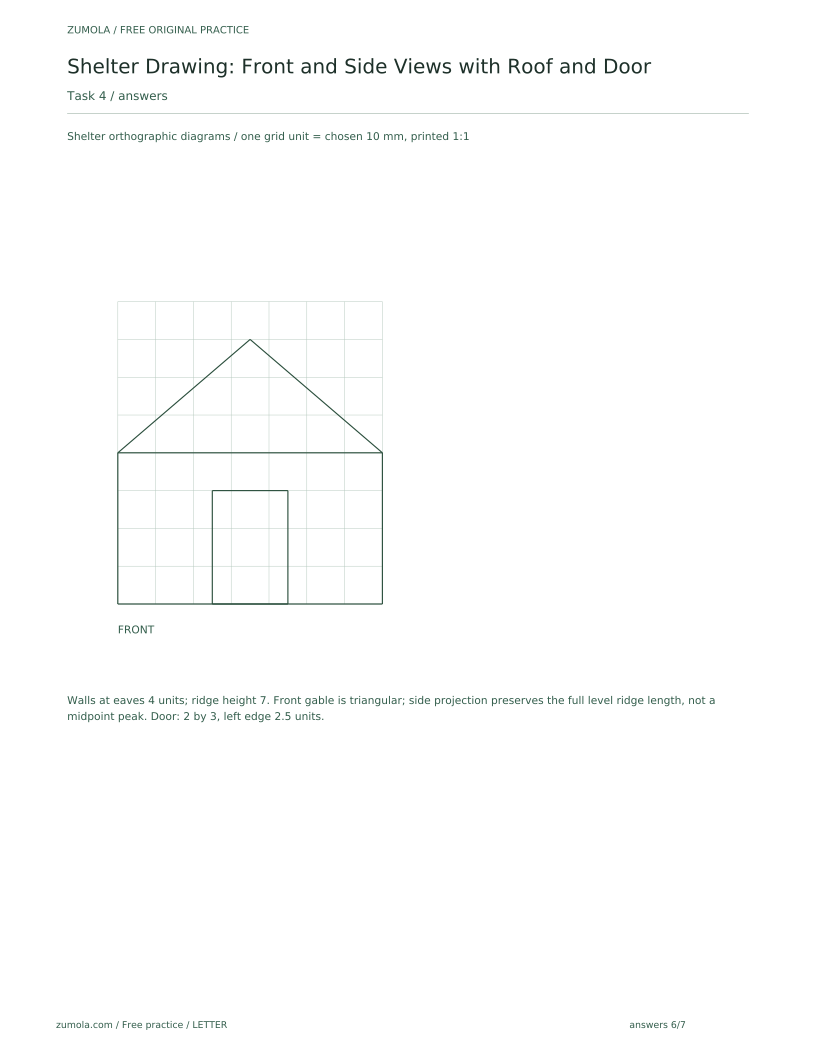
Draw a front view of a shelter 7 units wide and 4 units tall to the eaves, with a gable roof rising 3 units. The door is 2 units wide and 3 units tall, centered on the wall. Check the areas of the wall, door, and roof.
Show answer and check
Front view: 7 by 4 wall, gable roof with base 7 and peak 3 units above the eaves, door 2 by 3 centered on the wall with its bottom on the ground line. Wall area 28, door area 6, roof area 10.5.
Why: Wall area is 7 times 4 equals 28. Door area is 2 times 3 equals 6. Roof area is half of 7 times 3 equals 10.5. The door center is at 3.5 units from either side.
Check: Measure the door center from each side; both distances should be 3.5 units. Confirm the door height 3 is less than the wall height 4. Recalculate areas to confirm 28, 6, and 10.5 square units.
Common mistakes
- Drawing the roof peak off-center in the front view. Measure from each side to the peak; the distances should be equal. Adjust the peak to the midpoint.
- Using different scales for front and side views. Use one grid square per unit for both views. Re-measure the side depth and front width with the same scale.
- Placing the door bottom above the ground line. The door bottom should sit on the ground line. Lower the door until its bottom edge touches the ground line.
- Making the door taller than the wall. The door height must be less than the wall height. Reduce the door height or increase the wall height, then re-check both views.
Self-check rubric
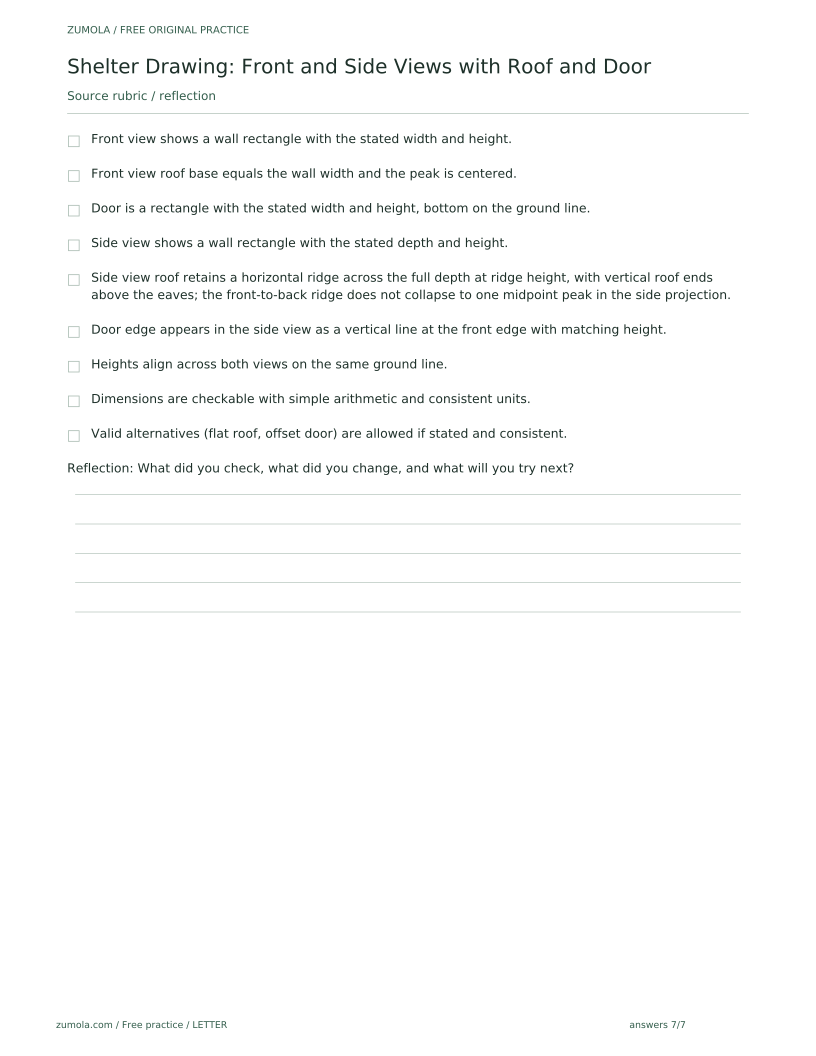
- Front view shows a wall rectangle with the stated width and height.
- Front view roof base equals the wall width and the peak is centered.
- Door is a rectangle with the stated width and height, bottom on the ground line.
- Side view shows a wall rectangle with the stated depth and height.
- Side view roof retains a horizontal ridge across the full depth at ridge height, with vertical roof ends above the eaves; the front-to-back ridge does not collapse to one midpoint peak in the side projection.
- Door edge appears in the side view as a vertical line at the front edge with matching height.
- Heights align across both views on the same ground line.
- Dimensions are checkable with simple arithmetic and consistent units.
- Valid alternatives (flat roof, offset door) are allowed if stated and consistent.
Questions and answers
Do I have to use a gable roof?
No. A flat roof is a valid alternative if you state the convention and keep both views consistent. For a flat roof, the roof appears as a horizontal line above the eaves in both views.
Can the door be off-center?
Yes, if you state the widthwise offset in the front view. That widthwise coordinate is suppressed in the side projection, so a front-wall door still appears as an edge at the front end; transfer its height, not its front-view horizontal offset.
What if my shelter is a different size?
Choose your own dimensions and label them as hypothetical examples. Keep the same scale for both views and check with arithmetic.
How do I show the door in the side view?
If the door is on the front wall, draw a vertical line at the front edge of the side view. Its height should match the door height in the front view.
Reference illustration
Free printable downloads
Choose a paper size. Practice sheets and answer keys are separate. Download every file free, without registration.
This standard pack covers the four original exercises, blank work areas, complete keys and necessary figures. Additional extension sets described in the lesson are outside this download.
PDF bundles
Individual SVG pages
Reference-page preview