Free original lessons
Skull Contour Drawing: Single-Line and Blind-Contour Practice
Learn skull contour drawing through single-line and blind-contour exercises. Build observation skills with clear steps, checks, and a worked example.
Free lesson
Four exercises
Worked answers
Object Drawing Lessons
Contour drawing trains your eye to follow edges slowly and your hand to record them without guessing. This lesson applies that discipline to a skull outline using two variants: a single-line contour, where the pencil stays on the paper for the whole drawing, and a blind contour, where you look only at the reference and never at your paper. You will compare both results against the reference to see where observation drifted. The goal is not a polished skull rendering but honest, checkable line work. All measurements below are hypothetical examples; measure your own paper and reference before starting.
Practice materials: Printable downloads are not available for this lesson yet. Use the instructions and four exercises below.
Reference illustration
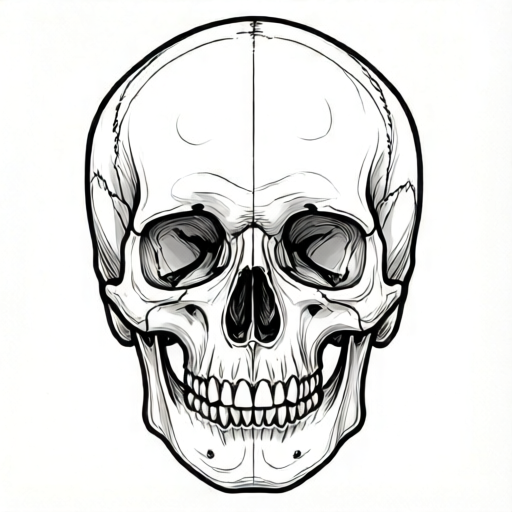
Use the stated measurements and conventions for each exercise.
Set up the reference and drawing areas
Place a skull reference image or a simple printed outline in front of you at eye level. Tape it down so it does not shift. On a separate sheet, draw two boxes side by side: one labeled single-line and one labeled blind-contour. A third blank frame is for an independent contour drawing at the end. Use a pencil with a visible point and paper that accepts graphite without smudging badly.
Define your convention before drawing: x-height means the distance from baseline to midline of lowercase letters in your written labels, not a skull measurement. Letter styles vary, so do not treat any single x-height as universal. For the drawing itself, decide that one continuous line means the pencil tip never lifts from the paper; if you must reposition, note it in the margin rather than hiding it.
- Tape the reference at eye level and confirm it cannot slide.
- Draw two boxes of equal size, each at least 12 cm by 12 cm (hypothetical example; measure your own paper).
- Label the boxes single-line and blind-contour using a consistent x-height you choose and record.
- Place the pencil at a starting point on the skull outline, such as the top of the cranium.
Single-line contour: keep the pencil down
In single-line contour, you trace the skull outline as one unbroken path. Move slowly along the edge: cranium, temple, cheekbone, jaw, chin, and back up the other side. Do not lift the pencil. If the outline has an interior opening such as the eye socket, you may loop into it and back out along the same path, but the line must remain continuous. Speed is not the goal; steady observation is.
Keep your eyes on the reference more than on the paper. Glance at the paper only to confirm the pencil is moving, then return to the edge. If the line drifts, continue from where it is rather than erasing; the drift is useful information about your observation.
- Start at the top of the cranium and move clockwise.
- Follow the temple curve, then the cheekbone edge, then the jaw line.
- Loop into the eye socket and return along the same path without lifting.
- Finish at the starting point and note any place where the line jumped.
Blind contour: look only at the reference
Blind contour removes visual feedback from your hand. Cover your drawing paper or turn your head so you cannot see it. Keep your eyes on the skull reference for the entire drawing. Move the pencil as if you were tracing the edge in the air, but let it mark the paper. The result will look distorted; that is expected and useful.
Because you cannot see the paper, you must trust the pace of your eye. If you feel lost, slow down and name the next edge silently: temple, cheek, jaw. Do not peek until the drawing is complete. After finishing, compare the blind contour to the reference and mark three places where the line departed from the edge.
- Cover or turn away from the drawing paper.
- Fix your eyes on the top of the cranium and begin the continuous line.
- Name each edge silently as you follow it: temple, cheekbone, jaw, chin.
- Complete the outline without looking at the paper, then reveal and compare.
Compare and refine with a checkable rubric
Place the single-line and blind-contour drawings beside the reference. Use a simple rubric: continuity (did the pencil stay down?), edge coverage (did you include cranium, temple, cheekbone, jaw, and chin?), proportion check (measure two distances on the reference and on your drawing with the same ruler), and honesty (did you record drifts rather than hide them?). Score each item as met, partly met, or not met.
Valid alternatives exist. A skull outline may be drawn with slightly different jaw angles or cheekbone curves and still be a faithful contour. Do not penalize style differences; penalize only missed edges, lifted lines that were not noted, or proportions that differ by more than a stated margin. For the proportion check, a hypothetical margin is 1 cm on a 12 cm drawing; measure your own and label the value you choose.
- Lay both drawings beside the reference.
- Check continuity by tracing each line with a finger to find lifts.
- Measure cranium width and jaw width on reference and drawing with the same ruler.
- Record scores and one specific edge to practice next time.
Worked example
A learner draws a single-line contour of a skull outline that includes the cranium, temple, cheekbone, jaw, and chin. The pencil stays down for the whole outline. On a 12 cm wide drawing, the cranium measures 7 cm and the jaw measures 5 cm. On the reference, the cranium measures 8 cm and the jaw measures 5.5 cm. The learner notes one drift at the left temple. Using a hypothetical margin of 1 cm, evaluate the drawing.
Worked answer
Continuity is met because the pencil stayed down. Edge coverage is met because all five named edges appear. Proportion check: cranium differs by 1 cm (8 minus 7), which equals the hypothetical margin, so it is partly met; jaw differs by 0.5 cm, which is within the margin, so it is met. Honesty is met because the drift is noted. Overall, the drawing is a valid contour with one proportion item to practice.
Four practice exercises
Exercise 1
Draw a single-line contour of a skull outline that includes the cranium, temple, cheekbone, jaw, and chin. Keep the pencil down for the entire outline. After drawing, measure the cranium width on your drawing and on the reference with the same ruler. State both values and whether they differ by more than 1 cm (hypothetical margin).
Show answer and check
A completed single-line contour with all five edges present and the pencil down throughout. The learner states two measured cranium widths and compares them to the 1 cm margin.
Why: The task checks continuity and edge coverage, then uses a simple arithmetic comparison with consistent units to check proportion.
Check: Trace the line with a finger to confirm no lifts. Confirm all five edges are named. Subtract the smaller cranium measurement from the larger and compare to 1 cm.
Exercise 2
Draw a blind contour of the same skull outline without looking at your paper. After revealing the drawing, mark three places where the line departed from the reference edge. Describe each departure in one sentence.
Show answer and check
A completed blind contour with three marked departures and three short descriptions, such as the jaw line drifting outward or the temple curve flattening.
Why: The task checks blind-contour discipline and honest comparison rather than accuracy.
Check: Confirm the paper was covered or the head turned during drawing. Count three marks and read each description to confirm it names a specific edge.
Exercise 3
Compare your single-line and blind-contour drawings using the rubric items continuity, edge coverage, proportion check, and honesty. Score each item as met, partly met, or not met. Then name one edge to practice next time.
Show answer and check
A completed comparison with four rubric scores and one named edge for future practice.
Why: The task checks structured self-assessment and transfer to the next practice session.
Check: Confirm four scores are present and each is one of the three allowed labels. Confirm the named edge is one of cranium, temple, cheekbone, jaw, or chin.
Exercise 4
In the blank frame, draw an independent contour of a skull outline using either single-line or blind-contour method. Label which method you used. Measure one distance on the reference and the same distance on your drawing with the same ruler, then state the difference in centimeters.
Show answer and check
A completed independent contour with a method label, two measurements in centimeters, and a stated difference.
Why: The task checks independent application of either variant and a simple, checkable measurement.
Check: Confirm the method label matches the drawing style. Confirm both measurements use centimeters and the difference equals the larger minus the smaller.
Common mistakes
- Lifting the pencil during single-line contour and restarting without noting it. Keep the pencil down; if a lift is unavoidable, write a small note in the margin so the break is recorded honestly.
- Peeking at the paper during blind contour. Cover the paper fully or turn your head; reveal only after the outline is complete.
- Rushing along the edge and guessing the jaw shape. Slow down and name each edge silently before moving the pencil.
- Erasing drifts to make the drawing look cleaner. Leave drifts visible; they show where observation slipped and guide the next practice.
Self-check rubric
- Continuity: pencil stayed down for the full single-line contour, or lifts were noted.
- Edge coverage: cranium, temple, cheekbone, jaw, and chin all appear.
- Proportion check: two measured distances compared with the same ruler and a stated margin.
- Honesty: drifts and lifts recorded rather than erased or hidden.
- Blind-contour discipline: no peeking before the outline was complete.
Questions and answers
How long should each contour drawing take?
There is no fixed time. A useful guide is to spend at least twice as long looking as drawing. If the single-line contour takes two minutes, aim to look for four minutes total across the process.
Can I use a ruler to check proportions?
Yes. Measure the same two distances on the reference and on your drawing with one ruler. Record the values and the margin you choose, such as 1 cm on a 12 cm drawing as a hypothetical example.
What if my blind contour looks nothing like a skull?
That is normal. Blind contour trains observation, not accuracy. Compare it to the reference and mark three places where the line departed from the edge.
Does the skull need anatomical labels?
No. This lesson excludes anatomical labeling and tonal shading. Focus only on the continuous outline.