Free original lessons
Drawing a Snake Head: Jaw, Eye, and Scale Construction
Learn to draw a snake head by building the jaw hinge, placing the eye, and constructing scale rows with a clear convention and checkable steps.
Free lesson
Four exercises
Worked answers
Object Drawing Lessons
This lesson teaches a repeatable method for drawing a snake head in profile. You will establish the jaw hinge first, place the eye using proportional guides, and build scale rows with a simple overlapping convention. The approach works for many snake species because it relies on measurable relationships rather than a single fixed outline. All measurements are hypothetical examples; measure your own reference or drawing surface and label any numbers you choose. The convention for scale rows is defined explicitly so that valid stylistic alternatives can be assessed fairly.
Practice materials: Printable downloads are not available for this lesson yet. Use the instructions and four exercises below.
Reference illustration
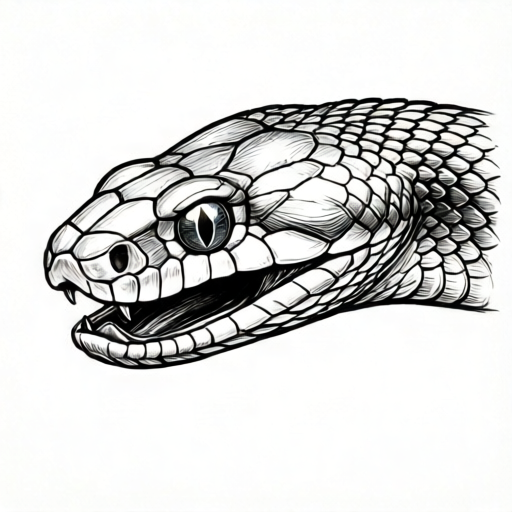
Use the stated measurements and conventions for each exercise.
Establish the jaw hinge and head mass
Begin with a light horizontal guide for the mouth line. Mark a hinge point where the upper and lower jaw meet; this is the pivot for the mouth opening. From the hinge, draw a short line forward for the lower jaw and a slightly longer line forward for the upper jaw. The upper jaw typically extends beyond the lower jaw at the snout, but species vary, so compare with your reference.
Build the head mass as a tapered wedge around these jaw lines. The widest part is usually behind the eye, narrowing toward the snout. Keep the back of the head rounded rather than pointed. Check that the distance from hinge to snout tip is roughly two to three times the eye diameter; this is a hypothetical proportion, not a rule.
- Draw a light horizontal mouth-line guide.
- Mark the jaw hinge point on that guide.
- Draw the lower jaw line forward from the hinge.
- Draw the upper jaw line forward, slightly longer than the lower.
- Add a tapered head mass around the jaw lines, widest behind the eye.
Place the eye with proportional guides
The eye sits above and behind the jaw hinge in most profile views. Draw a vertical guide through the hinge and a second vertical guide about one eye-width behind it. Place the eye center between the two guides, nearer the rear guide, so the hinge is roughly one eye-width in front of the eye center. The eye is usually circular or slightly oval; draw a light circle first, then refine the lid shape.
Use the eye diameter as a unit for checking placement. The distance from the eye center to the top of the head should be about one eye diameter. The distance from the eye center to the mouth line should be about one and a half eye diameters. These are hypothetical examples; adjust to your reference and record your chosen values.
- Draw a vertical guide through the jaw hinge.
- Draw a second vertical guide one eye-width behind the hinge.
- Place the eye center between the guides, nearer the rear guide.
- Draw a light circle for the eye, then refine the lid.
- Check top-of-head and mouth-line distances using the eye diameter as a unit.
Construct scale rows with an explicit convention
Use this convention: each scale is drawn as a rounded diamond or teardrop, and rows overlap from front to back so that the rear edge of each scale sits over the front edge of the scale behind it. Rows run roughly parallel to the jaw line on the lower head and curve gently over the top of the head. Scale size decreases toward the snout and increases toward the back of the head.
Valid alternatives include drawing scales as simple ovals, as overlapping arcs, or as a crosshatch pattern, provided the overlap direction is consistent and the row spacing is even. The rubric rewards consistency and clear row structure, not a single correct scale shape. Keep the eye and jaw lines visible by drawing scales lightly around them.
- Draw a light row guide parallel to the jaw line on the lower head.
- Mark evenly spaced scale positions along the guide.
- Draw each scale as a rounded diamond or teardrop.
- Overlap each scale so its rear edge covers the front edge of the next.
- Repeat rows over the top of the head, reducing scale size toward the snout.
Refine, check, and finish
Darken the final jaw lines, eye outline, and a few key scales. Keep the hinge point visible as a small notch or crease. Check that the eye sits above the mouth line and behind the hinge, and that scale rows do not cross the eye. Erase construction guides only after the final lines are stable.
A simple arithmetic check: if your eye diameter is 10 mm, the eye center should be about 10 mm below the top of the head and about 15 mm above the mouth line. These are hypothetical values; measure your actual drawing and compare. Record any deviations and decide whether they match your reference.
- Darken final jaw lines and the hinge notch.
- Darken the eye outline and lid.
- Darken a few key scales to show row structure.
- Check eye placement against the hinge and mouth line.
- Erase construction guides and compare with your reference.
Worked example
A student draws a snake head profile with a 12 mm eye diameter. The eye center is 12 mm below the top of the head and 18 mm above the mouth line. The hinge is 12 mm in front of the eye center. Check the placement using the lesson's hypothetical proportions.
Worked answer
The top-of-head distance matches one eye diameter (12 mm). The mouth-line distance matches one and a half eye diameters (18 mm). The hinge is one eye-width in front of the eye center, which is acceptable for a profile view. The placement passes the proportional check; the student should now confirm the jaw lengths and scale row overlap.
Four practice exercises
Exercise 1
Draw a snake head profile with a 10 mm eye diameter. Place the eye center 10 mm below the top of the head and 15 mm above the mouth line. Mark the hinge 10 mm in front of the eye center. Describe your final placement.
Show answer and check
The eye center is 10 mm below the top of the head and 15 mm above the mouth line, with the hinge 10 mm in front of the eye center. The placement matches the hypothetical proportions.
Why: One eye diameter below the top and one and a half eye diameters above the mouth line are the lesson's check values. The hinge sits one eye-width forward of the eye center.
Check: Measure the three distances with a ruler and compare to the eye diameter. Confirm the eye is above the mouth line and behind the hinge.
Exercise 2
A drawing has scale rows that overlap from back to front. The student wants to keep this direction. State whether this is valid under the lesson convention and describe one adjustment that would improve consistency.
Show answer and check
Back-to-front overlap is a valid alternative if applied consistently to every row. To improve consistency, ensure each scale's front edge sits over the rear edge of the scale behind it, and keep row spacing even.
Why: The convention defines front-to-back overlap as the default, but the rubric accepts alternatives with consistent direction. The key is uniform application.
Check: Inspect three adjacent rows: confirm the overlap direction is the same in all three and that spacing between scale centers is roughly equal.
Exercise 3
Using a 14 mm eye diameter, calculate the hypothetical top-of-head distance and mouth-line distance. Then state where the hinge should be relative to the eye center.
Show answer and check
Top-of-head distance is 14 mm (one eye diameter). Mouth-line distance is 21 mm (one and a half eye diameters). The hinge should be about 14 mm in front of the eye center.
Why: Multiply the eye diameter by 1 for the top distance and by 1.5 for the mouth-line distance. The hinge offset is one eye-width forward.
Check: Recompute 14 × 1 = 14 and 14 × 1.5 = 21. Measure the drawing to confirm the hinge offset is close to 14 mm.
Exercise 4
A student's scale rows cross the eye outline. Describe two changes that would fix this while keeping the scale convention.
Show answer and check
First, stop each row at the eye outline and resume behind it. Second, draw the eye outline darker before adding scales so the boundary is clear. Keep the overlap direction and row spacing unchanged.
Why: Rows should not cross the eye because the eye is a feature, not a scale area. Stopping rows at the outline preserves the convention and keeps the eye readable.
Check: Check that no scale line enters the eye circle. Confirm the rows on either side of the eye still share the same overlap direction and spacing.
Common mistakes
- Placing the eye directly above the jaw hinge. Move the eye center slightly behind the hinge, using a vertical guide one eye-width back.
- Drawing scale rows that cross the eye or jaw line. Keep row guides parallel to the jaw and stop rows at the eye outline; draw scales lightly around features.
- Making the upper and lower jaw the same length at the snout. Extend the upper jaw slightly beyond the lower jaw, then compare with your reference.
- Using inconsistent overlap direction in scale rows. Choose one overlap direction (front-to-back is the convention here) and apply it to every row.
Self-check rubric
- Jaw hinge is clearly marked and jaw lines meet at the hinge.
- Upper jaw extends slightly beyond the lower jaw at the snout, or a recorded reference justifies otherwise.
- Eye center sits above the mouth line and behind the hinge by about one eye-width.
- Scale rows use a consistent overlap direction and even spacing.
- Scale size decreases toward the snout and increases toward the back of the head.
- Construction guides are erased or faint in the final drawing.
- Valid alternative scale shapes are accepted if row structure and overlap direction are consistent.
Questions and answers
Do I need to draw every scale?
No. Draw enough rows to show structure, then simplify. The rubric checks row consistency and overlap direction, not scale count.
Can I use a different scale shape?
Yes. Ovals, arcs, or crosshatch are valid if the overlap direction and row spacing stay consistent.
How do I know the eye is in the right place?
Check that the eye center is above the mouth line and behind the hinge by about one eye-width. Measure with a ruler if needed.
What if my snake species looks different?
Adjust proportions to your reference. The method is a construction sequence, not a fixed outline.