Free original lessons
Draw and Label a Horse Spur: Rowel, Shank, and Heel-Band
Learn to draw a side-view spur and label its rowel, shank, and heel-band using a clear convention, a worked example, and four practice tasks.
Free lesson
Four exercises
Worked answers
Object Drawing Lessons
This lesson teaches a labeled side-view drawing of a horse spur. You will build the shape in stages, place three labels precisely, and check your work with a simple convention: the heel-band is the curved band that would sit around the boot heel; the shank is the arm extending back from that band; the rowel is the spiked wheel at the shank's end. Letter styles vary, so labels may be printed or handwritten as long as each label touches or points clearly to its part. All measurements below are hypothetical examples chosen for practice, not manufacturing standards.
Practice materials: Printable downloads are not available for this lesson yet. Use the instructions and four exercises below.
Reference illustration
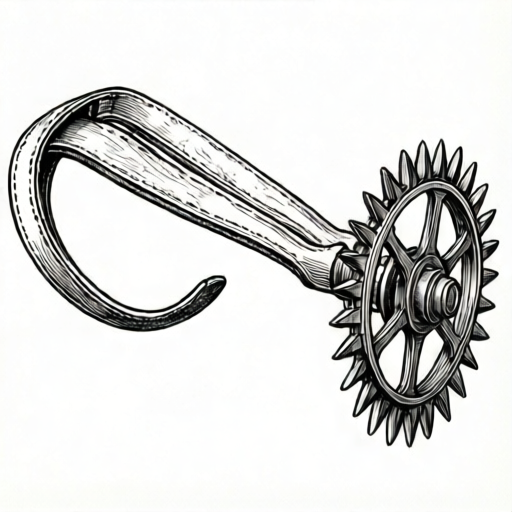
Use the stated measurements and conventions for each exercise.
Set the drawing convention before you start
Use a side view with the heel-band opening facing left and the rowel at the right. Draw on plain paper with a pencil and a ruler. Decide a scale: for this lesson, treat one grid square as one unit. A hypothetical heel-band height of 3 units and a shank length of 5 units keeps the arithmetic simple.
Label with short leader lines. A leader line is a thin straight line from the label text to the part. The label must touch the part or end within one unit of it. Write labels horizontally so they are easy to read.
- Draw a light vertical midline and a horizontal baseline; these are guides only.
- Mark a heel-band opening 3 units tall and about 2 units deep, centered on the midline.
- Sketch the shank as a tapered arm 5 units long from the band toward the right.
- Draw the rowel as a circle 2 units across at the shank end, then add 8 short spokes.
- Erase guides, darken outlines, and add the three labels with leader lines.
Build the heel-band and shank
The heel-band is a curved strip, not a full circle. Draw two curved lines that face each other, then close the ends with short straight lines. Keep the gap between the curves even; a 1-unit gap is a hypothetical example. The band's outer curve should look like it could wrap a boot heel.
Attach the shank at the middle of the band's back edge. Make the shank slightly narrower where it meets the band and slightly wider near the rowel, or the reverse, but keep the taper gentle. A shank that bends sharply is harder to label clearly.
- Draw the inner curve of the heel-band first, then the outer curve 1 unit away.
- Close both ends so the band reads as a strip.
- Start the shank at the band's midpoint and extend it 5 units to the right.
- Check that the shank does not cross the band opening.
Add the rowel and place labels
The rowel is a small wheel with points. Draw the circle first, then add evenly spaced spokes that extend slightly beyond the circle. Eight spokes is a hypothetical example; any even number that reads clearly is acceptable. The rowel should sit at the far end of the shank, centered on the shank's tip.
Place the rowel label to the right of the wheel, the shank label above the arm, and the heel-band label to the left of the band. Each leader line should stop at the part's outline, not float in empty space.
- Draw a 2-unit circle at the shank tip.
- Add 8 spokes at equal angles, extending about half a unit beyond the circle.
- Write ROWEL, SHANK, and HEEL-BAND in clear letters.
- Draw one leader line per label and check each endpoint.
Check the labeled drawing
Use the rubric below to check your own work. A valid drawing may vary in line weight, letter style, and exact curve shape, but the three parts must be identifiable and correctly labeled. Measure with a ruler only if you want to confirm your chosen units; the labels matter more than perfect proportions.
- Confirm all three labels are present and spelled correctly.
- Confirm each leader line ends on or within one unit of its part.
- Confirm the rowel is at the shank end, not on the heel-band.
- Confirm the heel-band is a curved strip with an opening, not a closed circle.
Worked example
A learner draws a side-view spur with a 3-unit heel-band, a 5-unit shank, and a 2-unit rowel with 8 spokes. The rowel label's leader line ends 2 units away from the wheel. Is the drawing fully valid?
Worked answer
No. The parts and proportions are acceptable, but the rowel leader line ends 2 units from the wheel, which exceeds the one-unit limit. Move the leader line endpoint to touch the rowel outline or come within one unit.
Four practice exercises
Exercise 1
Describe how to draw a side-view spur with a 3-unit heel-band, a 5-unit shank, and a 2-unit rowel. State where each of the three labels goes.
Show answer and check
Draw the heel-band as a curved strip 3 units tall with a 1-unit gap and an opening facing left. Attach a 5-unit tapered shank at the band's back midpoint, extending right. Draw a 2-unit circle at the shank tip with 8 spokes. Label the rowel to the right, the shank above, and the heel-band to the left, each with a leader line ending on the part.
Why: The convention fixes the opening direction and part order, so the description can be checked part by part. The units are hypothetical examples, so only consistency is required.
Check: Verify that all three labels are named, each leader line is described as touching its part, and the rowel is at the shank tip.
Exercise 2
A drawing shows a closed circle labeled heel-band, a shank attached to its top, and a rowel at the shank's middle. List two errors and give a fix for each.
Show answer and check
Error 1: the heel-band is a closed circle; fix by adding an opening so it reads as a strip. Error 2: the rowel is at the shank's middle; fix by moving it to the shank tip.
Why: The convention requires an open curved strip for the heel-band and the rowel at the shank end. Both errors break identifiable placement.
Check: Confirm each fix changes the named part to match the convention and that no new label error is introduced.
Exercise 3
You have a 4-unit shank and a 2-unit rowel. If the rowel is centered at the shank tip, how far is the rowel's center from the shank's starting point? Show the arithmetic.
Show answer and check
4 units. The rowel center sits at the shank tip, so the distance equals the shank length: 4 units.
Why: The shank length is measured from its start at the heel-band to its tip. Centering the rowel at the tip does not add length.
Check: Re-read the prompt: the rowel is centered at the tip, not beyond it. Confirm the answer equals the given shank length.
Exercise 4
A learner's rowel leader line ends 1 unit from the wheel, the shank leader line touches the arm, and the heel-band leader line ends 2 units from the band. Which label fails the convention, and what is the fix?
Show answer and check
The heel-band label fails because its leader line ends 2 units away, beyond the one-unit limit. Fix by extending the leader line to touch the band or end within one unit.
Why: The convention allows endpoints on the part or within one unit. One unit passes; two units fails.
Check: Compare each stated distance to the one-unit limit and confirm only the heel-band label exceeds it.
Common mistakes
- Drawing the heel-band as a complete circle. Leave an opening on the left side so the band reads as a strip that wraps a heel.
- Putting the rowel on the heel-band instead of the shank end. Trace the shank from the band to its tip, then center the rowel there.
- Using leader lines that stop in empty space. Extend each leader line until it touches the part's outline or comes within one unit.
- Making the shank cross the band opening. Start the shank at the band's back edge and keep it outside the opening.
Self-check rubric
- All three labels present and spelled correctly: rowel, shank, heel-band.
- Each leader line ends on or within one unit of its part.
- Rowel is centered at the shank tip and has an even number of spokes.
- Heel-band is drawn as a curved strip with an opening, not a closed circle.
- Shank connects to the band's back edge without crossing the opening.
- Drawing is a side view and is readable without extra explanation.
Questions and answers
Must the rowel have exactly eight spokes?
No. Eight is a hypothetical example. Any even number that reads clearly is acceptable under the convention.
Can labels be handwritten?
Yes. Printed or handwritten labels are both valid if they are readable and each leader line points to the correct part.
Do I need exact measurements?
No. The units in this lesson are hypothetical practice values. Consistent units and clear labels matter more than exact sizes.
Where should the shank attach?
At the middle of the heel-band's back edge, extending away from the opening.