Free original lessons
Tea Set Drawing: Pot, Cups, Saucers, Handle and Spout Shapes
Learn to draw a grouped tea set by breaking the pot body, spout, handle, cup and saucer into simple shapes, then arranging them in a small composition.
Free lesson
Four exercises
Worked answers
Object Drawing Lessons
A tea set drawing works best when you treat each vessel as a family of simple shapes rather than a single outline. This lesson shows how to build a pot body, spout, handle, cup and saucer from circles, ovals, cylinders and curves, then arrange them as a small grouped composition. You will use a consistent convention: x-height means the distance from baseline to midline of lowercase letters, and letter styles vary, so proportions are judged against your own chosen reference rather than a universal template. All measurements below are hypothetical examples; measure your actual paper and tools before drawing.
Practice materials: Printable downloads are not available for this lesson yet. Use the instructions and four exercises below.
Reference illustration
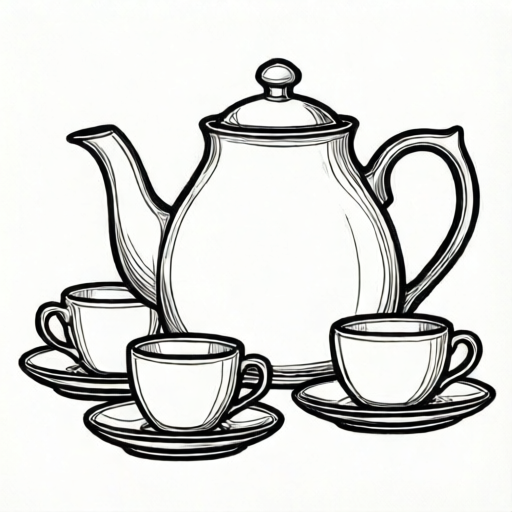
Use the stated measurements and conventions for each exercise.
Break the pot into body, lid, spout and handle
Start with the pot body as a rounded cylinder or squat oval. A pot 10 cm tall and 12 cm wide is a hypothetical example; adjust to your paper. Draw a light vertical midline, then an oval for the body and a smaller oval for the lid. The spout is a tapered tube that leaves the body at roughly the upper third, above the midline, and curves upward. The handle is a C-shaped loop opposite the spout, attached at the same height band.
Keep the spout and handle on opposite sides so the pot reads as balanced. Check that the spout opening is narrower than its base and that the handle loop is wide enough for a finger. Use the x-height convention to compare the lid knob to a lowercase letter: if your lowercase x-height is 5 mm, a knob about 5 mm across is a reasonable hypothetical proportion.
- Draw a light vertical midline and a horizontal baseline for the pot.
- Sketch the body as a rounded oval or squat cylinder.
- Add the lid oval and a small knob on top.
- Draw the spout as a tapered curve from the body's upper third.
- Draw the handle as a C-loop opposite the spout.
- Check symmetry by folding or measuring from the midline.
Build cups and saucers from cylinders and shallow ovals
A cup is a short cylinder with a curved rim and a handle loop. Draw the cup body as a trapezoid that narrows slightly toward the base, then round the rim. The saucer is a shallow oval with a raised center; draw the outer oval first, then a smaller inner oval for the well. Place the cup so its base sits inside the saucer's inner oval.
Use the same x-height reference for cup height: if your lowercase x-height is 5 mm, a cup about 15 mm tall is a hypothetical example. Keep cup handles as open loops that do not touch the saucer rim. Vary cup styles slightly, but keep the rim ellipse consistent with the viewing angle.
- Draw the saucer as a wide shallow oval.
- Add a smaller inner oval for the saucer well.
- Sketch the cup body as a narrowing trapezoid with a rounded rim.
- Attach a C-shaped handle to the cup side.
- Seat the cup base inside the saucer well.
- Repeat for additional cups, keeping saucer ovals parallel.
Arrange the grouped composition
Place the pot slightly behind and to one side, with two cups and saucers in front. Use overlapping to show depth: the front saucer should overlap the pot base slightly. Keep all saucer ovals tilted at the same angle so the set sits on one surface. Leave breathing room around the group; a hypothetical margin of 2 cm on all sides works for a 20 cm wide sheet.
Check the arrangement by drawing a light bounding box around the whole set. The pot should be the tallest element, cups shorter, and saucers widest. If the bounding box is too tight, shift the group rather than shrinking individual vessels.
- Draw a light bounding box for the whole set.
- Place the pot at the back with its spout and handle clear.
- Position two saucers in front, overlapping the pot base slightly.
- Seat cups inside the saucers.
- Check that all saucer ovals share one tilt.
- Adjust spacing so the group fits the bounding box.
Worked example
A pot body is drawn as an oval 12 cm wide and 10 cm tall. The spout starts at 6 cm height and rises 4 cm. The handle loop is 5 cm wide. Check whether the spout and handle are balanced.
Worked answer
The spout starts at 6 cm, which is above the body midline of 5 cm, so it leaves from the upper third. The handle loop at 5 cm wide is about half the body width, which is a reasonable hypothetical proportion. They are on opposite sides, so the pot is balanced.
Four practice exercises
Exercise 1
A pot body is 14 cm wide and 9 cm tall. The lid oval is 8 cm wide. Is the lid narrower than the body, and by how much?
Show answer and check
Yes, the lid is 6 cm narrower than the body.
Why: 14 minus 8 equals 6, so the lid is narrower by 6 cm.
Check: Subtract lid width from body width and confirm the result is positive.
Exercise 2
Two saucers are drawn with ovals tilted 20 degrees and 35 degrees. What is the tilt difference, and should they match?
Show answer and check
The difference is 15 degrees, and they should match for a consistent surface.
Why: 35 minus 20 equals 15; matching tilts keep the set on one plane.
Check: Subtract the smaller tilt from the larger and compare to zero.
Exercise 3
A cup is 15 mm tall and its saucer well is 40 mm wide. The cup base is 30 mm wide. Does the base fit inside the well?
Show answer and check
Yes, the base fits with 10 mm total clearance.
Why: 40 minus 30 equals 10 mm, so the base is narrower than the well.
Check: Subtract base width from well width and confirm the result is positive.
Exercise 4
A bounding box is 20 cm wide. The pot is 12 cm wide and two saucers are 6 cm wide each, placed side by side in front. Does the group fit if the saucers overlap the pot by 1 cm on each side?
Show answer and check
No, the group is 22 cm wide and does not fit within the 20 cm bounding box.
Why: The pot is 12 cm wide and the two saucers span 6 + 6 = 12 cm. With 1 cm overlap on each side, total overlap is 2 cm, so the group width is 12 + 12 - 2 = 22 cm, which exceeds the 20 cm bounding box.
Check: Add widths, subtract overlaps, and compare to the bounding box width.
Common mistakes
- Drawing the spout and handle on the same side of the pot. Place them opposite each other and check against the vertical midline.
- Making saucer ovals tilt in different directions. Draw one light guide oval and repeat its angle for every saucer.
- Letting cup handles touch or cross the saucer rim. Rotate the handle outward or move the cup slightly toward the saucer center.
- Making the pot body too tall so the set looks unstable. Compare pot height to width; a squat oval reads more stable.
Self-check rubric
- Pot body, lid, spout and handle are distinguishable and on opposite sides where required.
- Cup bodies narrow toward the base and have open C-shaped handles.
- Saucer ovals share one tilt and cups sit inside the saucer wells.
- The grouped composition fits a bounding box with clear margins.
- Proportions are checked against a stated x-height or measured reference, allowing valid style alternatives.
Questions and answers
Do I need exact measurements?
No. Use the x-height convention and your own paper size; all numbers here are hypothetical examples.
Can I draw more than two cups?
Yes, but keep saucer ovals parallel and leave enough margin around the group.
How do I check the spout angle?
The spout should rise from the body's upper third and taper toward the opening.
What if my cup rims look flat?
Draw the rim as an ellipse matching the saucer tilt, not a straight line.