Free original lessons
Draw a Pitcher: Rim Ellipse, Handle Curve, and Spout
Learn to draw a pitcher by constructing a rim ellipse, a balanced handle curve, and a spout. Includes steps, checks, and practice tasks.
Free lesson
Four exercises
Worked answers
Object Drawing Lessons
A pitcher is a vessel with three defining features: an open rim, a handle, and a pouring spout. This lesson teaches a reliable construction order so the parts align and the form reads clearly. You will use a simple convention: the rim is an ellipse seen in perspective, the handle is a smooth curve attached at two points, and the spout is a short extension of the rim that narrows to a pour point. All measurements are hypothetical examples; measure your own paper and tools. The goal is a believable pitcher form, not a single universal shape. Letter styles and handwriting vary, so the rubric rewards consistent construction and clear checks rather than exact copying.
Practice materials: Printable downloads are not available for this lesson yet. Use the instructions and four exercises below.
Reference illustration
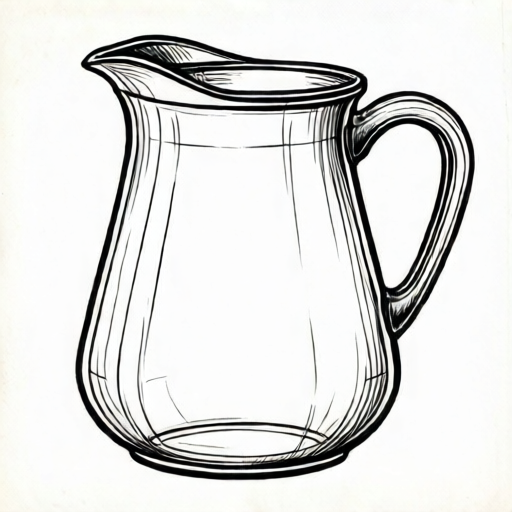
Use the stated measurements and conventions for each exercise.
Set the body and rim ellipse
Begin with a light vertical axis for the pitcher body. Choose a body height and width that fit your paper; for example, a body 12 cm tall and 8 cm wide at its widest point. Mark the top and bottom of the body on the axis. The rim sits at the top. Draw a horizontal line through the rim center and mark the rim width, for example 7 cm total. The rim is an ellipse: a flattened circle seen at an angle. Its height (minor axis) is shorter than its width (major axis). A practical starting ratio is minor axis = one third of major axis, so a 7 cm wide rim has a 2.3 cm tall ellipse. Draw the ellipse lightly, keeping it centered on the axis.
Check the ellipse by folding or measuring: the left and right edges should be the same distance from the axis, and the top and bottom of the ellipse should sit on the minor axis. If the ellipse looks like a circle, reduce the minor axis; if it looks like a flat line, increase it. Keep the rim line light so you can adjust it after the handle and spout are placed.
- Draw a light vertical axis and mark body top and bottom.
- Mark the rim center and rim width on a horizontal line.
- Draw an ellipse with minor axis about one third of the major axis.
- Check symmetry left and right of the axis.
Attach the handle curve
The handle attaches at two points on the pitcher body, usually opposite the spout. Mark an upper attachment near the rim and a lower attachment about one third of the body height below it. For a 12 cm body, a lower attachment 4 cm below the rim is a reasonable hypothetical example. The handle curve bows outward from the body. Draw a smooth curve that leaves the upper point, bows away from the body, and returns to the lower point. Keep the curve continuous and avoid sharp corners.
Check the handle by comparing the outward bow: the farthest point of the handle should be a consistent distance from the body, for example 2 cm. The upper and lower attachment points should sit on the body outline, not float inside or outside. If the handle crosses the rim ellipse, move the upper attachment slightly down or reduce the bow.
- Mark upper and lower handle attachment points opposite the planned spout.
- Draw a light outward bow from upper to lower point.
- Smooth the curve and check the farthest bow distance.
- Confirm attachments sit on the body outline.
Form the spout and unify the outline
The spout is a short extension of the rim on the side opposite the handle. Mark a spout base on the rim ellipse, for example one quarter of the rim width from the side. From the rim, draw two short lines that converge to a pour point slightly above the rim level. The spout should look like a narrow channel, not a separate tube. Keep the spout length modest, for example 2 cm beyond the rim, so it does not dominate the pitcher.
Unify the outline by darkening the body, rim, handle, and spout only after all parts align. Erase unnecessary construction lines. Check that the spout opening connects to the rim ellipse and that the handle does not overlap the spout. A final check is to trace the silhouette: the pitcher should read as one object with three clear features.
- Mark the spout base on the rim opposite the handle.
- Draw two converging lines to a pour point above rim level.
- Connect the spout opening to the rim ellipse.
- Darken final outlines and erase construction lines.
Worked example
Construct a pitcher with a 12 cm tall body, 8 cm widest width, 7 cm rim width, and a rim ellipse minor axis of 2.3 cm. Place the handle opposite the spout with a 2 cm outward bow.
Worked answer
Draw a vertical axis 12 cm tall. Mark the body widest point at 8 cm. At the top, draw a horizontal rim line 7 cm wide and an ellipse 2.3 cm tall. Mark the spout base one quarter of the rim width from the right side and draw two lines converging to a pour point 2 cm above the rim. On the left side, mark handle attachments at the rim and 4 cm below, then draw a smooth curve bowing 2 cm outward. Darken the final outline and erase construction lines.
Four practice exercises
Exercise 1
A pitcher body is 10 cm tall and 6 cm wide. The rim width is 5 cm. Using the one-third ratio, what is the rim ellipse minor axis?
Show answer and check
About 1.7 cm.
Why: One third of 5 cm is 1.67 cm, rounded to 1.7 cm for drawing.
Check: Multiply 1.7 cm by 3 to get about 5.1 cm, close to the 5 cm rim width.
Exercise 2
A handle attaches 3 cm below the rim and 9 cm below the rim on a 12 cm body. What is the vertical distance between attachments?
Show answer and check
6 cm.
Why: Subtract the upper attachment height from the lower: 9 cm minus 3 cm equals 6 cm.
Check: Add 6 cm to 3 cm to return to 9 cm.
Exercise 3
A spout base is marked 1.5 cm from the rim side on a 6 cm wide rim. The pour point is 2 cm above the rim. Describe the two spout lines needed.
Show answer and check
Two lines from the spout base area on the rim converge to a pour point 2 cm above the rim.
Why: The spout is a short channel; the lines start at the rim and meet at one point.
Check: Confirm both lines touch the rim ellipse and meet at the same pour point.
Exercise 4
A drawing shows a circular rim, a handle on the right, and a spout on the right. Name two fixes.
Show answer and check
Flatten the rim into an ellipse and move the spout or handle to the opposite side.
Why: A pitcher rim is seen as an ellipse, and handle and spout should be opposite for a clear form.
Check: Check that the rim minor axis is shorter than the major axis and that handle and spout are on opposite sides.
Common mistakes
- Drawing the rim as a perfect circle. Flatten the ellipse by making the minor axis about one third of the major axis, then check symmetry.
- Placing the handle and spout on the same side. Mark the spout first, then place handle attachments on the opposite side of the body.
- Making the handle bow too far or too little. Measure a consistent outward bow, such as 2 cm, and keep the curve smooth.
- Letting the spout look like a separate tube. Start the spout lines from the rim ellipse and converge them to a single pour point.
Self-check rubric
- Rim is drawn as an ellipse with a clear minor axis shorter than the major axis.
- Handle attaches at two points on the body and bows outward smoothly.
- Spout connects to the rim and converges to a single pour point.
- Handle and spout are on opposite sides.
- Final outline is clear and construction lines are removed or light.
- Valid alternative proportions are accepted if the three features read clearly.
Questions and answers
Do I need a ruler?
A ruler helps with the hypothetical measurements, but you can use any straight edge. Measure your own paper and adjust the numbers.
Can the handle be a different shape?
Yes. The rubric allows valid alternatives as long as the handle attaches at two points and bows outward smoothly.
How tall should the rim ellipse be?
A common starting ratio is one third of the rim width. Adjust until the ellipse reads as a rim seen at an angle.
What if my pitcher looks tilted?
Check that the body axis is vertical and the rim center sits on that axis. Small shifts are acceptable if the form still reads clearly.