Free original lessons
Draw a Lemon: Rind, Segment and Leaf Construction
Learn to construct a single lemon with a clear rind contour, segment lines and a leaf attachment using proportion guides and simple checks.
Free lesson
Four exercises
Worked answers
Object Drawing Lessons
This lesson builds one lemon from three linked parts: the rind contour, the segment lines that suggest the cut face, and the leaf attachment at the stem end. Work on a single sheet with a light construction layer and a final line layer. Use a pencil for construction and a darker tool for final lines. The convention for all measurements is simple: x-height means the distance from the baseline to the midline of a letter, used here only as a scale reference for small spacing decisions. Letter styles vary, so treat x-height as a personal unit, not a universal standard. Measure your own paper and tools; any numbers below are hypothetical examples, not printer or manufacturing specifications. Keep units consistent: use millimetres for paper and pencil marks, and use the same unit for every check. The goal is a believable lemon, not a perfect copy. Valid alternatives are expected: a rounder lemon, a more pointed lemon, a leaf on the left or right, and a cut face shown or omitted are all acceptable if the construction logic holds.
Practice materials: Printable downloads are not available for this lesson yet. Use the instructions and four exercises below.
Reference illustration
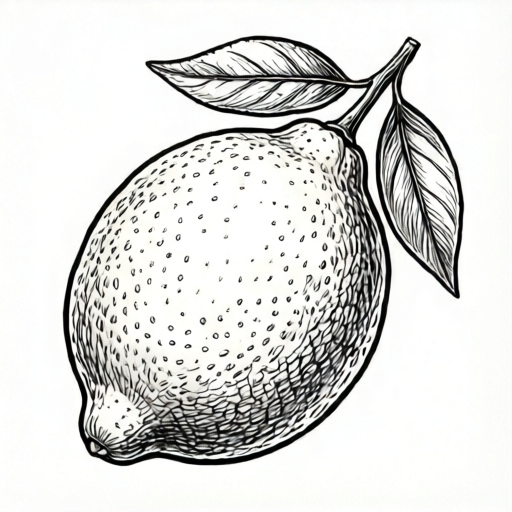
Use the stated measurements and conventions for each exercise.
Set up the page and define your scale
Place the paper in portrait orientation. Draw a light rectangular frame about 20 mm from each edge; this is a hypothetical example, so measure your own paper and choose a frame that leaves room for notes. Mark a baseline near the bottom of the frame and a midline above it. The distance between baseline and midline is your x-height reference for small gaps, such as the space between segment lines. Because letter styles vary, do not copy a fixed x-height from another person; choose one that feels comfortable and keep it consistent on the page.
Divide the frame into three zones: a large lemon zone, a small leaf-attachment zone at the top, and a narrow notes strip at the side. Label the zones lightly. This prevents the leaf from crowding the rind contour and gives you space to test segment spacing before committing to final lines.
- Measure your paper and draw a light frame, leaving a margin you choose.
- Mark a baseline and a midline; record the baseline-to-midline distance as your x-height unit.
- Divide the frame into lemon, leaf-attachment and notes zones.
- Write the unit and the zone labels in the notes strip.
Build the rind contour with proportion guides
The rind contour is the outer silhouette. Start with a light oval that is slightly wider than tall. A lemon often has a small protrusion at the stem end and a softer curve at the blossom end. Do not draw the final outline yet. Instead, place four guide points: top, bottom, left and right. Check that the horizontal distance between left and right is greater than the vertical distance between top and bottom. If your oval is too round, adjust the side points outward.
Next, add the stem-end protrusion as a short curve that grows from the top guide point. Keep it small relative to the oval; a protrusion that is too large makes the lemon look like a different fruit. Add a gentle flattening or slight point at the blossom end. Compare the two ends: they should not be identical. The rind contour is now a closed shape made of a main oval plus two end adjustments.
- Draw a light oval wider than tall.
- Mark top, bottom, left and right guide points.
- Check horizontal width is greater than vertical height.
- Add a small stem-end protrusion and a softer blossom-end curve.
- Close the rind contour lightly and compare both ends for difference.
Place segment lines and the cut-face option
Segment lines suggest the internal structure of a lemon. If you show a cut face, draw a light circle or oval inside the rind contour, offset toward one side. This inner shape is the cut face. Divide it with lines that radiate from a central point, but do not make them perfectly even; lemons vary. Use your x-height unit to space the lines: for example, if your x-height is 8 mm, keep the gap between adjacent segment lines at about half that unit, 4 mm, as a hypothetical example. Measure your own drawing and adjust.
If you omit the cut face, use a few short curved lines on the rind surface to suggest texture. These lines should follow the rind contour, not cross it. Whether you show the cut face or not, keep segment lines lighter than the final rind outline so the lemon still reads as a single object.
- Choose whether to show a cut face or only rind texture.
- For a cut face, draw a light inner oval offset toward one side.
- Mark a central point and radiate segment lines outward.
- Space lines using half your x-height unit as a starting guide.
- Keep segment lines lighter than the final rind outline.
Attach the leaf and finish the drawing
The leaf attaches at the stem end. Draw a short stem line from the protrusion, then a leaf shape that grows from the stem. The leaf should have a central vein and a smooth outline. Check the attachment: the stem line should meet the rind contour at the protrusion, not float above it. The leaf can point left or right; both are valid. Keep the leaf size proportional to the lemon; a leaf that is longer than the lemon is acceptable only if you intend a decorative style, so state your choice in the notes.
Finish by darkening the final rind contour, the stem line and the leaf outline. Leave the construction guides light or erase them. Add a small shadow line under the lemon if desired, but keep it separate from the object. Check that the drawing still fits inside the frame and that the notes strip records your x-height unit and any hypothetical spacing values you used.
- Draw a short stem line from the stem-end protrusion.
- Add a leaf shape with a central vein, pointing left or right.
- Check the stem line meets the rind contour at the protrusion.
- Darken final lines and erase or lighten construction guides.
- Record your unit and spacing choices in the notes strip.
Worked example
Construct a lemon with a rind contour wider than tall, a small stem-end protrusion, a cut face offset to the left, and a leaf pointing right. Use an x-height unit of 10 mm as a hypothetical example and space segment lines at about 5 mm.
Worked answer
Draw a light oval about 60 mm wide and 45 mm tall. Mark top, bottom, left and right points. Add a 6 mm stem-end protrusion at the top and a soft blossom curve at the bottom. Draw an inner cut-face oval about 30 mm wide, offset 5 mm to the left. Mark a central point and draw six segment lines radiating outward, keeping gaps near 5 mm. Draw a 10 mm stem line from the protrusion and a leaf about 35 mm long pointing right, with a central vein. Darken the rind contour, stem line and leaf outline; keep segment lines lighter. Check that the width is greater than the height, the stem line meets the protrusion, and the segment lines stay inside the cut face.
Four practice exercises
Exercise 1
Draw a lemon rind contour only. Make it 50 mm wide and 40 mm tall as hypothetical examples. Add a 5 mm stem-end protrusion and a soft blossom end. Do not add a leaf or segment lines.
Show answer and check
A closed rind contour with a main oval wider than tall, a small protrusion at the top and a softer curve at the bottom. The two ends are visibly different.
Why: The exercise isolates the rind contour. Width greater than height and different end treatments are the key construction checks.
Check: Measure the widest horizontal distance and the tallest vertical distance. Confirm width is greater than height. Confirm the top has a protrusion and the bottom does not.
Exercise 2
Draw a lemon with a cut face. Use an inner oval offset to the right. Add four segment lines radiating from a central point. Use an x-height unit of 8 mm as a hypothetical example and keep gaps near 4 mm.
Show answer and check
A lemon rind contour with an inner cut-face oval offset right, four segment lines inside it, and gaps recorded near 4 mm.
Why: The exercise practices segment placement and spacing. The inner oval must stay inside the rind contour, and the lines must not cross the outline.
Check: Check that all segment lines start near the central point and end inside the inner oval. Measure two adjacent gaps and confirm they are close to your recorded value.
Exercise 3
Draw a lemon with a leaf pointing left. The stem line must start at the stem-end protrusion. Use a leaf length of 30 mm as a hypothetical example. Add three short surface texture lines that follow the rind contour.
Show answer and check
A lemon with a stem line from the protrusion, a leaf pointing left, and three short curved texture lines that do not cross the rind outline.
Why: The exercise tests leaf attachment and surface texture. The leaf direction is a valid alternative, but the attachment point is fixed at the stem end.
Check: Trace the stem line to confirm it meets the protrusion. Check that each texture line stays inside the rind contour and follows its curve.
Exercise 4
Draw a lemon with no cut face. Use a rounder oval that is only slightly wider than tall. Add a leaf pointing right and a notes strip recording your x-height unit and one spacing choice labelled as a hypothetical example.
Show answer and check
A rounder lemon with a rind-only surface, a leaf attached at the stem end, and a notes strip with a unit and a labelled hypothetical spacing value.
Why: The exercise accepts a valid alternative shape and tests record-keeping. The construction logic still requires a stem-end attachment and consistent notes.
Check: Confirm the oval is slightly wider than tall, the leaf stem meets the protrusion, and the notes strip contains a unit and a value labelled as hypothetical.
Common mistakes
- Drawing a perfectly round lemon with identical ends. Make the oval wider than tall and give the stem end a small protrusion while the blossom end stays softer.
- Letting segment lines cross the rind contour. Keep segment lines inside the inner cut-face oval or as short surface curves that follow the rind.
- Attaching the leaf to the side of the lemon instead of the stem end. Start the stem line at the stem-end protrusion and grow the leaf from that line.
- Using inconsistent spacing for segment lines. Choose one x-height unit and use half that unit as a starting gap, then adjust by measuring the actual drawing.
Self-check rubric
- Rind contour is wider than tall and has two different end treatments.
- Stem-end protrusion is present and the leaf stem meets it.
- Segment lines stay inside the cut face or follow the rind surface without crossing the outline.
- Spacing choices are recorded with a consistent unit, and any numerical values are labelled as hypothetical examples.
- Final lines are darker than construction guides, and the drawing fits the frame.
- Valid alternatives such as leaf direction, cut-face omission or rounder shape are accepted if the construction logic is explained.
Questions and answers
Do I have to show the cut face?
No. A rind-only lemon with surface texture is valid. If you show a cut face, keep the inner oval offset and the segment lines lighter than the final outline.
Can the leaf point either direction?
Yes. Left or right is acceptable. The check is that the stem line meets the rind contour at the stem-end protrusion.
What is x-height used for here?
It is a personal scale unit for small spacing decisions, such as gaps between segment lines. Letter styles vary, so choose your own baseline-to-midline distance and keep it consistent.
Are the numbers in this lesson standard measurements?
No. Any numbers are hypothetical examples. Measure your own paper and tools and label your chosen values as your own examples.