Free original lessons
Draw a Lemon Wedge: Rind, Segments, and Juice Droplets
Learn to draw a lemon wedge with a curved rind, clear segment divisions, and juice droplets using a simple convention and checkable steps.
Free lesson
Four exercises
Worked answers
Object Drawing Lessons
This lesson teaches a reliable way to draw a lemon wedge: a curved rind arc, segment divisions that meet at a central point, and juice droplets that suggest freshness. You will use a defined drawing convention so that different styles can still be checked fairly. The focus is on construction and proportion, not on shading realism. All measurements are hypothetical examples; measure your own paper and tools. Work lightly at first, then darken final lines. The same method works for a single wedge on a plate or a wedge held in hand, as long as the rind curve and segment structure are clear.
Practice materials: Printable downloads are not available for this lesson yet. Use the instructions and four exercises below.
Reference illustration
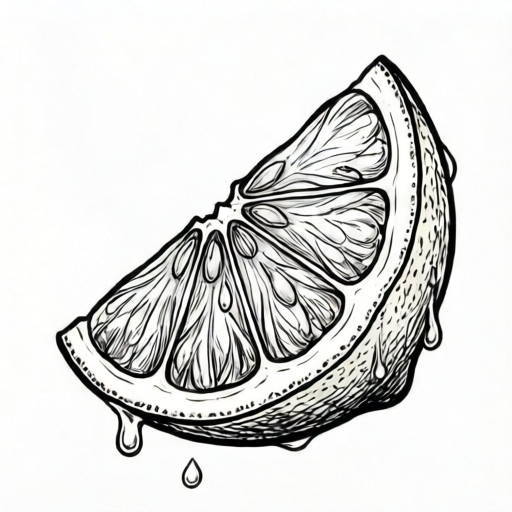
Use the stated measurements and conventions for each exercise.
Set the rind arc and wedge outline
Begin by deciding the wedge orientation. A common choice is a wedge pointing left or right, with the rind arc on the outer curved side. Draw a light arc for the rind using a compass or a freehand curve. The arc should be smooth and continuous; avoid sharp corners unless your chosen style intentionally uses them.
Close the wedge shape with two straight or slightly curved sides that meet at a point opposite the rind. The point is the tip of the wedge. Keep the two sides roughly equal in length so the wedge reads as a symmetrical slice. If you want a more natural look, make one side slightly longer, but keep the difference small enough that the wedge still reads clearly.
- Draw a light arc for the rind, about 6 cm long as a hypothetical example.
- Mark the two ends of the arc and draw two lines that meet at a point opposite the arc.
- Check that the wedge is closed and that the point is roughly centered opposite the arc.
- Erase or lighten construction lines before adding segments.
Divide the wedge into segments
Segments are the internal divisions of the lemon flesh. In this convention, segment lines start near the rind arc and converge toward the tip, but they do not all meet at one exact point. Instead, they meet a small central zone, which keeps the drawing readable and avoids a messy single intersection.
Use a light guide line from the tip to the midpoint of the rind arc. Then add segment lines on either side, spacing them evenly. For a typical wedge, four to six segments are enough. Fewer segments look coarse; more segments can become crowded. Choose a number and state it in your notes so the drawing can be checked consistently.
- Draw a light center guide from the tip to the middle of the rind arc.
- Add segment lines on both sides of the center guide, spacing them evenly.
- Stop segment lines a small distance before the rind so the rind remains visible.
- Check that each segment is a closed region bounded by two segment lines and the rind arc.
Add juice droplets and final checks
Juice droplets suggest the lemon is fresh. Place three to five droplets near the cut face or just outside the wedge. Each droplet should be a small closed shape, such as a teardrop or oval, with a tiny highlight if desired. Keep droplets small relative to the wedge; oversized droplets can distract from the wedge structure.
Finally, check the drawing against the convention: one clear rind arc, a closed wedge outline, segment lines that converge toward a central zone, and droplets that are separate from the segment lines. Darken the final lines and erase construction marks. If you use shading, keep it light so the segment structure remains visible.
- Draw three to five small droplets near the cut face or just outside the wedge.
- Make each droplet a closed shape and keep it smaller than one segment.
- Check that droplets do not overlap segment lines in a confusing way.
- Darken final lines and erase construction marks.
Worked example
Draw a lemon wedge pointing right, with a rind arc on the left, five segments, and four juice droplets. Use a hypothetical rind arc length of 6 cm and keep droplets smaller than one segment.
Worked answer
A completed drawing shows a smooth rind arc on the left, two sides meeting at a point on the right, five segment lines converging toward a small central zone near the tip, and four small closed droplets near the cut face. The rind remains visible, the wedge is closed, and droplets do not overlap segment lines confusingly.
Four practice exercises
Exercise 1
Draw a lemon wedge pointing left with a rind arc on the right. Use four segments and three droplets. State your hypothetical rind arc length.
Show answer and check
A drawing with a smooth rind arc on the right, a closed wedge outline meeting at a point on the left, four segment lines converging toward a small central zone, and three small droplets near the cut face. The stated arc length is a hypothetical example, such as 5 cm.
Why: The orientation is reversed from the worked example, so the rind arc is on the right and the tip on the left. Four segments and three droplets stay within the recommended ranges.
Check: Check that the rind arc is smooth, the outline is closed, there are exactly four segment regions, and exactly three droplets smaller than one segment.
Exercise 2
Draw a lemon wedge pointing up with a rind arc at the bottom. Use six segments and five droplets. Keep all droplets outside the wedge outline.
Show answer and check
A drawing with a smooth rind arc at the bottom, a closed wedge outline meeting at a point at the top, six segment lines converging toward a small central zone, and five small droplets placed outside the wedge outline near the cut face.
Why: Pointing up changes the tip location to the top. Six segments is the upper end of the recommended range, and five droplets is the maximum. Placing droplets outside the outline tests separation from segment lines.
Check: Check that the tip is at the top, the rind arc is at the bottom, there are six segment regions, five droplets, and no droplet crosses the wedge outline.
Exercise 3
Draw a lemon wedge pointing right with a rind arc on the left. Use five segments. Add two droplets inside the wedge near the tip and two droplets outside the wedge. State one hypothetical droplet size.
Show answer and check
A drawing with a smooth rind arc on the left, a closed wedge outline meeting at a point on the right, five segment lines converging toward a small central zone, two small droplets inside near the tip, and two small droplets outside. A hypothetical droplet size is 4 mm across.
Why: Mixing inside and outside droplets tests placement control. The droplet size is a hypothetical example and should be smaller than one segment.
Check: Check that there are five segment regions, four droplets total, two inside and two outside, and that the stated droplet size is smaller than the smallest segment width.
Exercise 4
Draw a lemon wedge pointing down with a rind arc at the top. Use four segments and three droplets. Make one side of the wedge slightly longer than the other, but keep the difference small.
Show answer and check
A drawing with a smooth rind arc at the top, a closed wedge outline meeting at a point at the bottom, four segment lines converging toward a small central zone, three small droplets, and one side slightly longer than the other by a small amount, such as 5 mm as a hypothetical example.
Why: Pointing down places the tip at the bottom. A small asymmetry adds natural variation without breaking the wedge structure. The difference is stated as a hypothetical example.
Check: Check that the tip is at the bottom, the rind arc is at the top, there are four segment regions, three droplets, and the side length difference is small enough that the wedge still reads as a single slice.
Common mistakes
- Segment lines all meet at one sharp point, creating a messy intersection. Aim segment lines toward a small central zone instead of a single point, and keep the lines light until the structure is clear.
- The rind arc is too flat or has sharp corners. Redraw the arc as a smooth curve and check that it reads as the outer edge of the wedge.
- Juice droplets are too large or too many. Limit droplets to three to five and keep each smaller than one segment.
- The wedge outline is not closed, so the shape is ambiguous. Trace the outline from the rind arc to the tip and back, ensuring no gaps.
Self-check rubric
- Rind arc is smooth and continuous and reads as the outer edge of the wedge.
- Wedge outline is closed and the tip is roughly centered opposite the rind arc.
- Segment lines converge toward a small central zone and divide the flesh into four to six clear regions.
- Juice droplets are three to five small closed shapes placed near the cut face or just outside the wedge.
- Final drawing is clear enough that another person can identify the rind, segments, and droplets without explanation.
Questions and answers
How many segments should a lemon wedge have?
Four to six segments is a practical range for a clear drawing. Choose a number and keep it consistent so the drawing can be checked.
Do segment lines have to meet at the tip?
No. In this convention, segment lines converge toward a small central zone near the tip, which keeps the drawing readable.
Can I draw the wedge without a compass?
Yes. A freehand arc is fine as long as it is smooth and continuous. The check is whether the rind reads as a single curved edge.
Where should juice droplets go?
Place them near the cut face or just outside the wedge. Keep them small and separate from the segment lines.