Free original lessons
Pencil Animal Drawing: Tonal Layering and Fur Stroke Direction
Learn graphite grades, fur-stroke direction, and tonal layering to render a generic animal head in pencil with controlled value and texture.
Free lesson
Four exercises
Worked answers
Object Drawing Lessons
This lesson teaches a repeatable pencil method for drawing a generic animal head using tonal layering and directional fur strokes. You will choose graphite grades, map light and dark zones, and apply strokes that follow fur flow. The goal is controlled value and believable texture, not species-specific anatomy or cartoon style. All measurements are hypothetical examples; measure your own paper and tools. Work on smooth paper with a sharp pencil and a soft eraser. Keep your hand relaxed and rotate the pencil slightly between strokes to avoid grooves. For fur, define stroke direction as the path from root to tip; strokes may curve but should not cross randomly. Build tone in three passes: light base, midtone shaping, and dark accents. Check value by comparing adjacent patches, not by guessing. The plate described in the resource plan shows a generic animal head with labeled graphite swatches, fur-direction arrows, and a blank frame for practice. This lesson does not rely on that plate being present; all steps are described in text.
Practice materials: Printable downloads are not available for this lesson yet. Use the instructions and four exercises below.
Reference illustration
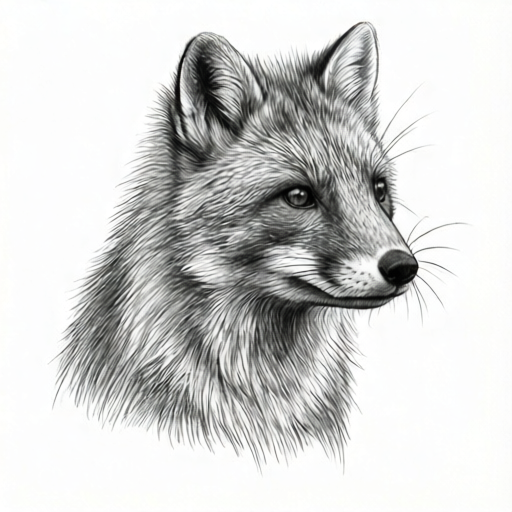
Use the stated measurements and conventions for each exercise.
Choose graphite grades and set up a value scale
Graphite grades run from hard (H, 2H) to soft (B, 2B, 4B, 6B). Hard grades give light, precise lines; soft grades give dark, broad marks. For a generic animal head, use 2H for construction, HB for base tone, 2B for midtones, and 4B for dark accents. Make a five-patch value scale on scrap paper: white paper, 2H light, HB medium-light, 2B medium-dark, and 4B dark. Label each patch. This scale is your reference for the drawing.
Keep the pencil sharp for fur strokes and slightly blunt for tonal shading. Test pressure on scrap paper: light pressure for base, medium for shaping, firm for accents. Do not press so hard that the paper shines. If your pencil feels scratchy, switch to a softer grade rather than increasing pressure.
- Draw a 5 cm by 1 cm rectangle on scrap paper and divide it into five equal patches.
- Fill patches left to right with white, 2H, HB, 2B, and 4B using even pressure.
- Label each patch and keep the scale beside your drawing.
- Measure your paper and pencil; record any chosen sizes as hypothetical examples.
Map light and dark zones on a generic animal head
Draw a simple oval for the head and a smaller oval for the muzzle. Add two ear shapes and a neck line. Do not add species details. Mark the light source with an arrow from the upper left. Shade a light base over the whole head with HB, leaving the brightest highlight unshaded. The highlight is the area facing the light source.
Next, identify three tonal zones: light (facing the source), midtone (turning away), and dark (under the muzzle, inside ears, and at the neck shadow). Use 2B for midtones and 4B for darks. Keep transitions gradual by overlapping strokes. Check your value scale: the midtone should be darker than HB but lighter than 4B.
- Draw the head oval, muzzle oval, ears, and neck line with 2H.
- Mark the light-source arrow from the upper left.
- Apply an even HB base over the head, leaving the highlight white.
- Add 2B midtones on the right side and under the ears.
- Add 4B darks under the muzzle and at the neck shadow.
Direct fur strokes from root to tip
Fur strokes should follow the direction the fur would lie. Define direction as root to tip. On the head, strokes flow from the center of the face outward. On the ears, strokes flow from base to tip. On the neck, strokes flow downward. Use short, tapered strokes: start with light pressure, increase slightly in the middle, and lift at the tip. Do not draw parallel lines like a comb; vary length and spacing.
Apply fur strokes in three layers. First, a light layer with HB following the direction arrows. Second, a midtone layer with 2B in the shadow zones. Third, dark accents with 4B at the roots and in deep shadows. Keep strokes separated enough to see paper between them. If strokes merge into a solid patch, you have lost texture; lift pressure and space them out.
- Draw direction arrows on scrap paper: center-to-edge on the face, base-to-tip on ears, downward on the neck.
- Practice ten tapered strokes with HB along one arrow.
- Apply the light fur layer over the head with HB.
- Add 2B strokes in midtone zones, following the same arrows.
- Add 4B accents at roots and deep shadows, then compare with your value scale.
Refine edges and check tonal balance
Step back and compare the drawing to your value scale. The darkest dark should be 4B, the lightest light should be white paper, and midtones should sit between. If the drawing looks flat, add 2B in the turning zones. If it looks muddy, erase small areas with a soft eraser and reapply lighter strokes. Keep fur strokes visible at the edges; do not outline the head with a hard line.
Check fur direction: every stroke should point from root to tip. If a stroke crosses another randomly, lift it with a kneaded eraser and redraw. Check that the highlight remains unshaded. Check that the neck shadow is darker than the midtone. Make one final pass with 4B only where the value scale shows dark.
- Compare the darkest patch to 4B and the lightest to white paper.
- Erase any muddy area and reapply HB lightly.
- Redraw any stroke that does not follow root-to-tip direction.
- Leave the highlight unshaded and confirm the neck shadow is darkest.
Worked example
A generic animal head is drawn on 15 cm by 20 cm paper with a light source from the upper left. The head oval is 8 cm wide and 10 cm tall. The muzzle oval is 4 cm wide and 3 cm tall. Using the lesson convention, describe the tonal layering and fur-stroke plan with grades and directions.
Worked answer
Construct with 2H: head oval 8 cm by 10 cm, muzzle oval 4 cm by 3 cm, two ears, and a neck line. Mark the light arrow from upper left. Apply HB base over the head, leaving the upper-left highlight white. Add 2B midtones on the right side and under the ears. Add 4B darks under the muzzle and at the neck shadow. Fur strokes follow root to tip: face center to edge, ears base to tip, neck downward. Apply HB light strokes first, then 2B in midtones, then 4B accents at roots. Check against the five-step value scale: white, 2H, HB, 2B, 4B.
Four practice exercises
Exercise 1
On scrap paper, make a five-step value scale in a 5 cm by 1 cm rectangle using white paper, 2H, HB, 2B, and 4B. Label each patch. Then draw a 6 cm by 8 cm generic animal head oval and mark a light arrow from the upper right.
Show answer and check
A labeled five-patch scale from white paper through 2H, HB, 2B, and 4B, plus a head oval with an upper-right light arrow.
Why: The scale establishes checkable values; the arrow sets the light source before shading.
Check: Compare each patch to its label and confirm the arrow points from the upper right. The 2H patch should be lighter than HB, HB lighter than 2B, and 2B lighter than 4B.
Exercise 2
Draw a 4 cm by 3 cm muzzle oval under a head oval. Apply HB base, then 2B midtone on the lower half, then 4B dark under the muzzle. Add ten fur strokes from root to tip flowing downward.
Show answer and check
A muzzle with three tonal layers and ten downward tapered strokes.
Why: Layering builds value; downward strokes follow the neck fur direction.
Check: Check that the lower half is darker than the top, the underside is darkest, and all ten strokes point downward. Count the strokes and confirm paper gaps remain visible.
Exercise 3
Draw two ear shapes on a generic head. Mark base-to-tip arrows. Apply HB light strokes, then 2B strokes in the inner ear shadow, then 4B at the ear base. Leave the outer ear edge unshaded.
Show answer and check
Ears with base-to-tip strokes, a 2B inner shadow, 4B base accent, and an unshaded outer edge.
Why: Direction arrows control texture; the unshaded edge keeps the light source consistent.
Check: Confirm every stroke follows base to tip and the inner shadow is darker than the outer edge. Compare the inner shadow to the 2B patch and the base accent to the 4B patch.
Exercise 4
On a 15 cm by 20 cm sheet, draw a generic animal head with a neck line. Use the three-pass method: HB base, 2B midtone, 4B dark accent. Add fur strokes on face, ears, and neck. Then compare your darkest patch to 4B and your lightest to white paper.
Show answer and check
A complete generic head with three tonal passes, directional fur strokes, and a value comparison.
Why: The full sequence tests grade choice, layering, and direction together.
Check: Check that the highlight is white, the neck shadow is darkest, strokes follow root to tip, and the value scale matches the drawing. Confirm the darkest area matches the 4B patch and the lightest area matches white paper.
Common mistakes
- Pressing hard with a hard pencil to make dark fur. Switch to a softer grade such as 2B or 4B and use light pressure; hard pressure shines the paper and flattens texture.
- Drawing fur strokes in random directions. Mark root-to-tip arrows first and follow them; lift and redraw any crossing stroke.
- Shading the highlight and losing the light source. Keep the highlight as white paper and compare it to your value scale before adding tone.
- Merging strokes into a solid patch. Space strokes with paper visible between them and reduce pressure; texture needs gaps.
Self-check rubric
- Value scale includes five labeled patches: white, 2H, HB, 2B, 4B.
- Light source is marked and the highlight remains unshaded.
- Three tonal layers are visible: HB base, 2B midtone, 4B dark accent.
- Fur strokes follow root-to-tip direction with visible paper gaps.
- Edges are textured, not outlined with a hard line.
- Valid alternatives are accepted: stroke length, spacing, and exact grade choices may vary if the value scale and direction convention are followed.
Questions and answers
Which graphite grades should I use for a generic animal head?
Use 2H for construction, HB for base tone, 2B for midtones, and 4B for dark accents. Make a five-step value scale to check each grade.
How do I know which way fur strokes should go?
Define direction as root to tip. On the face, strokes flow from center outward; on ears, base to tip; on the neck, downward. Mark arrows before drawing.
How many tonal layers should I apply?
Three passes: light base with HB, midtone shaping with 2B, and dark accents with 4B. Check each pass against your value scale.
How should I judge stroke length and spacing in this lesson?
Use your own handwriting as a guide: letter styles vary, so there is no single universal stroke length or spacing. Keep strokes tapered and leave visible paper gaps; valid alternatives are accepted if the root-to-tip direction and value scale are followed.