Free original lessons
Aztec Dragon Drawing: Feather and Geometric Ornament Steps
Learn to draw an Aztec-style dragon with feathered crest, geometric body bands, and step-by-step ornament placement on a printable plate.
Free lesson
Four exercises
Worked answers
Object Drawing Lessons
This guide teaches a construction method for an Aztec-style dragon that combines a serpentine body with feather ornament and geometric pattern bands. The approach separates body structure from surface ornament so you can place feathers and geometric steps deliberately rather than randomly. You will use a simple convention: x-height is measured from baseline to midline of a letter, and letter styles vary, so ornament spacing is judged by consistent visual rhythm rather than a single universal measurement. All numerical values below are hypothetical examples for practice; measure your own paper and tools before committing to a layout. The method is designed for pencil and paper, with optional ink and color.
Practice materials: Printable downloads are not available for this lesson yet. Use the instructions and four exercises below.
Reference illustration
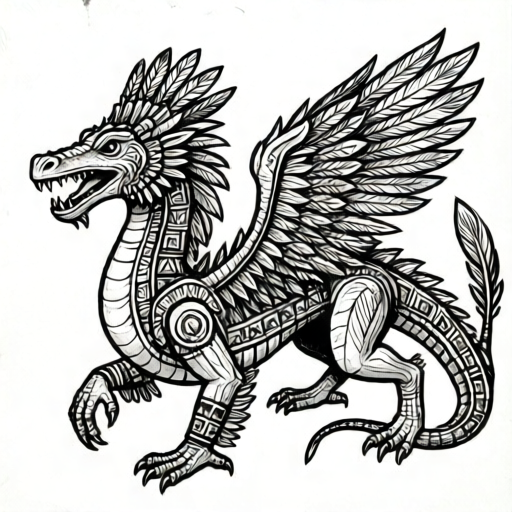
Use the stated measurements and conventions for each exercise.
Body Construction and Proportions
Begin with a serpentine spine: a gentle S-curve that fits within your page margins. Mark three body zones along the spine: head, mid-body, and tail. The head should occupy roughly one-fifth of the total spine length as a hypothetical starting proportion; adjust after measuring your actual paper. Draw a light centerline and two parallel body edges that taper toward the tail. Keep the body width consistent through the mid-body so geometric bands have a stable surface.
Add a jaw wedge and a brow ridge to establish the dragon form. The jaw should open slightly to suggest a roar, and the brow should overhang the eye socket. Place the eye as an oval set back from the snout tip. These features distinguish the Aztec-style dragon from a generic lizard: the head is angular, the body is serpentine, and the ornament is structured rather than decorative filler.
- Draw a light S-curve spine from head to tail within your page margins.
- Mark head, mid-body, and tail zones along the spine.
- Draw two parallel body edges that taper toward the tail.
- Add a jaw wedge, brow ridge, and oval eye set back from the snout.
- Check that the head is angular and the body is serpentine before adding ornament.
Feather Ornament Placement
Feathers on an Aztec-style dragon are arranged in layered rows, not scattered. Define a feather zone along the back of the neck and above the shoulders. Each feather is a tapered leaf shape with a central quill line. Use a consistent x-height convention: measure from baseline to midline of a letter to set feather length, and keep letter styles varied so the rhythm reads as ornament rather than text. A hypothetical example is a feather length equal to two x-heights; measure your own x-height first.
Layer feathers in overlapping rows, with each row offset by half a feather width. This creates a rhythmic, woven appearance. Keep quill lines parallel within a row and angled slightly outward from the body. Do not fill every gap; leave small negative spaces to suggest depth. The feather zone should follow the body curve, so rotate each feather slightly as the spine turns.
- Measure your x-height from baseline to midline and record it.
- Mark a feather zone along the neck and above the shoulders.
- Draw tapered leaf shapes with central quill lines, using two x-heights as a hypothetical length.
- Offset each row by half a feather width and keep quill lines parallel within a row.
- Rotate feathers slightly to follow the body curve and leave small negative spaces.
Geometric Pattern Bands
Geometric ornament on the body is organized into bands that cross the body width. Choose three band locations: behind the head, at mid-body, and near the tail. Each band contains a repeating step motif: a rectangular step, a short horizontal run, and a second rectangular step. Use a consistent unit, such as one x-height for the step height, and label this as a hypothetical example. Measure your actual body width to decide how many motifs fit without crowding.
Draw band borders first as two parallel lines across the body. Inside, place step motifs with equal spacing. Alternate the direction of the steps in adjacent bands to create visual contrast. Keep the geometric lines crisp and the feather lines softer; this contrast helps the two ornament systems read separately. Check that every band follows the body taper rather than staying perfectly horizontal.
- Mark three band locations: behind the head, mid-body, and near the tail.
- Draw two parallel border lines across the body at each location.
- Place step motifs with equal spacing using one x-height as a hypothetical step height.
- Alternate step direction in adjacent bands for contrast.
- Check that bands follow the body taper and that geometric lines stay crisp.
Ink, Color, and Final Checks
Ink the body outline first, then the geometric bands, then the feather quills. Use a consistent line weight for structural lines and a lighter weight for ornament details. If coloring, choose a limited palette: one warm body color, one contrasting feather color, and one neutral for geometric bands. Keep color boundaries aligned with the drawn lines rather than freehand.
Final checks include: the dragon form is clearly serpentine with an angular head; feathers are layered and follow the body curve; geometric bands are evenly spaced and follow the taper; and the two ornament systems remain visually distinct. Measure your actual paper and tools before finalizing any numerical spacing, and treat all example values as hypothetical.
- Ink body outline, then geometric bands, then feather quills.
- Use consistent line weights for structure versus ornament.
- Apply a limited palette with color boundaries aligned to drawn lines.
- Check serpentine form, layered feathers, even bands, and distinct ornament systems.
- Measure actual paper and tools before finalizing spacing values.
Worked example
A student draws a serpentine dragon with a head zone of 4 cm, mid-body of 12 cm, and tail of 4 cm on a 20 cm spine. They measure an x-height of 0.5 cm and plan feather length of 1.0 cm and step height of 0.5 cm. Check whether three geometric bands fit with even spacing and whether feather rows can be offset by half a feather width.
Worked answer
Total spine is 20 cm. Three bands placed behind the head, at mid-body, and near the tail can be spaced at approximately 5 cm intervals along the spine, which is even. Feather length of 1.0 cm equals two x-heights, a consistent multiple. Half a feather width offset is 0.5 cm if feather width is 1.0 cm, which is measurable. The plan is consistent, but the student should measure actual paper and tools before finalizing.
Four practice exercises
Exercise 1
On a 15 cm spine, place two geometric bands: one behind the head and one near the tail. Using a hypothetical step height of 0.5 cm, describe how many step motifs fit in each band if the body width at each band is 3 cm and motifs are 1 cm wide with 0.5 cm spacing.
Show answer and check
Each band fits two motifs: 1 cm motif plus 0.5 cm spacing plus 1 cm motif equals 2.5 cm, leaving 0.5 cm margin within the 3 cm width.
Why: Two motifs require 2.5 cm of the 3 cm band width, so two fit without crowding. A third would exceed the width.
Check: Add motif widths and spacings: 1 + 0.5 + 1 = 2.5 cm, which is less than 3 cm; adding another 1.5 cm would exceed 3 cm.
Exercise 2
A feather zone is 6 cm long along the neck. If each feather is 1.5 cm wide and rows are offset by half a feather width, describe how many feathers fit in a single row and how much offset occurs between two adjacent rows.
Show answer and check
Four feathers fit in a single row (6 divided by 1.5 equals 4). Adjacent rows are offset by 0.75 cm, which is half a feather width.
Why: Feather width divides the zone length evenly into four feathers. Half of 1.5 cm is 0.75 cm, so that is the row offset.
Check: Multiply 4 feathers by 1.5 cm to get 6 cm, matching the zone length; divide 1.5 cm by 2 to confirm 0.75 cm offset.
Exercise 3
A student measures an x-height of 0.4 cm and sets feather length at 1.2 cm and step height at 0.8 cm. Check whether these values are consistent multiples of the x-height and suggest one adjustment if not.
Show answer and check
Feather length is three x-heights (1.2 divided by 0.4 equals 3), which is consistent. Step height is two x-heights (0.8 divided by 0.4 equals 2), which is also consistent. No adjustment is needed.
Why: Both values divide evenly by the measured x-height, so they follow the convention of using x-height multiples.
Check: Divide each value by 0.4 cm: 1.2/0.4 = 3 and 0.8/0.4 = 2, both whole numbers.
Exercise 4
On a 24 cm spine, a student plans four bands at 6 cm intervals, placing them at 6, 12, 18, and 24 cm. The tail zone is the last 3 cm of the spine (from 21 to 24 cm). Check whether the spacing is even and whether the fourth band falls within the tail taper.
Show answer and check
Spacing is even at 6 cm intervals, but the fourth band at 24 cm lies within the tail taper (21–24 cm). Move the fourth band to before 21 cm, or use only three bands, so no band sits on the taper.
Why: Even spacing means equal gaps between band positions. The gaps are 6 cm each (6 to 12, 12 to 18, 18 to 24), so spacing is even. The tail zone starts at 21 cm, and the fourth band at 24 cm is inside that zone, so it overlaps the taper.
Check: Subtract consecutive positions: 12-6=6, 18-12=6, 24-18=6, confirming even spacing. Compare the fourth position (24 cm) to the tail zone start (21 cm): 24 is greater than 21, so the band is within the tail taper.
Common mistakes
- Scattering feathers randomly instead of layering them in rows. Define a feather zone and draw overlapping rows offset by half a feather width, with quill lines parallel within each row.
- Making geometric bands perfectly horizontal so they ignore the body taper. Draw band borders across the body width and rotate them slightly to follow the taper toward the tail.
- Using the same line weight for body outline and ornament details. Use a heavier line for structural body edges and a lighter line for feather quills and geometric motifs.
- Treating x-height as a universal measurement without measuring the actual lettering or paper. Measure baseline to midline on your own reference letter and record that value before setting ornament spacing.
Self-check rubric
- Dragon form is serpentine with an angular head, jaw wedge, brow ridge, and set-back eye.
- Feather ornament is arranged in overlapping rows with parallel quill lines and follows the body curve.
- Geometric bands are evenly spaced, contain step motifs, and follow the body taper.
- Feather and geometric ornament systems remain visually distinct through line weight and placement.
- X-height convention is explicitly measured and used consistently; alternative letter styles are acceptable if rhythm is consistent.
- All numerical values are labeled as hypothetical examples and actual equipment is measured before finalizing.
Questions and answers
What makes this an Aztec-style dragon rather than a generic dragon?
The combination of a serpentine body, angular head, layered feather ornament, and geometric step bands. Generic dragons often lack the structured ornament system and the specific feather-plus-geometric pairing.
How do I decide feather length without a fixed standard?
Measure your x-height from baseline to midline of a letter and use a multiple of that value as a hypothetical starting length. Adjust after checking the feather zone against your actual body width.
Can I change the number of geometric bands?
Yes. Three bands are a starting suggestion. Add or remove bands as long as spacing remains even and each band follows the body taper.
What if my feathers overlap the geometric bands?
Keep the feather zone and band zones separate. If they meet, let the band border act as a boundary and stop the feather row at that line.