Free original lessons
Old Man Drawing: Wrinkles and Posture Portrait Guide
Learn to draw an elderly man portrait with believable wrinkles and posture using a construction plate, placement rules, and four self-contained practice tasks.
Free lesson
Four exercises
Worked answers
Object Drawing Lessons
This guide teaches a repeatable method for drawing an elderly man's portrait from the head to mid-chest, focusing on two things beginners often rush: where wrinkles belong and how age shows in posture. You will build the head from simple shapes, place wrinkle lines along compression and sag zones, and set the shoulders and neck so the figure reads as older without becoming a caricature. All measurements are hypothetical examples; measure your own paper and reference photos. The convention for line work is stated once and used throughout: a wrinkle is drawn as a single continuous line that follows the skin surface, with breaks allowed where a fold crosses a bone ridge. Any line style is acceptable if it follows that rule.
Practice materials: Printable downloads are not available for this lesson yet. Use the instructions and four exercises below.
Reference illustration
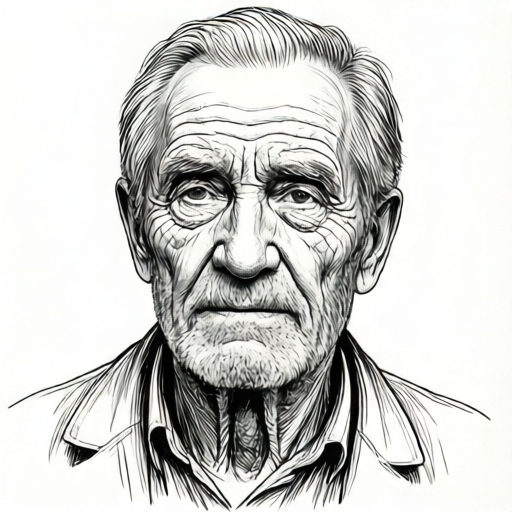
Use the stated measurements and conventions for each exercise.
Building the elderly head shape
Start with a vertical oval for the cranium and a narrower tapered shape for the jaw. On an adult face the jaw is usually wider and the chin more forward; on an elderly face the jaw often appears narrower because of soft-tissue loss, so taper the lower third slightly. Mark the eye line at about half the head height. Then divide the span from the eye line to the chin into thirds: place the nose base about one-third down from the eye line, and the mouth line about two-thirds down from the eye line (roughly one-third up from the chin). These are proportions, not fixed rules; adjust to your reference.
Add the brow ridge and cheekbone as gentle arcs rather than sharp corners. Elderly faces often show a slightly sunken cheek below the cheekbone and a fuller lower cheek, so keep the upper cheek plane flatter and the lower cheek rounder. Draw the ear from the eye line to the nose base, slightly larger than you expect, because ears often appear longer with age.
- Draw a vertical oval about 8 cm tall on your paper as a hypothetical working size.
- Taper the lower third into a jaw and chin, keeping the chin slightly forward.
- Mark the eye line at half the head height, the nose base one-third down from the eye line to the chin, and the mouth line two-thirds down from the eye line.
- Add brow ridge, cheekbone, and ear arcs, then check that the ear spans eye line to nose base.
Placing wrinkles by zone
Wrinkles are not random lines. Place them where skin compresses, folds, or sags. Use four zones: forehead, eye area, mouth area, and neck. In the forehead, draw horizontal lines that curve with the brow ridge; keep them shorter near the temples. Around the eyes, draw crow's feet as short lines radiating from the outer corner, and add a soft line under the lower lid. Around the mouth, draw nasolabial folds from the nose wings toward the mouth corners, and fine vertical lines above the upper lip. On the neck, draw horizontal rings that follow the neck cylinder, not straight lines across the throat.
Keep wrinkle density uneven. A common mistake is covering the whole face with equal lines. Instead, choose two or three dominant folds and make the rest lighter. Use the convention: one continuous line per wrinkle, with breaks where a fold crosses a bone ridge. This lets you show depth without shading every line.
- Lightly mark the four zones: forehead, eye area, mouth area, neck.
- Draw two dominant forehead lines that curve with the brow ridge.
- Add three to five short crow's feet lines at each outer eye corner.
- Draw nasolabial folds from nose wings to mouth corners, then add neck rings.
Setting posture for age
Age shows in posture through the relationship between head, neck, and shoulders. An elderly man often has a slight forward head position, rounded upper back, and shoulders that sit lower and closer to the chest. Draw the neck as a cylinder that tilts forward a few degrees, and let the chin project slightly beyond the chest line. Keep the shoulders asymmetrical: one shoulder can be a little higher, which reads as natural rather than stiff.
Use a simple shoulder line that slopes down from the neck, and add a second line for the upper back curve. Avoid a perfectly horizontal shoulder line, which reads young and rigid. For the portrait boundary, stop at mid-chest; do not draw the full body. Check posture by drawing a vertical line from the ear through the shoulder; in a forward-head posture the ear sits ahead of the shoulder line.
- Draw a neck cylinder tilted forward about 5 to 10 degrees as a hypothetical example.
- Set the shoulder line sloping down from the neck, with one side slightly higher.
- Add a gentle upper-back curve behind the neck.
- Check that the ear sits slightly ahead of the shoulder line for a forward-head read.
Refining expression and contrast
Expression in an elderly portrait comes from small changes: a slight squint, a relaxed mouth, and the direction of the gaze. Keep the eyes focused and the mouth neutral unless your reference shows otherwise. Use contrast to separate the face from the neck and clothing: darken the shadow under the jaw and the side of the neck, but keep the forehead lighter. This helps the wrinkles read as surface detail rather than dark marks.
Finally, review the whole portrait against the convention. Every wrinkle should be a single continuous line following the skin surface, with breaks allowed at bone ridges. If a line crosses the nose bridge or cheekbone without a break, redraw it with a small gap. This single check prevents the most common wrinkle error.
- Set a slight squint and a neutral mouth from your reference.
- Darken under the jaw and side of the neck, keeping the forehead light.
- Check each wrinkle for the continuous-line convention and add breaks at bone ridges.
- Compare the ear-to-shoulder vertical to confirm the forward-head posture.
Worked example
Draw an elderly man's portrait from head to mid-chest on a 15 cm by 20 cm sheet. Use an 8 cm head height, place the eye line at half the head height, taper the jaw, add two forehead lines, crow's feet, nasolabial folds, neck rings, and a forward-head posture with sloping shoulders.
Worked answer
A completed portrait with an 8 cm head, eye line at 4 cm from the top of the head, nose base about 5.3 cm from the top (one-third down the 4 cm eye-to-chin span), mouth line about 6.7 cm from the top (two-thirds down that span), tapered jaw, two curved forehead lines, three short crow's feet per outer eye, nasolabial folds from nose wings to mouth corners, three neck rings, and a shoulder line sloping down with one side slightly higher. The ear sits slightly ahead of the shoulder line, confirming the forward-head posture. All wrinkles follow the continuous-line convention with breaks at bone ridges.
Four practice exercises
Exercise 1
On a blank sheet, draw an elderly man's head only using an 8 cm head height. Mark the eye line at half the head height and the nose base one-third below the eye line. Taper the jaw and add two forehead lines and three crow's feet per outer eye. Use the continuous-line convention.
Show answer and check
A head with an 8 cm height, eye line at 4 cm from the top, nose base about 5.3 cm from the top (one-third down the eye-to-chin span), mouth line about 6.7 cm from the top (two-thirds down that span), tapered jaw, two curved forehead lines, and three short crow's feet per outer eye. Lines are continuous with breaks at bone ridges.
Why: The proportions set the construction, and the wrinkle zones test placement and the convention. Tapering the jaw avoids a young, square read.
Check: Measure the head height and eye line with a ruler. Confirm the nose base sits about one-third down from the eye line to the chin and the mouth about two-thirds down. Count two forehead lines and three crow's feet per eye. Check that each wrinkle is one continuous line with a break where it crosses a bone ridge.
Exercise 2
Draw an elderly man's portrait from head to mid-chest. Use a neck tilted forward about 5 to 10 degrees as a hypothetical example, a shoulder line sloping down from the neck, and one shoulder slightly higher. Add nasolabial folds and three neck rings.
Show answer and check
A portrait with a forward-tilted neck, sloping shoulder line, one shoulder higher, nasolabial folds from nose wings to mouth corners, and three neck rings following the neck cylinder.
Why: Posture is the main age cue here. The forward neck and sloping shoulders read older than a vertical neck and horizontal shoulders. Neck rings follow the cylinder rather than crossing straight.
Check: Draw a vertical line from the ear through the shoulder; the ear should sit slightly ahead of the shoulder line. Check that the shoulder line slopes down and one side is higher. Count three neck rings and confirm they curve with the neck.
Exercise 3
Draw an elderly man's head with uneven wrinkle density. Use two dominant forehead lines, one dominant nasolabial fold per side, and lighter secondary lines elsewhere. Keep the forehead lighter and darken under the jaw and side of the neck.
Show answer and check
A head with two dominant forehead lines, one dominant nasolabial fold per side, lighter secondary lines, a light forehead, and darker shadow under the jaw and side of the neck.
Why: Uneven density prevents the face from looking covered in equal dark lines. Contrast separates the face from the neck and helps wrinkles read as surface detail.
Check: Identify the two dominant forehead lines and one dominant nasolabial fold per side. Check that secondary lines are lighter. Compare the forehead tone to the shadow under the jaw; the forehead should be lighter.
Exercise 4
Draw an elderly man's portrait from head to mid-chest and then review it against the rubric. Mark any wrinkle that crosses a bone ridge without a break and redraw it with a small gap. Confirm the portrait stops at mid-chest.
Show answer and check
A reviewed portrait with corrected wrinkle breaks at bone ridges and a clear mid-chest boundary. The rubric check confirms proportions, wrinkle placement, posture, and contrast.
Why: The review step tests whether you can apply the convention consistently. Correcting breaks at bone ridges is the most common fix for wrinkle errors.
Check: Use the rubric line by line. For each wrinkle crossing a bone ridge, confirm a small gap. Measure the portrait boundary to confirm it stops at mid-chest and does not include a full body.
Common mistakes
- Drawing wrinkles as many short, disconnected scratches across the whole face. Use the continuous-line convention: one line per wrinkle, with breaks only where a fold crosses a bone ridge. Choose two or three dominant folds and keep the rest lighter.
- Making the jaw wide and square, which reads young. Taper the lower third slightly and keep the chin forward. Check the jaw width against your reference rather than a generic adult face.
- Drawing a horizontal shoulder line and a vertical neck. Slope the shoulder line down from the neck, tilt the neck forward a few degrees, and make one shoulder slightly higher.
- Covering the face with equal dark lines so wrinkles look like dirt. Keep the forehead lighter, darken under the jaw and neck, and vary line weight. Use contrast to separate face from neck.
Self-check rubric
- Head proportions: eye line near half the head height, nose base about one-third down from the eye line to the chin, and mouth line about two-thirds down, adjusted to reference.
- Jaw and chin: lower third tapered with chin slightly forward, not wide and square.
- Wrinkle placement: lines in forehead, eye, mouth, and neck zones, with uneven density and two or three dominant folds.
- Wrinkle convention: each wrinkle is a single continuous line following the skin surface, with breaks allowed at bone ridges.
- Posture: neck tilted forward a few degrees, shoulder line sloping down, one shoulder slightly higher, ear ahead of shoulder line.
- Boundary: portrait stops at mid-chest and excludes full-body figures.
- Contrast: forehead lighter, shadow under jaw and side of neck darker, wrinkles read as surface detail.
Questions and answers
How many wrinkles should I draw?
There is no fixed number. Choose two or three dominant folds per zone and add lighter secondary lines. Uneven density reads more natural than equal coverage.
Can I use curved or straight wrinkle lines?
Either is acceptable if the line follows the skin surface and uses the continuous-line convention with breaks at bone ridges. Match the curve to the zone, such as horizontal curves on the forehead and rings on the neck.
How do I show age without making the face look sad?
Keep the gaze focused and the mouth neutral. Use posture and wrinkle placement for age, and avoid pulling the mouth corners down unless your reference shows it.
What paper size should I use?
Any size works. The 8 cm head height in this guide is a hypothetical example; measure your own paper and scale the proportions to fit.