Free original lessons
Draw an Owl Perched in a Tree: Branch Grip and Foliage Framing
Learn to draw a perched owl with believable branch grip and leafy framing. Step-by-step construction, common fixes, and four practice tasks with checks.
Free lesson
Four exercises
Worked answers
Object Drawing Lessons
This lesson teaches a repeatable way to draw an owl perched in a tree. You will build the body as a tapered oval, set the feet so toes wrap the branch, and use foliage as a frame rather than a backdrop. The method uses simple shapes and measured proportions, so you can check your work as you go. All measurements are hypothetical examples; measure your own paper and tools. The convention for line art is stated once and used throughout: pencil lines are construction lines, ink lines are final contours, and shading is optional. X-height means the distance from baseline to midline of lowercase letters; letter styles vary, so use the x-height of your own handwriting as a size guide for small details such as talons and leaf veins.
Practice materials: Printable downloads are not available for this lesson yet. Use the instructions and four exercises below.
Reference illustration
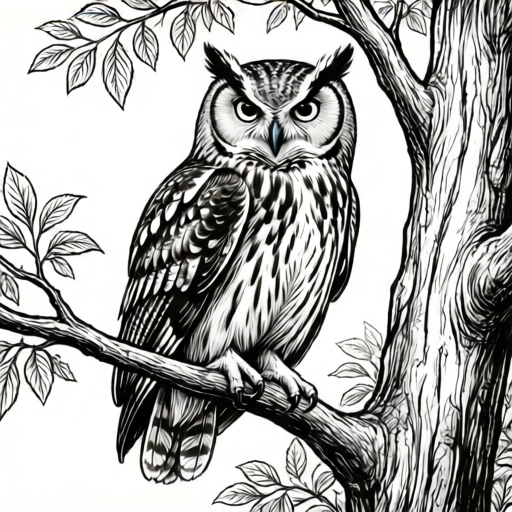
Use the stated measurements and conventions for each exercise.
Build the perched body and branch
Start with a light construction line for the branch. On a hypothetical 20 cm by 25 cm sheet, place the branch line about 12 cm from the top, angled 10 degrees upward to the right. Mark a grip zone 6 cm long where the feet will sit. Draw the body as a tapered oval: wider at the shoulders, narrower at the tail. A hypothetical body height of 8 cm and shoulder width of 5 cm gives a compact perched shape. Keep the body tilted slightly forward so the owl looks balanced.
Add the head as a circle overlapping the top of the body oval. A head diameter of 4 cm is a useful starting example. Place the eyes on a horizontal midline across the head; the beak sits below that line. The tail extends down and slightly behind the branch. Check that the body's center of mass sits above the grip zone, not ahead of it.
- Draw the branch line and mark the 6 cm grip zone.
- Draw the tapered body oval with shoulders above the grip zone.
- Add the head circle overlapping the body top.
- Mark the eye midline and beak position.
- Draw the tail down and back from the body.
Set the branch grip
The grip is the part viewers check first. Draw two feet inside the grip zone. Each foot has a back toe and two front toes visible from the side. Use a simple convention: each toe is a short tapered tube ending in a curved talon. A hypothetical toe length of 1.5 cm and talon curve of 0.5 cm keeps the scale readable. The toes should wrap the branch contour, not float above it.
Check the grip by tracing the branch edge through the toes. The branch line should disappear behind each toe and reappear between them. If the toes sit on top of the branch line without interrupting it, redraw them so they cross the contour. Keep both feet inside the grip zone and leave a small gap between them.
- Draw the back toe hooking behind the branch.
- Draw two front toes curving over the branch front.
- Add talons as short curved tips.
- Erase the branch line where toes cross it.
- Check that both feet sit inside the grip zone.
Frame with foliage
Foliage frames the owl without hiding it. Place leaf clusters at the upper left and lower right of the scene frame, leaving the owl's face and grip zone clear. A hypothetical cluster of five leaves, each 2 cm long, is enough for a corner. Draw leaves as simple pointed ovals with a center vein. Vary leaf angles so the frame looks natural.
Use the frame to direct attention: keep the densest foliage away from the face and feet. Check that no leaf overlaps the eyes or the grip zone. If a leaf blocks the beak, move it outward. The owl should remain the focal point, with foliage acting as a border.
- Mark two corner zones for foliage.
- Draw five leaves per zone with varied angles.
- Add center veins using the x-height of your handwriting as a size guide.
- Keep leaves clear of the face and grip zone.
- Check that the owl remains the focal point.
Refine contours and check proportions
Convert construction lines to final contours with ink or darker pencil. Keep the body outline smooth and the talons crisp. Add a few feather marks on the chest and wing edge, but avoid dense detail that competes with the grip. A hypothetical feather mark length of 1 cm is a useful example.
Check proportions with simple arithmetic. If the body is 8 cm tall and the head is 4 cm, the head-to-body ratio is 1:2. If the branch grip zone is 6 cm and each foot is 2 cm wide, two feet plus a 2 cm gap fit exactly. Adjust before inking if the numbers do not fit your measured drawing.
- Ink the body, head, and branch contours.
- Ink the toes and talons with crisp edges.
- Add sparse feather marks on chest and wing.
- Measure head-to-body ratio and grip fit.
- Erase construction lines after ink dries.
Worked example
On a 20 cm by 25 cm sheet, draw an owl perched on a branch angled 10 degrees upward. Use a body height of 8 cm, head diameter of 4 cm, grip zone of 6 cm, and two foliage clusters of five leaves each. Show the grip clearly.
Worked answer
Branch line placed 12 cm from the top, angled 10 degrees up to the right. Grip zone marked 6 cm long. Body oval 8 cm tall and 5 cm wide at the shoulders, centered above the grip zone. Head circle 4 cm diameter overlapping the body top. Eye midline drawn across the head, beak below. Two feet inside the grip zone, each with one back toe and two front toes; branch line erased where toes cross. Tail drawn down and back. Foliage clusters at upper left and lower right, five leaves each, clear of face and grip. Final contours inked, construction lines erased.
Four practice exercises
Exercise 1
Draw a perched owl on a horizontal branch. Use a body height of 6 cm, head diameter of 3 cm, and a grip zone of 5 cm. Show two feet with one back toe and two front toes each. Add one foliage cluster of four leaves at the upper left, clear of the face.
Show answer and check
A perched owl with body 6 cm tall, head 3 cm diameter, grip zone 5 cm, two feet inside the zone, toes interrupting the branch line, and four leaves at upper left not covering the face.
Why: The head-to-body ratio is 1:2, and two feet fit inside the 5 cm grip zone with a small gap. The foliage cluster frames without blocking the focal owl.
Check: Measure head diameter and body height to confirm 1:2. Trace the branch line through the toes to confirm interruption. Check that no leaf overlaps the eyes or beak.
Exercise 2
Draw an owl on a branch angled 15 degrees upward to the left. Body height 7 cm, head diameter 3.5 cm, grip zone 6 cm. Place foliage clusters at upper right and lower left, three leaves each. Keep the grip zone clear.
Show answer and check
An owl perched on an upward-left branch with body 7 cm, head 3.5 cm, grip zone 6 cm, two feet wrapping the branch, and two three-leaf clusters at upper right and lower left.
Why: The 1:2 ratio holds. The angled branch requires the toes to follow the branch contour, so the branch line is erased at each toe crossing. Foliage at opposite corners frames the owl.
Check: Confirm the branch angle by comparing to a 15-degree line. Check toe crossings interrupt the branch contour. Verify foliage clusters do not enter the grip zone.
Exercise 3
Draw a compact owl with body height 5 cm and head diameter 2.5 cm on a branch with a 4 cm grip zone. Show one foot with three visible toes and the other foot partly hidden behind the branch. Add a single foliage cluster of five leaves at the lower right.
Show answer and check
A compact owl with 1:2 head-to-body ratio, one foot with three toes wrapping the branch, the second foot partly hidden, and five leaves at lower right clear of the face.
Why: A partly hidden foot is valid if the visible foot clearly grips the branch. The 4 cm grip zone fits one 2 cm foot plus space. The single cluster frames without crowding.
Check: Measure the visible foot width against the grip zone. Check that the hidden foot does not float above the branch. Confirm leaves do not cover the eyes or beak.
Exercise 4
Draw an owl on a branch with a 7 cm grip zone. Body height 8 cm, head diameter 4 cm. Show both feet fully with toes wrapping the branch. Add foliage at upper left and upper right, four leaves each, leaving a clear gap above the owl's head.
Show answer and check
An owl with body 8 cm, head 4 cm, both feet fully gripping the 7 cm zone, and two four-leaf clusters at upper corners with a clear gap above the head.
Why: Two feet plus a gap fit inside 7 cm if each foot is about 2.5 cm wide. Upper corner foliage frames the head without covering it. The clear gap keeps the focal owl visible.
Check: Measure foot widths and gap to confirm they fit the 7 cm zone. Check that the gap above the head is unobstructed. Trace branch contour interruptions at each toe.
Common mistakes
- Toes drawn on top of the branch line without interrupting it. Erase the branch line where each toe crosses so the toe appears to wrap the branch.
- Body center of mass placed ahead of the grip zone. Shift the body oval back until its center sits above the marked grip zone.
- Foliage covering the eyes or beak. Move leaf clusters outward and keep the face area clear.
- Head too large or too small for the body. Measure the head diameter and body height; adjust to a simple ratio such as 1:2.
Self-check rubric
- Owl body is perched and centered above the grip zone.
- Branch grip shows toes wrapping the branch with interrupted branch contour.
- Foliage frames the owl without covering eyes, beak, or grip zone.
- Head-to-body ratio is consistent and measurable.
- Final contours are clear and construction lines are removed.
- Valid alternatives are accepted if the grip reads clearly and the owl remains the focal point.
Questions and answers
How many toes should be visible?
From a side view, show one back toe and two front toes per foot. Keep talons short and curved.
Where should the foliage go?
Place clusters at two opposite corners, such as upper left and lower right, leaving the face and grip zone clear.
What if my branch is too thin?
Measure the branch width against the foot width. The branch should be at least as wide as one foot so the grip reads clearly.
Can I shade the owl?
Yes. Shading is optional. Keep the grip and face readable by limiting dark shading near the eyes and toes.