Free original lessons
SUV Drawing: Body Shape and Wheel-Arch Construction
Learn to draw an SUV by building its boxy body outline, planning wheel-arch curves, and placing windows with a clear, repeatable method.
Free lesson
Four exercises
Worked answers
Object Drawing Lessons
This lesson teaches a construction-first approach to drawing an SUV. You will establish a proportional body box, locate axles and wheel arches, then refine the silhouette and window layout. The method uses simple measured guides so you can check your work at each stage. All measurements are hypothetical examples; measure your own paper and tools. A consistent convention is used: x-height means baseline to midline for lettering, and line weights are described relative to your drawing size. Valid stylistic alternatives are allowed where the rubric permits.
Practice materials: Printable downloads are not available for this lesson yet. Use the instructions and four exercises below.
Reference illustration
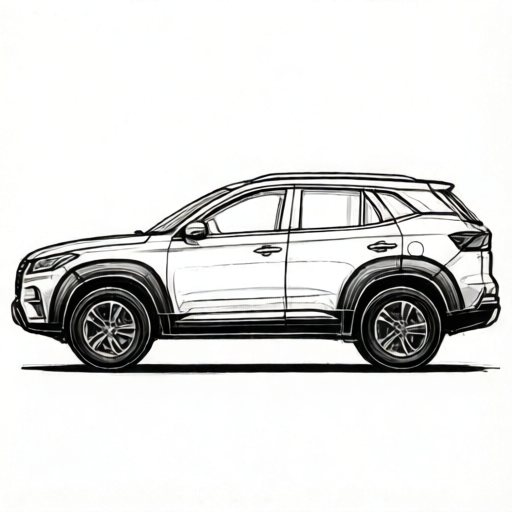
Use the stated measurements and conventions for each exercise.
Set the body box and ground line
Begin with a light rectangular body box that represents the SUV's overall length and height. SUVs typically have a tall, boxy profile with a relatively flat roof and a high beltline. Choose a length-to-height ratio that suits your composition; for example, a hypothetical body box 18 cm long and 9 cm tall gives a 2:1 ratio. Mark a ground line below the box to anchor the wheels.
Divide the body box vertically into three zones: front overhang, wheelbase, and rear overhang. A hypothetical layout might use 3 cm front overhang, 10 cm wheelbase, and 5 cm rear overhang along the 18 cm length. These values are examples only; adjust them to your chosen proportions while keeping the total length consistent.
- Draw a light ground line across the page.
- Draw the body box above the ground line, leaving space for wheels below.
- Mark the front and rear overhang divisions and the wheelbase span.
- Label the axle centers at the midpoint of each wheelbase end zone.
Construct wheel arches with consistent curves
Wheel arches are curved cutouts in the lower body that frame the wheels. For an SUV, arches are often slightly squared or rounded-rectangular rather than perfectly circular. Define an arch convention: each arch is a curve that starts at the body's lower edge, rises to a peak above the axle center, and returns to the lower edge. The arch width should exceed the wheel width by a small margin.
Use a compass or freehand curve. A hypothetical arch peak height is 2 cm above the axle center, with an arch width of 4 cm for a wheel of 3 cm diameter. These numbers are examples; measure your actual drawing tools and keep units consistent. Draw both arches at the same peak height and width to maintain symmetry.
- Mark the axle center on each side of the body box.
- Draw a vertical centerline through each axle center.
- Mark the arch width symmetrically about each centerline.
- Draw the arch curve from the lower body edge up to the peak and back down.
- Check that both arches share the same peak height and width.
Refine the silhouette and window layout
With the body box and arches in place, refine the SUV silhouette. Add a slightly tapered front hood, a near-vertical rear hatch, and a roof line that stays mostly flat. The beltline (the line separating windows from body panels) should run consistently above the wheel arches.
Lay out windows using the body box divisions. A hypothetical window band 2 cm tall sits above the beltline, divided into a windshield, two side windows, and a rear window. Keep gaps between windows narrow and even. Lettering or labels, if used, follow the x-height convention: baseline to midline defines the x-height, and letter styles may vary.
- Draw the beltline across the body above the arches.
- Mark the window band height above the beltline.
- Divide the band into windshield, side windows, and rear window.
- Refine the hood, roof, and rear hatch lines.
- Erase construction guides lightly and confirm proportions.
Worked example
Draw an SUV body box 16 cm long and 8 cm tall. Place axles with a 9 cm wheelbase, 3 cm front overhang, and 4 cm rear overhang. Draw two wheel arches with a hypothetical peak height of 1.5 cm and width of 3.5 cm. Add a beltline 1 cm above the arch peaks and a window band 1.5 cm tall.
Worked answer
The body box is 16 cm by 8 cm. The wheelbase spans 9 cm, with 3 cm front and 4 cm rear overhangs (3+9+4=16 cm). Axle centers sit at the midpoint of each wheelbase end zone. Each arch is centered on its axle, 3.5 cm wide, peaking 1.5 cm above the axle center. The beltline runs 1 cm above the arch peaks, and the window band is 1.5 cm tall above the beltline. Both arches match in width and peak height.
Four practice exercises
Exercise 1
Draw an SUV body box 20 cm long and 10 cm tall. Use a 12 cm wheelbase, 4 cm front overhang, and 4 cm rear overhang. Mark axle centers and draw two arches with a hypothetical peak height of 2 cm and width of 4 cm. Check that the overhangs and wheelbase sum to the body length.
Show answer and check
Body box 20 cm by 10 cm; wheelbase 12 cm; front overhang 4 cm; rear overhang 4 cm. Sum: 4+12+4=20 cm. Axle centers at the midpoints of the wheelbase ends. Each arch is 4 cm wide and peaks 2 cm above its axle center.
Why: The overhang and wheelbase values must add to the total length. Arch width and peak height are applied symmetrically to both axles.
Check: Measure the body box length and confirm 4+12+4=20 cm. Measure each arch width and peak height and compare them.
Exercise 2
Using a body box 18 cm long and 9 cm tall, place a beltline 1.5 cm above the arch peaks. Draw a window band 2 cm tall above the beltline and divide it into a windshield, two side windows, and a rear window with even gaps. Describe how you check the gaps.
Show answer and check
The beltline sits 1.5 cm above the arch peaks. The window band is 2 cm tall above the beltline. The band is divided into four window sections with equal gaps. Check gaps by measuring each gap with the same ruler and confirming they match within your chosen tolerance.
Why: A consistent beltline and window band height keep the layout coherent. Even gaps are checked by direct measurement.
Check: Measure the beltline height above the arch peaks, the window band height, and each gap between windows.
Exercise 3
Draw an SUV with a slightly squared wheel-arch convention instead of a rounded curve. Use a hypothetical arch width of 5 cm and peak height of 2 cm on both sides. Explain how you keep the two arches consistent.
Show answer and check
Both arches use the same squared convention, 5 cm wide and 2 cm peak height. Consistency is kept by marking the same width and peak height on each side before drawing the curves.
Why: The rubric allows valid alternatives if both sides match. Pre-marking dimensions prevents drift between arches.
Check: Measure the width and peak height of each arch and confirm they match.
Exercise 4
Draw an SUV body box 22 cm long and 11 cm tall. Use a 14 cm wheelbase, 4 cm front overhang, and 4 cm rear overhang. Add a beltline 1 cm above the arch peaks and a window band 2 cm tall. Check that the total length is consistent and that the window band sits above the beltline.
Show answer and check
Body box 22 cm by 11 cm; wheelbase 14 cm; overhangs 4 cm each. Sum: 4+14+4=22 cm. Beltline 1 cm above arch peaks; window band 2 cm tall above the beltline.
Why: The length check confirms the layout. The beltline and window band heights are measured from the arch peaks upward.
Check: Confirm 4+14+4=22 cm. Measure the beltline height above the arch peaks and the window band height above the beltline.
Common mistakes
- Drawing wheel arches as perfect circles that cut too deeply into the body. Use a shallower arch curve with a defined peak height and width, and check that the arch returns to the lower body edge.
- Making the body box too low and wide, losing the SUV's tall profile. Recheck the length-to-height ratio and adjust the body box before refining details.
- Placing windows without a consistent beltline. Draw the beltline first, then set the window band height above it.
- Using inconsistent units when measuring arches and wheels. Choose one unit (for example, centimeters) and label all hypothetical values in that unit.
Self-check rubric
- Body box proportions are consistent and clearly taller than a passenger car profile.
- Wheel arches are centered on axle marks and share the same width and peak height.
- Beltline is continuous and windows sit above it with even gaps.
- Construction guides are light and refined lines are clear.
- Valid stylistic alternatives (such as squared arches) are acceptable if consistency is maintained.
Questions and answers
Do I need exact measurements to draw an SUV?
No. The measurements here are hypothetical examples. Use them as a guide, then measure your own paper and tools to keep proportions consistent.
Can I use a different arch shape?
Yes. The rubric allows valid alternatives such as slightly squared arches, provided the arch width and peak height are consistent on both sides.
How do I check my window layout?
Confirm that all windows sit above the same beltline and that the gaps between windows are even.
What does x-height mean here?
X-height is the distance from baseline to midline for lettering. Letter styles may vary, so use it only as a sizing convention for any labels.