Free original lessons
Upside-Down Car Drawing: Inverted Body and Wheel Practice
Learn to copy an inverted car by tracking body cues and wheel placement. Includes orientation checks, a worked example, and four self-contained exercises.
Free lesson
Four exercises
Worked answers
Object Drawing Lessons
Drawing an upside-down car is an orientation exercise, not a mechanical one. The goal is to copy a reference car that has been rotated 180 degrees so that its roof points toward the bottom of the page and its wheels point toward the top. You will practice reading body cues (roof line, window band, hood, trunk) and wheel cues (axle position, tire shape, hub center) in inverted orientation. Use a simple convention: treat the baseline as the line where the roof would sit if the car were upright, and the midline as the horizontal center of the drawing frame. All numerical values below are hypothetical examples for practice, not manufacturing standards. Measure your own paper and tools if you adapt the tasks.
Practice materials: Printable downloads are not available for this lesson yet. Use the instructions and four exercises below.
Reference illustration
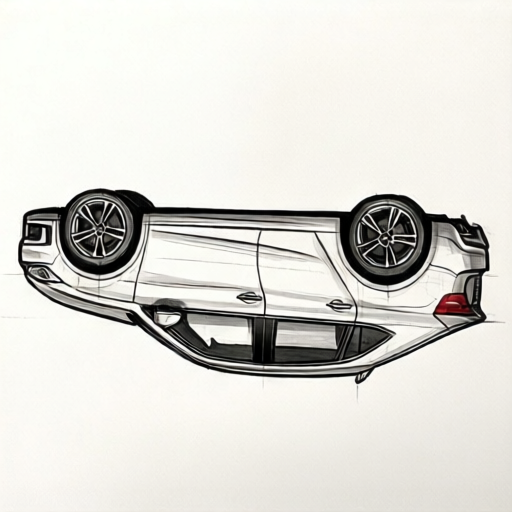
Use the stated measurements and conventions for each exercise.
Reading the inverted car as a set of cues
An upside-down car keeps the same parts but reverses their vertical order. In an upright car, the roof is at the top and the wheels are at the bottom. Inverted, the roof line sits near the bottom of the frame and the wheel centers sit near the top. The window band remains between them, but its curve now opens downward. The hood and trunk swap visual weight: what looked like a front slope may now read as a rear slope unless you anchor it with wheel positions.
Use three anchor cues before drawing any curve. First, mark the roof line as a long, slightly curved horizontal near the lower third of the frame. Second, mark two wheel centers as small crosses near the upper third, spaced apart by roughly half the frame width. Third, mark the window band as a shorter horizontal between them. These three cues fix orientation. Body details are added only after the anchors agree with the inverted reference.
- Draw a rectangular frame and label the top edge 'wheel side' and the bottom edge 'roof side'.
- Place two wheel-center crosses near the top edge, about one-quarter and three-quarters across the frame width.
- Draw the roof line as a gentle curve near the bottom edge, leaving a margin of about one finger width.
- Add the window band between the wheel centers and the roof line, keeping it parallel to the roof line.
- Connect the body sides from the roof line toward the wheel centers, checking that the body does not cross the wheel crosses.
Wheel placement and body proportion
Wheels are the strongest orientation signal. In the inverted view, each wheel is drawn as an oval or circle whose center is the cross you placed. The tire sits around the center, and the hub is a smaller shape inside it. Because the car is upside down, the wheel arches curve toward the roof side, not away from it. If an arch curves the wrong way, the drawing reads as upright even when the roof line is low.
Body proportion is checked with simple arithmetic. Suppose your frame is 12 cm wide and 8 cm tall. A hypothetical wheel-center spacing of 6 cm (half the width) and a roof-line margin of 1 cm from the bottom edge give a stable layout. These numbers are examples only; measure your own frame and choose values that fit. Keep units consistent: if you measure in centimeters, record all checks in centimeters.
- Draw each tire as an oval around its wheel cross, with the oval's long axis horizontal.
- Add a smaller hub shape inside each tire, centered on the cross.
- Draw wheel arches that open toward the roof side, not toward the wheel side.
- Check spacing: measure from the left frame edge to the left wheel center and from the right frame edge to the right wheel center; the two distances should be similar.
- Check the roof margin: measure from the lowest body line to the bottom frame edge; it should be roughly equal on both sides.
Orientation check and valid alternatives
An orientation check is a quick test that the drawing reads as inverted. Cover the wheel side of the frame with a sheet of paper and ask whether the visible body looks like a car roof and window band. Then cover the roof side and ask whether the visible shapes look like wheels and arches. If either answer is unclear, adjust the anchor cues rather than adding detail.
There is no single correct car style. Roof lines may be flat, curved, or stepped; window bands may be one shape or divided; wheels may be circles or ovals. The rubric rewards consistent orientation and clear cues, not a particular model. Valid alternatives include a boxy car with a flat roof line and a rounded car with a curved roof line, provided the wheel centers remain near the wheel side and the arches open toward the roof side.
- Perform the cover test on the wheel side and record whether the body cues are readable.
- Perform the cover test on the roof side and record whether the wheel cues are readable.
- Compare your drawing to the inverted reference by checking the order of roof line, window band, and wheel centers from bottom to top.
- If the order is wrong, move the misplaced cue rather than redrawing the whole car.
- Label one valid alternative you could try, such as a flatter roof line, and note how it would still pass the orientation check.
Worked example
A frame is 10 cm wide and 6 cm tall. Place two wheel centers 2.5 cm from the left edge and 2.5 cm from the right edge, both 1.5 cm below the top edge. Place the roof line 1 cm above the bottom edge. Describe the order of cues from bottom to top and state one orientation check.
Worked answer
From bottom to top: roof line at 1 cm above the bottom edge, window band between the roof line and the wheel centers, wheel centers at 1.5 cm below the top edge. The wheel centers are 5 cm apart (10 minus 2.5 minus 2.5). Orientation check: cover the top edge; the visible roof line and window band should read as an inverted car body, not as wheels.
Four practice exercises
Exercise 1
In a 12 cm by 8 cm frame, place wheel centers 3 cm from each side edge and 2 cm below the top edge. Place the roof line 1.5 cm above the bottom edge. State the distance between the wheel centers and the order of cues from bottom to top.
Show answer and check
Wheel-center distance is 12 minus 3 minus 3 = 6 cm. From bottom to top: roof line, window band, wheel centers.
Why: The frame width minus both edge margins gives the spacing. The roof line is near the bottom, so it is lowest; wheel centers are near the top, so they are highest.
Check: Measure the two edge margins to confirm they are both 3 cm, and measure the spacing to confirm 6 cm. Then cover the top edge and check that the body cues read as inverted.
Exercise 2
A drawing has wheel centers near the top edge but the wheel arches curve toward the top edge. Describe the orientation error and one fix.
Show answer and check
The arches open toward the wheel side instead of the roof side, so the drawing reads as upright. Fix by redrawing each arch to open toward the roof line.
Why: In an inverted car, the arch should curve toward the roof side. An arch curving toward the wheel side reverses the cue.
Check: For each wheel, trace the arch and confirm it opens toward the roof line. Then perform the cover test on the roof side.
Exercise 3
In a 9 cm by 6 cm frame, a student places the roof line 0.5 cm from the top edge and wheel centers 1 cm from the bottom edge. Identify the orientation mistake and state the corrected order.
Show answer and check
The roof line and wheel centers are swapped. The roof line should be near the bottom edge and the wheel centers near the top edge. Corrected order from bottom to top: roof line, window band, wheel centers.
Why: The labels roof side and wheel side fix the vertical order. Placing the roof line near the top reverses the inverted orientation.
Check: Measure the distance from each cue to its labeled frame edge. The roof line should be closer to the roof side and the wheel centers closer to the wheel side.
Exercise 4
A frame is 14 cm wide. Wheel centers are placed 4 cm from the left edge and 3 cm from the right edge. Are the edge margins similar? State one adjustment and the resulting spacing if the left margin becomes 3.5 cm.
Show answer and check
The margins are 4 cm and 3 cm, which differ by 1 cm, so they are not similar. Adjust the left margin to 3.5 cm; the spacing becomes 14 minus 3.5 minus 3 = 7.5 cm.
Why: Similar edge margins keep the wheel placement balanced. Changing one margin changes the spacing by the same amount.
Check: Measure both margins after adjustment and confirm they are within about 0.5 cm of each other. Recalculate the spacing with consistent units.
Common mistakes
- Drawing the roof line near the top of the frame out of habit. Mark the wheel side and roof side on the frame before drawing, then place the roof line near the labeled roof side.
- Making wheel arches curve away from the roof side. Check each arch against the nearest wheel center; the arch should open toward the roof line, not toward the frame edge.
- Spacing the wheel centers unevenly without measuring. Measure from each frame edge to its wheel center and compare the two distances; adjust until they are similar.
- Adding windows and doors before the three anchor cues are stable. Complete the roof line, wheel centers, and window band first, then add details only after the orientation check passes.
Self-check rubric
- Roof line is placed near the labeled roof side of the frame.
- Two wheel centers are placed near the labeled wheel side and are spaced with similar edge margins.
- Window band sits between the roof line and the wheel centers.
- Wheel arches open toward the roof side.
- The cover test on each side gives a clear orientation reading.
- Valid style alternatives are accepted if the cue order and arch direction remain consistent.
Questions and answers
Do I need to draw a realistic car?
No. The task is orientation practice. A simple body shape with clear roof, window, and wheel cues is enough.
How do I know my drawing is upside down?
Use the cover test: hide the wheel side and check that the body reads as a roof and window band; hide the roof side and check that the wheels read clearly.
Can I use circles instead of ovals for wheels?
Yes. Circles and ovals are both valid. Keep the hub centered and the arch opening toward the roof side.
What if my paper is a different size?
Measure your own frame and choose spacing values that fit. The numerical examples are hypothetical and not fixed standards.