Free original lessons
Draw an Upside-Down Mushroom: Cap, Gills, and Stem Orientation
Learn to draw an inverted mushroom with a domed cap below, radial gills, and a stem pointing upward. Includes tracing practice, labeling, and self-checks.
Free lesson
Four exercises
Worked answers
Object Drawing Lessons
Drawing an upside-down mushroom means flipping the usual orientation: the cap dome sits at the bottom, the gills face upward, and the stem rises from the cap center. This guide breaks the shape into simple contours, explains how radial gills behave when inverted, and gives you checkable steps to keep proportions consistent. You will trace an inverted contour, label cap, gills, and stem, and complete four self-contained practice tasks. All measurements are hypothetical examples; measure your own paper and tools before drawing.
Practice materials: Printable downloads are not available for this lesson yet. Use the instructions and four exercises below.
Reference illustration
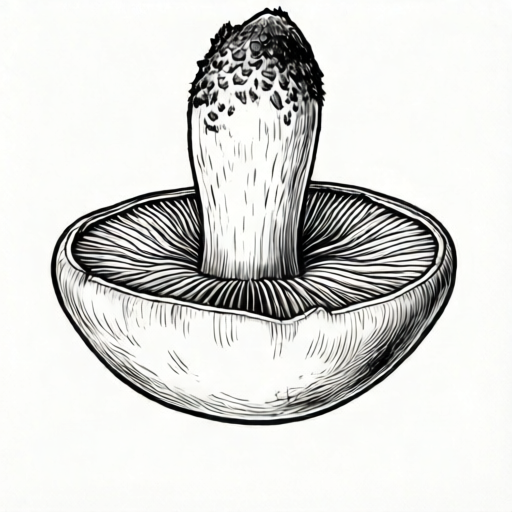
Use the stated measurements and conventions for each exercise.
Understand the inverted orientation
A mushroom drawn from below shows the cap as a dome or shallow bowl, the gills as lines radiating from the stem attachment, and the stem as a cylinder rising from the cap center. When you turn this view upside down on the page, the dome curves downward, the gills fan outward across the top surface of the cap, and the stem points upward. The key is to keep the stem attached at the cap center and the gill lines radiating from that same point.
Use a simple convention: the cap outline is a smooth arc; the gills are thin lines that start near the stem base and end at the cap rim; the stem is a narrow shape with two side edges and a top opening. Letter styles and line weights vary, so treat these as guides, not rigid rules.
- Draw a horizontal baseline for the cap rim.
- Sketch a downward-curving dome below the baseline.
- Mark the cap center on the baseline.
- Draw the stem upward from that center point.
- Add radial gill lines from the stem base to the cap rim.
Build the cap and stem contour
Start with the cap rim as a gentle curve, not a straight line. The dome hangs below it. The stem rises from the middle of the rim. Keep the stem width roughly one-third of the cap width for a balanced look; this is a hypothetical proportion you can adjust after measuring your own drawing space.
Check that the stem edges are parallel or slightly tapered. The stem top should be open or closed consistently. If the stem looks off-center, redraw the center mark and align the stem to it.
- Measure your paper width and choose a cap width that fits with margins.
- Draw the rim curve and mark its midpoint.
- Draw the dome arc below the rim, keeping the lowest point near the center.
- Draw two stem edges upward from the midpoint.
- Close the stem top with a small curve or flat line.
Add radial gills and label parts
Gills radiate from the stem attachment to the cap rim. In the inverted view, they appear on the upper surface of the cap. Draw them as thin lines that do not cross the stem. Space them evenly by eye, then adjust. Label cap, gills, and stem with short leader lines that touch the part without covering it.
Use a consistent labeling convention: place labels outside the drawing, use straight leader lines, and keep text horizontal. This makes your diagram readable even if your lettering style differs from someone else’s.
- Mark the stem base on the cap surface.
- Draw 8 to 12 gill lines from near the stem base to the rim.
- Keep gill lines inside the cap outline.
- Add three labels with leader lines.
- Check that each label points to the correct part.
Self-check proportions and orientation
Compare the cap width to the stem height. In a hypothetical example, a cap 10 cm wide might have a stem 6 cm tall. These numbers are examples only; measure your own drawing and keep units consistent. Check that the dome is below the rim, the stem is above the cap center, and the gills radiate from the stem base.
A valid alternative is a shallower dome or a wider stem, as long as the orientation and attachments remain correct. The rubric rewards clear orientation, correct attachments, and readable labels rather than a single perfect shape.
- Measure cap width and stem height with a ruler.
- Confirm the dome is below the rim line.
- Confirm the stem rises from the cap center.
- Confirm gills radiate from the stem base.
- Confirm labels are outside the drawing and readable.
Worked example
Draw an inverted mushroom with a cap 8 cm wide, a stem 5 cm tall, and 10 gill lines. Label cap, gills, and stem.
Worked answer
The cap rim is an 8 cm curve. The dome hangs below it with its lowest point near the center. The stem rises 5 cm from the rim midpoint, with two side edges and a small top curve. Ten thin gill lines radiate from the stem base to the rim without crossing the stem. Labels sit outside the drawing with leader lines touching the cap, a gill line, and the stem.
Four practice exercises
Exercise 1
Draw an inverted mushroom with a cap 6 cm wide and a stem 4 cm tall. Add 8 gill lines and label all three parts.
Show answer and check
A 6 cm rim curve with a dome below, a 4 cm stem rising from the midpoint, 8 radial gill lines from stem base to rim, and three outside labels.
Why: The cap width and stem height are measured with a ruler. The stem starts at the rim midpoint so it stays centered. Gill lines start near the stem base and end at the rim, showing radial direction without crossing the stem.
Check: Measure cap width and stem height. Confirm the dome is below the rim, the stem is above the center, gills do not cross the stem, and labels point to the correct parts.
Exercise 2
Draw an inverted mushroom with a shallow dome and a stem one-half the cap width. Use 12 gill lines. Label cap, gills, and stem.
Show answer and check
A wide rim with a shallow dome below, a stem half as wide as the cap rising from the center, 12 evenly spaced gill lines, and three labels outside the contour.
Why: A shallow dome is a valid alternative. The stem width is chosen as half the cap width, a hypothetical proportion. Centering the stem on the rim midpoint keeps the attachment correct. Twelve gills still radiate from the stem base.
Check: Check that the dome is below the rim, the stem is centered, gill lines stop at the rim, and labels are readable and outside the drawing.
Exercise 3
Draw an inverted mushroom and add a dashed line showing the cap center. Explain in one sentence why the stem must start there.
Show answer and check
The drawing shows the dome below the rim, the stem rising from a marked center point, radial gills, and a dashed center line. The sentence states that the stem attaches at the cap center so the mushroom looks balanced and the gills radiate correctly.
Why: The center mark makes the attachment point visible. Starting the stem there keeps the stem aligned with the gill origin. The dashed line is a check aid, not a required feature.
Check: Confirm the dashed line passes through the stem base and the rim midpoint. Check that gills radiate from the same area and labels are correct.
Exercise 4
Draw two inverted mushrooms side by side: one with a deep dome and one with a shallow dome. Use the same cap width and stem height for both. Label cap, gills, and stem on each.
Show answer and check
Two drawings share the same rim width and stem height. One dome curves deeply below the rim; the other curves shallowly. Both stems rise from the center, both have radial gills, and both are labeled.
Why: Keeping cap width and stem height equal isolates the dome shape as the variable. Both versions are valid if orientation and attachments are correct. Labels on each drawing make the comparison clear.
Check: Measure both cap widths and stem heights to confirm they match. Check that each dome is below its rim, each stem is centered, gills do not cross stems, and all labels are readable.
Common mistakes
- Drawing the stem downward from the cap top. Mark the cap center on the rim and draw the stem upward from that point.
- Making gills cross the stem. Start gill lines near the stem base and stop at the cap rim; do not draw through the stem.
- Placing the dome above the rim. Keep the rim as the upper boundary and draw the dome below it.
- Using labels that cover the drawing. Place labels outside the contour and use short leader lines that touch the part.
Self-check rubric
- Orientation: dome below the rim and stem pointing upward.
- Attachment: stem centered on the cap and gills radiating from the stem base.
- Contour: cap and stem outlines are closed and clear.
- Gills: lines stop at the rim and do not cross the stem.
- Labels: cap, gills, and stem labeled with readable leader lines.
- Valid alternatives: shallower dome or wider stem accepted if orientation and attachments are correct.
Questions and answers
How many gills should I draw?
Eight to twelve lines are enough to show radial direction. Keep spacing even by eye and stop at the rim.
Can the stem be wider than one-third of the cap?
Yes. One-third is a hypothetical starting proportion. A wider stem is valid if it stays centered and attached.
Do I need to shade the cap?
No. Shading is optional. Clear contour, radial gills, and correct orientation matter more.
What if my dome is shallow?
A shallow dome is a valid alternative. Keep the dome below the rim and the stem centered.