Free original lessons
Upside-Down Portrait Drawing: A Perceptual Shift Exercise
Learn to draw a portrait inverted to bypass naming and improve observation. Includes orientation checks, a worked example, and four self-contained practice tasks.
Free lesson
Four exercises
Worked answers
Object Drawing Lessons
Drawing a portrait upside down is a classic perceptual exercise: by rotating the reference and your paper, you reduce the tendency to draw a symbolic face and instead copy lines, angles, and spaces as they appear. This lesson defines a clear convention for orientation, provides a worked example, and gives four solvable tasks. All measurements are hypothetical examples; measure your own paper and reference. The exercise is about seeing relationships, not about producing a single correct likeness.
Practice materials: Printable downloads are not available for this lesson yet. Use the instructions and four exercises below.
Reference illustration
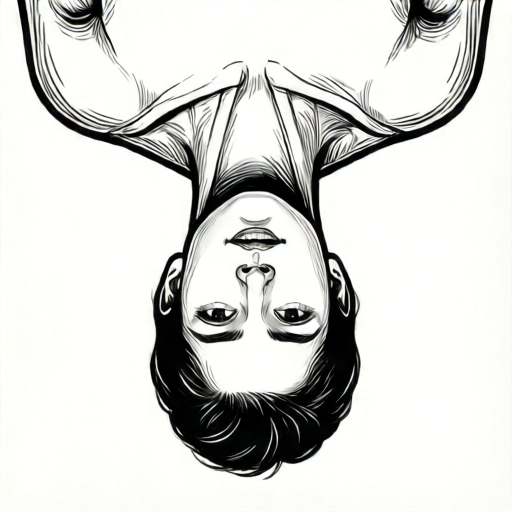
Use the stated measurements and conventions for each exercise.
Orientation convention and setup
Convention: place the reference so the top of the head points toward you and the chin points away. Tape it down. Place your drawing paper in the same orientation. Mark a small arrow on the back of both sheets pointing toward you; this is your orientation check. Every few minutes, confirm the arrow on the reference and the arrow on your paper point the same way. If they do not, stop and rotate one sheet.
Use a soft pencil and a sheet at least as large as the reference. Lightly draw a border rectangle on your paper with the same width-to-height ratio as the reference. Measure the reference with a ruler and record the numbers; for example, a hypothetical reference might be 12 cm wide and 16 cm tall, giving a ratio of 3:4. Your border should match that ratio, not necessarily the same size.
- Tape the inverted reference so its top edge is nearest you.
- Draw a border rectangle on your paper with the same ratio as the reference.
- Mark orientation arrows on the back of both sheets.
- Check the arrows before starting and every five minutes.
Copying by relationships, not by names
Work from large shapes to small details. First locate the outer boundary of the head as a set of straight segments. Compare each segment's direction to the edges of your border: is it closer to horizontal, vertical, or diagonal? Record angles as clock directions if that helps, for example 'this edge runs from 10 o'clock to 4 o'clock'. Then place the hair mass, the neck, and the shoulders as simple polygons.
Next, locate features by distances between them, not by what they represent. Measure with a pencil or ruler: the distance from the top of the head to the eye line, from the eye line to the chin, and from the left edge of the face to the right. Use the same units on your paper, scaled by the border ratio. If your border is half the reference width, halve every measured distance. Keep a written list of three or four key distances and check them before adding detail.
- Draw the outer head boundary as four to six straight segments.
- Add hair, neck, and shoulders as simple polygons.
- Measure three key distances and scale them to your border.
- Place feature positions as small marks, then refine outlines.
- Check orientation arrows and distance list before finishing.
Using x-height and letter-style variation
For any lettering or labels on the portrait, use this convention: x-height is the distance from the baseline to the midline of lowercase letters. Ascenders rise above the midline; descenders fall below the baseline. Letter styles vary, so do not force one universal shape. If you add a name or date, keep the baseline horizontal relative to your paper's orientation arrow. A valid alternative is to omit lettering entirely; the rubric rewards consistent orientation and measured relationships, not a specific style.
When comparing your drawing to the reference, rotate both back to upright only at the end. Before rotating, check that the orientation arrows still match. Then compare the three key distances you recorded. A difference of one or two millimeters on a hypothetical 12 cm reference is acceptable for this exercise; label any numerical tolerance you choose as a hypothetical example and measure your actual equipment.
- Define baseline and midline before adding any letters.
- Keep lettering aligned to the orientation arrow.
- Record three key distances and compare at the end.
- Rotate both sheets upright only after the orientation check.
Worked example
A hypothetical inverted reference is 12 cm wide and 16 cm tall. The distance from the top of the head to the eye line is 6 cm, and from the eye line to the chin is 5 cm. Your border is 6 cm wide. Scale the two distances and state where to place the eye-line mark.
Worked answer
Border ratio is 6/12 = 1/2. Scaled top-to-eye distance is 6 × 1/2 = 3 cm. Scaled eye-to-chin distance is 5 × 1/2 = 2.5 cm. Place the eye-line mark 3 cm from the top edge of your border, measured along the vertical center line. Check: 3 + 2.5 = 5.5 cm, which is less than the 8 cm border height, so the chin mark sits 5.5 cm from the top edge.
Four practice exercises
Exercise 1
A hypothetical inverted reference is 10 cm wide and 14 cm tall. Your border is 5 cm wide. The distance from the left edge of the face to the right edge is 8 cm. What scaled distance should you use, and what is the border height?
Show answer and check
Scaled width distance is 8 × (5/10) = 4 cm. Border height is 14 × (5/10) = 7 cm.
Why: The border ratio is 5/10 = 1/2. Multiply every reference measurement by 1/2. The height follows the same ratio.
Check: Verify 4 cm is half of 8 cm and 7 cm is half of 14 cm; confirm the border ratio 5:7 equals 10:14.
Exercise 2
An inverted reference has a hair mass whose top edge runs from 10 o'clock to 2 o'clock on the reference sheet. Your orientation arrow points toward you on both sheets. Describe the same edge on your paper using clock directions, and state one orientation check you would perform.
Show answer and check
The edge also runs from 10 o'clock to 2 o'clock on your paper. Check that both orientation arrows point toward you before drawing.
Why: When both sheets share the same orientation, clock directions transfer directly. The arrow check confirms the shared orientation.
Check: Compare the drawn edge to the reference edge after rotating neither sheet; both should read 10 to 2.
Exercise 3
A hypothetical reference is 16 cm tall. The top-to-eye distance is 7 cm and the eye-to-chin distance is 6 cm. Your border is 8 cm tall. Scale both distances and state the position of the chin mark from the top edge.
Show answer and check
Ratio is 8/16 = 1/2. Top-to-eye is 3.5 cm; eye-to-chin is 3 cm. The chin mark is 3.5 + 3 = 6.5 cm from the top edge.
Why: Scale each distance by the border ratio, then add them to locate the chin mark.
Check: Confirm 3.5 + 3 = 6.5 cm is less than the 8 cm border height, and each scaled value is half its reference value.
Exercise 4
You add a label with lowercase letters. The baseline is 2 cm above the bottom border edge and the midline is 1 cm above the baseline. Where is the x-height measured from and to, and what is its value?
Show answer and check
X-height is measured from the baseline to the midline. Its value is 1 cm.
Why: The convention defines x-height as baseline to midline. Subtract the baseline position from the midline position: 3 cm minus 2 cm equals 1 cm.
Check: Measure the vertical gap between the drawn baseline and midline; it should equal 1 cm, and both lines should align with the orientation arrow.
Common mistakes
- Rotating the paper mid-drawing without checking the orientation arrow. Stop, compare both arrows, and rotate one sheet back before continuing.
- Drawing the face upright on the page while the reference is inverted. Keep both sheets in the same orientation and copy the inverted shapes as they appear.
- Measuring distances but forgetting to scale them to the border ratio. Write the border ratio at the top of your paper and multiply or divide every measurement by it.
- Adding lettering with inconsistent baseline or midline. Mark baseline and midline lightly before lettering, or omit lettering.
Self-check rubric
- Orientation arrows on reference and drawing match at start and end.
- Border rectangle ratio matches the measured reference ratio.
- At least three key distances are recorded and scaled consistently.
- Outer head boundary is built from straight segments before detail.
- Lettering, if present, uses a defined baseline and midline; omission is valid.
- Final comparison uses measured distances, not resemblance alone.
Questions and answers
Why draw a portrait upside down?
Inverting the reference reduces the urge to draw a symbolic face and encourages copying lines, angles, and distances as they appear.
Do I need special paper or tools?
No. A pencil, ruler, and two sheets of paper are enough. Measure your own materials and label any chosen numbers as hypothetical examples.
How often should I check orientation?
Before starting and every five minutes, or whenever you feel uncertain about which way is up.
Is there one correct result?
No. The rubric rewards consistent orientation, measured relationships, and valid alternatives such as omitting lettering.