Free original lessons
Draw a Portrait Upside Down: A Brain-Teaser Exercise
Learn to copy an inverted portrait reference to bypass symbol recognition. Includes method, common mistakes, a worked example, and four practice tasks with checks.
Free lesson
Four exercises
Worked answers
Object Drawing Lessons
Copying a portrait while the reference is upside down is a classic brain-teaser that short-circuits your tendency to draw what you think a face should look like. By removing upright orientation, you force your attention onto lines, angles, and spaces rather than names like eye, nose, or mouth. This exercise does not teach portrait proportion or likeness accuracy; it trains observation and hand-eye coordination through an explicitly defined convention. You will use a simple measurement convention: x-height is measured from baseline to midline of lowercase letters, and letter styles vary, so treat any numeric values as hypothetical examples to be measured on your own equipment. All resources described here are planned and free, not yet built.
Practice materials: Printable downloads are not available for this lesson yet. Use the instructions and four exercises below.
Reference illustration
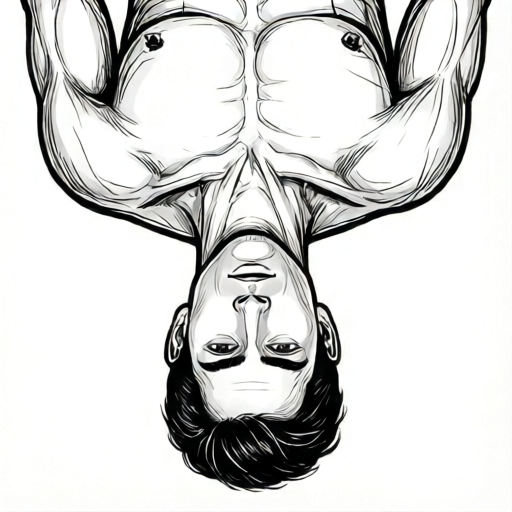
Use the stated measurements and conventions for each exercise.
The inverted-copy method
Place your reference portrait upside down on a flat surface. Do not rotate it during the drawing. Work on a blank frame of the same size. Begin by locating the outer boundary of the head and the shoulders as simple straight segments and curves, then build inward. Measure distances with a ruler or by marking intervals on a strip of paper; label any chosen numerical values as hypothetical examples. For instance, you might note that a segment spans 3.0 cm on your actual print, but verify with your own ruler. Keep units consistent, such as centimeters throughout.
Draw one small region at a time, comparing each new line to the lines already placed. Avoid naming features. If you catch yourself thinking 'that is the eye,' refocus on the shape's start point, direction, and length. Work from the outside toward the center and from large shapes to small ones. When the copy is complete, flip both the reference and your drawing upright together to compare. The flip-to-check comparison box is a planned feature of the printable; for now, use any two blank frames you prepare yourself.
- Place the reference upside down and secure it so it cannot rotate.
- Mark the outer boundary of the head and shoulders with light straight segments.
- Measure key intervals with a ruler or paper strip; record values in centimeters as hypothetical examples.
- Draw one region at a time, comparing each new line to existing lines.
- Complete the copy, then flip reference and drawing upright together to compare.
Convention and measurement
This exercise uses an explicitly defined convention so that checks are fair and repeatable. X-height is the distance from baseline to midline of lowercase letters in any printed label you add. Letter styles vary, so do not assume a universal x-height; measure the actual letters on your own reference or notes. For line placement, use a simple grid of horizontal and vertical intervals measured in centimeters. Any numbers you choose, such as a 2.0 cm spacing between guide lines, are hypothetical examples and must be verified on your equipment.
Because letter styles and handwriting vary, valid alternatives exist. A curve may be drawn as one smooth stroke or several short segments; both can satisfy the rubric if the overall shape and position match within your measured tolerance. Define your tolerance before starting, for example plus or minus 0.3 cm on a 10 cm segment, and label it as a hypothetical example. The goal is consistent observation, not a single universal answer.
- Measure the actual x-height of any labels you use and record it.
- Choose a grid spacing in centimeters and label it as a hypothetical example.
- Set a position tolerance before drawing and apply it consistently.
- Allow multiple valid stroke sequences if the final shape matches within tolerance.
Flip-to-check comparison
After copying, flip the reference and your drawing upright at the same time. Compare large relationships first: overall height and width, the angle of the shoulders, and the position of the head within the frame. Then compare smaller intervals using your recorded measurements. Note differences in centimeters and decide whether each difference is within your stated tolerance. This comparison is about observation, not likeness accuracy.
The planned printable includes a flip-to-check comparison box, but it is not yet built. You can prepare two identical blank frames yourself and place them side by side after flipping. Record at least three measured differences and one qualitative observation, such as whether a curve was drawn as one stroke or several. Keep your notes with the drawing so the check is repeatable.
- Flip reference and drawing upright together.
- Compare overall height, width, and shoulder angle first.
- Measure at least three intervals and record differences in centimeters.
- Decide whether each difference is within your pre-set tolerance.
Worked example
A learner places an upside-down portrait reference on a table and a blank frame of the same size beside it. They measure a shoulder segment as 4.0 cm on their print and set a tolerance of plus or minus 0.3 cm. They draw the outer boundary first, then one region at a time, and finally flip both upright. Describe a reasonable check and outcome.
Worked answer
The learner compares overall height and width first, then measures the shoulder segment on the drawing. If the drawn segment is 4.2 cm, the difference is 0.2 cm, which is within the 0.3 cm tolerance. They record this difference and one qualitative note, such as whether a curve was drawn as one stroke or several. The check is repeatable because the tolerance and units are stated.
Four practice exercises
Exercise 1
Prepare two identical blank frames 10 cm by 10 cm. Place an upside-down portrait reference beside them. Draw only the outer boundary of the head and shoulders using straight segments, then flip both upright and compare overall height and width. Record one measured difference in centimeters.
Show answer and check
A completed drawing with an outer boundary and a recorded difference, such as overall height differing by 0.4 cm, compared against a stated tolerance.
Why: Starting with the outer boundary forces attention on large shapes before interior details, which is the core of the inverted-copy method.
Check: Flip reference and drawing upright together; measure overall height and width with a ruler; confirm the recorded difference is in centimeters and compared to a stated tolerance.
Exercise 2
Using an upside-down reference, draw one small region without naming it. Before drawing, write the start point, direction, and length of the first line in centimeters as a hypothetical example. After drawing, measure the same line and record the difference.
Show answer and check
A drawing of one region with a pre-written line description and a measured difference, such as a planned 2.5 cm line drawn as 2.7 cm, within a stated tolerance.
Why: Describing a line by start point, direction, and length replaces feature naming with observable properties.
Check: Compare the pre-written description to the measured line; confirm units are consistent and the difference is within the stated tolerance.
Exercise 3
Measure the x-height of lowercase letters in a printed label on your reference. Record the value in centimeters as a hypothetical example. Then draw a short curve from the upside-down reference twice: once as one smooth stroke and once as three short segments. Flip both upright and decide whether both versions satisfy a stated position tolerance.
Show answer and check
A recorded x-height value and two curve versions, with a judgment that both satisfy the tolerance if their positions match within the stated limit.
Why: Letter styles vary, so measuring actual letters and allowing alternative stroke sequences keeps the check fair and repeatable.
Check: Re-measure the x-height on the actual label; compare both curve versions to the reference position using the stated tolerance.
Exercise 4
Complete a full upside-down copy on a blank frame. After flipping upright, list three measured differences in centimeters and one qualitative observation about stroke sequence. State whether each difference is within your pre-set tolerance.
Show answer and check
A full copy with three measured differences, one qualitative note, and a clear within-or-outside judgment for each difference against the stated tolerance.
Why: A full copy followed by structured comparison trains sustained observation and makes the check repeatable.
Check: Flip reference and drawing upright together; re-measure the three intervals; confirm units, tolerance, and judgments are recorded consistently.
Common mistakes
- Rotating the reference or the paper during drawing. Secure both with tape or weights and keep them upside down until the flip-to-check stage.
- Naming features and drawing symbols instead of shapes. Refocus on start point, direction, and length of each line; cover completed regions if needed.
- Using inconsistent units or unmeasured guesses. Measure with a ruler or paper strip and record all values in centimeters, labeling hypothetical examples.
- Expecting a single correct stroke order. Allow multiple valid stroke sequences if the final shape matches within your stated tolerance.
Self-check rubric
- Reference and drawing remain upside down until the flip-to-check stage.
- Outer boundary is placed before interior regions.
- At least three intervals are measured and recorded in consistent units.
- Differences are compared against a pre-set tolerance labeled as a hypothetical example.
- Valid alternative stroke sequences are accepted if final shape and position match within tolerance.
- X-height convention is stated and measured on actual letters, not assumed.
Questions and answers
Does this exercise improve likeness accuracy?
No. It trains observation and hand-eye coordination by bypassing symbol recognition; portrait proportion and likeness are outside this brief.
What does x-height mean here?
X-height is baseline to midline of lowercase letters. Letter styles vary, so measure the actual letters you use rather than assuming a standard.
Are the numerical values in this lesson fixed standards?
No. Any numbers are hypothetical examples. Measure your own equipment and keep units consistent, such as centimeters.
Can I use a different stroke order?
Yes. The rubric allows valid alternatives if the final shape and position match within your pre-set tolerance.