Free original lessons
Ratio Checks for Arm and Leg Proportions in Figure Drawing
Learn to measure limb length against total body height using simple ratios, with a worksheet plan and self-check exercises for drawing arms and legs proportion exercises.
Free lesson
Four exercises
Worked answers
Object Drawing Lessons
Proportion errors in figure drawing often come from guessing limb length instead of checking it against a stable reference. This lesson teaches a ratio method: measure total body height, then compare arm and leg lengths as fractions of that height. You will use a simple convention for landmarks, record measurements in the same units, and apply a self-check table. The approach works for any style because it checks relative length, not absolute size. All resources described are planned and free; none are built yet.
Practice materials: Printable downloads are not available for this lesson yet. Use the instructions and four exercises below.
Reference illustration
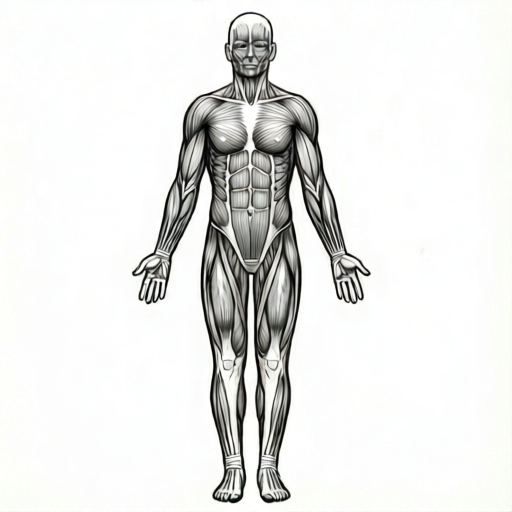
Use the stated measurements and conventions for each exercise.
Define landmarks and a measurement convention
Choose clear landmarks before measuring. For total body height, use the baseline (bottom of the feet) to the midline of the top of the head. For arm length, use the shoulder joint center to the wrist crease. For leg length, use the hip joint center to the ankle bone. These are drawing landmarks, not anatomical detail. Write them on your reference figure so every measurement uses the same points.
Use one unit throughout, such as centimeters on a printed reference or arbitrary units on a grid. If you measure a printed figure, record the actual printed height with a ruler; do not assume a standard print size. Any numerical ratio you choose for practice is a hypothetical example, not a universal rule. The goal is to check consistency between your drawing and your chosen reference ratio.
- Mark baseline, head midline, shoulder joint, wrist crease, hip joint, and ankle bone on the reference figure.
- Measure total height in your chosen unit and record it.
- Measure arm length and leg length using the defined landmarks.
- Divide each limb length by total height to get a ratio.
- Write the ratios in a self-check table beside the drawing.
Apply ratio checks to a drawn figure
After drawing a figure, measure the drawn limb lengths with the same landmarks and units. Compare each drawn ratio to your reference ratio. A small difference may be acceptable for style; a large difference signals a proportion error. Because letter styles and figure styles vary, treat the ratio as a checkable target you define, not a single correct answer for all art.
For arm-to-body ratio, divide arm length by total height. For leg-to-body ratio, divide leg length by total height. Keep units consistent: if height is in centimeters, limb length must also be in centimeters. Record both the reference ratio and the drawn ratio so the comparison is visible.
- Measure the drawn figure's total height from baseline to head midline.
- Measure the drawn arm from shoulder joint to wrist crease.
- Measure the drawn leg from hip joint to ankle bone.
- Compute drawn arm ratio and drawn leg ratio.
- Subtract each drawn ratio from the reference ratio and note the difference.
Use a self-check table and adjust
A self-check table has columns for body part, reference length, drawn length, reference ratio, drawn ratio, and difference. Fill it after each drawing. If the arm ratio is too small, lengthen the arm at the wrist end or move the shoulder landmark; if the leg ratio is too large, shorten the leg at the ankle end or adjust the hip landmark. Make one change at a time and remeasure.
Valid alternatives exist: you may define arm length to the fingertips instead of the wrist crease, as long as you use the same definition for reference and drawing. State your convention at the top of the worksheet. The rubric rewards consistent measurement and documented choices, not a single universal limb length.
- Create a table with the six columns listed above.
- Enter reference measurements and ratios first.
- Enter drawn measurements and ratios second.
- Compute differences and circle any difference larger than your chosen tolerance.
- Adjust one landmark, remeasure, and update the table.
Plan the printable worksheet
The planned worksheet includes a reference figure with labeled arm and leg ratios, a measuring guide, blank figures for drawing limbs at chosen ratios, and a self-check table. The answer sheet is separate so learners can attempt the check before comparing. Because the worksheet is planned and not yet built, treat these as design specifications: list the landmarks, the unit, the chosen hypothetical ratios, and the tolerance on the sheet.
Include a note that numerical ratios are hypothetical examples chosen for practice. Learners should measure their actual printed sheet with a ruler and record the printed height. This avoids relying on assumed printer tolerances or invented standards.
- Draft the reference figure with labeled landmarks.
- Write the measuring guide with unit and landmark definitions.
- Add blank figures and a blank self-check table.
- Create a separate answer sheet with one worked check.
- Label all numerical ratios as hypothetical examples.
Worked example
A reference figure measures 20 cm from baseline to head midline. The arm from shoulder joint center to wrist crease is 8 cm. The leg from hip joint center to ankle bone is 10 cm. Compute the arm-to-body and leg-to-body ratios and state them as decimals to two places.
Worked answer
Arm ratio = 8 ÷ 20 = 0.40. Leg ratio = 10 ÷ 20 = 0.50. Record both in the self-check table with unit cm.
Four practice exercises
Exercise 1
A drawn figure is 30 cm from baseline to head midline. The drawn arm from shoulder joint center to wrist crease is 12 cm. Compute the drawn arm-to-body ratio to two decimal places.
Show answer and check
0.40
Why: Divide arm length by total height: 12 ÷ 30 = 0.40. Both measurements are in centimeters, so the ratio is unitless.
Check: Reverse the division: 0.40 × 30 = 12 cm, which matches the measured arm length.
Exercise 2
A reference figure is 25 cm tall. Its leg from hip joint center to ankle bone is 11 cm. A drawing of the same figure has total height 50 cm and drawn leg length 20 cm. Compute the reference leg ratio and the drawn leg ratio, then state the difference to two decimal places.
Show answer and check
Reference ratio 0.44; drawn ratio 0.40; difference 0.04.
Why: Reference: 11 ÷ 25 = 0.44. Drawn: 20 ÷ 50 = 0.40. Difference: 0.44 − 0.40 = 0.04. Units are centimeters for lengths and unitless for ratios.
Check: Add the difference back to the drawn ratio: 0.40 + 0.04 = 0.44, matching the reference ratio.
Exercise 3
A figure is 40 cm tall. You want a hypothetical arm-to-body ratio of 0.35 using the shoulder-to-wrist convention. What arm length in centimeters should the drawing have?
Show answer and check
14 cm
Why: Multiply total height by the chosen ratio: 40 × 0.35 = 14 cm. The ratio is a hypothetical example for this exercise.
Check: Divide the result by total height: 14 ÷ 40 = 0.35, matching the chosen ratio.
Exercise 4
A drawing is 60 cm tall. Its arm from shoulder joint center to wrist crease is 18 cm, and its leg from hip joint center to ankle bone is 27 cm. Compute both drawn ratios to two decimal places and state which limb ratio is larger.
Show answer and check
Arm ratio 0.30; leg ratio 0.45; the leg ratio is larger.
Why: Arm: 18 ÷ 60 = 0.30. Leg: 27 ÷ 60 = 0.45. Compare 0.30 and 0.45; 0.45 is larger. All lengths are in centimeters.
Check: Multiply each ratio by total height: 0.30 × 60 = 18 cm and 0.45 × 60 = 27 cm, matching the measured lengths.
Common mistakes
- Measuring arm length from the neck or torso edge instead of the shoulder joint center. Mark the shoulder joint center on both reference and drawing, then measure from that point to the wrist crease.
- Using different units for height and limb length, such as centimeters for height and grid squares for limbs. Convert all measurements to one unit before dividing, and write the unit at the top of the self-check table.
- Treating a hypothetical practice ratio as a universal rule for all figures. Label chosen ratios as examples and compare drawn ratios to the reference ratio you defined for that exercise.
- Changing several landmarks at once after a failed check. Adjust one landmark, remeasure, and update the table before making another change.
Self-check rubric
- Landmarks are labeled and used consistently on reference and drawing.
- All measurements use one stated unit.
- Arm ratio is computed as arm length divided by total height.
- Leg ratio is computed as leg length divided by total height.
- Self-check table includes reference and drawn ratios with differences.
- Any chosen numerical ratio is labeled as a hypothetical example.
- Valid alternative landmark conventions are stated and applied consistently.
Questions and answers
What landmarks define arm and leg length in this lesson?
Arm length is shoulder joint center to wrist crease; leg length is hip joint center to ankle bone. You may define arm length to fingertips if you state that convention and use it consistently.
Are the numerical ratios in the examples universal rules?
No. They are hypothetical examples chosen for practice. Measure your actual reference and record your own ratios.
How do I check a drawing if my style changes limb shapes?
Use the same landmarks and units for reference and drawing. Compare ratios, not silhouettes. Style can change shape while ratio checks remain valid.
What tolerance should I use for a difference?
Choose a tolerance and state it on the worksheet. A small difference may be acceptable for style; the important part is that the check is consistent and recorded.