Free original lessons
Draw a Three-Strand Braid: Alternating Overlap Steps
Learn to draw braided hair with a clear three-strand guide, alternating over-under overlaps, and a tapered end using simple checkable steps.
Free lesson
Four exercises
Worked answers
Object Drawing Lessons
A three-strand braid is a repeating pattern of overlaps. Draw three parallel strands, then alternate which strand crosses over the middle. Each overlap creates a small lens shape at the crossing. Near the end, reduce strand width gradually to taper. This guide uses a simple convention: strand edges are drawn as smooth curves, and overlap boxes mark each crossing. Letter styles and hair texture vary, so treat proportions as adjustable. Measure your own paper and pencil if you set numerical examples; any numbers here are hypothetical.
Practice materials: Printable downloads are not available for this lesson yet. Use the instructions and four exercises below.
Reference illustration
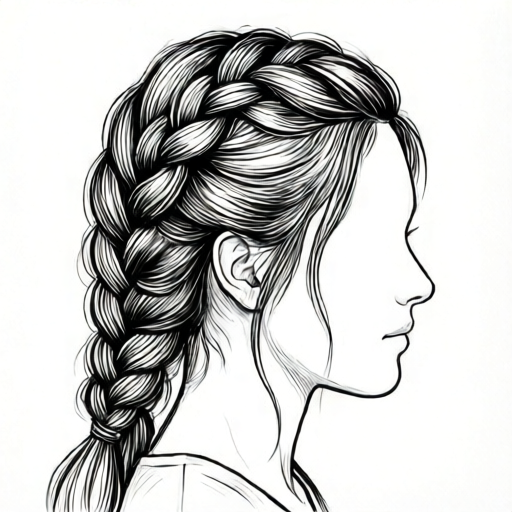
Use the stated measurements and conventions for each exercise.
Set up three strands and a center line
Draw a light vertical center line. Add three parallel curved lines on each side to suggest three strands: left, middle, right. Keep spacing even at the top and slightly narrower toward the bottom. The center line helps you judge symmetry but is not part of the final braid.
Label the strands L, M, R lightly. Decide a strand width in your own units, for example a hypothetical 1 cm at the top tapering to 0.5 cm near the end. These values are examples only; measure your actual drawing space.
- Draw a vertical center line.
- Draw three parallel strand outlines on each side, evenly spaced at the top.
- Mark L, M, R near the top.
- Check that the three strands are distinct and not touching except at planned overlaps.
Alternate the first two overlaps
In a three-strand braid, the right strand crosses over the middle, then the left strand crosses over the new middle. Each crossing forms a small overlap box. Draw the crossing as a smooth curve that hides the strand underneath.
Keep the overlap boxes the same size at first. A common mistake is making the first box too large, which crowds later steps. Use a light pencil so you can adjust.
- Cross R over M; draw the overlap box and erase the hidden line inside it.
- Cross L over the new middle strand; draw the second overlap box.
- Check that the two boxes alternate left and right.
- Repeat the pattern downward, keeping box size consistent.
Taper the braid end
Near the bottom, reduce strand width gradually. Draw the final overlap smaller, then bring the three strands into a single tapered tip. The taper should look like a narrowing triangle, not a sudden cut.
If you use a numerical taper, label it as hypothetical: for example, reduce width by 0.1 cm per overlap. Measure your own drawing to choose a workable reduction.
- Shrink each overlap box slightly as you go down.
- Draw the last crossing with the narrowest strands.
- Bring the three strand edges together into a tapered tip.
- Check that the taper is gradual and the tip is centered.
Check the repeating pattern
A correct braid alternates over-under crossings. Count the overlap boxes: they should alternate sides. The strand that was hidden should reappear on the other side of the next box.
Use a simple arithmetic check: if you plan five overlaps, number them 1 to 5 and mark L or R. The sequence should alternate, such as R, L, R, L, R. Adjust any box that breaks the pattern.
- Number each overlap box lightly.
- Mark whether the crossing strand came from the left or right.
- Check the sequence alternates.
- Erase guide lines and darken final curves.
Worked example
Draw a short three-strand braid with four overlap boxes and a tapered end. Use a center line and label each box L or R.
Worked answer
Draw a center line and three strands. Box 1: R over M, label R. Box 2: L over new M, label L. Box 3: R over M, label R. Box 4: L over M, label L. Shrink boxes 3 and 4 slightly, then bring strands to a centered tapered tip. The sequence R, L, R, L alternates correctly.
Four practice exercises
Exercise 1
Draw three strands and two overlap boxes. Label the first box R and the second box L. Check that the sequence alternates.
Show answer and check
First box: right strand crosses over middle, labeled R. Second box: left strand crosses over the new middle, labeled L. Sequence R, L alternates.
Why: A three-strand braid alternates right and left crossings. Two boxes should show one of each.
Check: Number the boxes 1 and 2. Confirm box 1 is R and box 2 is L, and that no hidden line remains inside either box.
Exercise 2
Draw a braid with five overlap boxes. Number them and mark L or R. What sequence should appear?
Show answer and check
A valid alternating sequence is R, L, R, L, R or L, R, L, R, L, depending on which side you start.
Why: Each crossing must alternate sides. Five boxes therefore alternate five times.
Check: Read the labels in order. No two adjacent labels should be the same.
Exercise 3
Draw a braid that tapers over the last two overlaps. Describe how the box sizes change and where the tip sits.
Show answer and check
The last two overlap boxes are smaller than the earlier boxes, and the three strands converge to a centered tapered tip below the final box.
Why: Tapering means gradual narrowing, not a sudden stop. Shrinking the last boxes creates a natural tip.
Check: Compare the width of the last two boxes to the first box. They should be smaller, and the tip should align with the center line.
Exercise 4
Draw a four-box braid and intentionally make box 3 the same side as box 2. Then correct it and explain the fix.
Show answer and check
The incorrect sequence might be R, L, L, R. Correct it by changing box 3 to R, giving R, L, R, L. The fix is to change box 3 so it alternates with box 2.
Why: Adjacent boxes must alternate. If box 2 is L, box 3 must be R.
Check: List the labels. Check that no adjacent pair matches. Redraw the corrected box and erase the hidden line.
Common mistakes
- Crossing the same strand twice in a row. Alternate: after a right-over-middle, the next crossing should be left-over-middle.
- Making overlap boxes different sizes. Use a light guide box for each crossing and keep them similar until the taper.
- Ending the braid with a blunt cut. Reduce strand width gradually over the last two or three overlaps to form a tapered tip.
- Leaving hidden lines visible inside overlap boxes. Erase the line of the strand that passes underneath at each crossing.
Self-check rubric
- Three distinct strands are visible at the top.
- Overlap boxes alternate left and right.
- Hidden lines are erased inside each overlap box.
- The braid tapers gradually to a centered tip.
- The pattern is consistent and checkable by numbering boxes.
Questions and answers
How many strands does this braid use?
Three strands. The pattern alternates the right and left strands over the middle.
Do I need to draw hair texture?
No. This guide focuses on strand structure and overlap. Texture is optional and outside the boundary.
Can the braid curve?
Yes. Keep the overlap pattern consistent even if the center line curves gently.
How do I know the taper is gradual?
Check that each overlap box is slightly smaller than the one above it, and the tip is centered.