Free original lessons
How to Draw an Isometric Brick Wall with Coursing and Mortar Joints
Learn isometric brick wall drawing: set up three axes, lay alternating courses, and construct mortar joints with clear steps, checks, and practice tasks.
Free lesson
Four exercises
Worked answers
Object Drawing Lessons
This lesson teaches a repeatable method for drawing a brick wall in isometric projection. You will establish three axes, lay out coursing with alternating half-brick offsets, and construct mortar joints as consistent gaps between brick faces. The focus is structural layout and joint construction, not surface texture or masonry history. All measurements below are hypothetical examples; measure your own paper and tools before drawing. Use a simple convention: x-height means the vertical distance from baseline to midline of a letter or brick face, and letter styles may vary, so accept any consistent, legible style that meets the rubric.
Practice materials: Printable downloads are not available for this lesson yet. Use the instructions and four exercises below.
Reference illustration
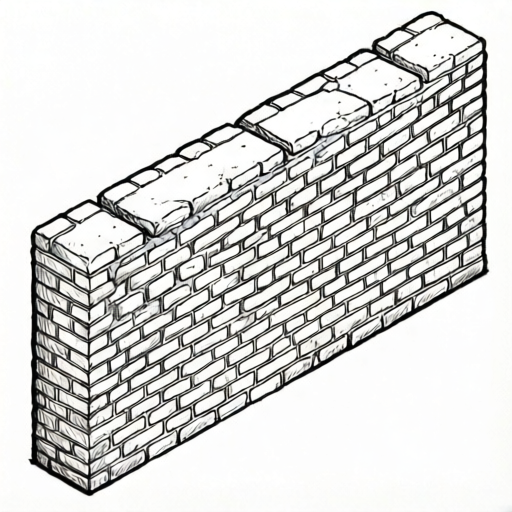
Use the stated measurements and conventions for each exercise.
Set up the isometric axes and wall plane
Isometric drawing uses three axes separated by 120 degrees on paper: one vertical axis and two axes at 30 degrees above horizontal. For a wall, choose the vertical axis for height, one 30-degree axis for wall length, and the other 30-degree axis for wall depth. Mark a baseline and a left origin point. Draw a light construction rectangle whose sides follow the length and height axes; this is the wall face you will fill with courses.
Decide a unit length for one brick along the length axis and one unit for course height along the vertical axis. For example, use 20 mm per brick length and 8 mm per course height on paper. These are hypothetical values; measure your actual ruler and paper to choose workable numbers. Keep all units in millimetres and write the chosen values at the top of the page so every course uses the same scale.
- Mark an origin and draw a vertical axis, a 30-degree length axis, and a 30-degree depth axis.
- Draw a light wall-face rectangle using the length and height axes.
- Label the chosen brick length and course height in millimetres.
- Check that the rectangle corners meet the axes cleanly before adding bricks.
Lay out coursing with alternating offsets
Coursing means horizontal rows of bricks. In a running bond, each course is offset by half a brick from the course below. Draw course lines first as light horizontals spaced by the course height. Then place brick divisions along each course line. On course one, start a full brick at the left edge. On course two, start with a half brick so the vertical joints do not align with course one. Continue alternating full and half starts.
Keep joint positions consistent: a vertical joint in one course should fall at the midpoint of the brick below. Use a light centre mark on each brick to place the next course's joint. This produces the staggered pattern that reads as coursing. Do not shade yet; layout lines must remain visible for checking.
- Draw horizontal course lines at the chosen course height.
- On course one, mark full brick lengths from the left edge.
- On course two, begin with a half brick, then continue full brick lengths.
- Alternate half and full starts for each subsequent course.
- Check that vertical joints sit at midpoints of bricks in the course below.
Construct mortar joints as consistent gaps
Mortar joints are the gaps between brick faces. In isometric drawing, show them as narrow bands along the length axis between bricks and along the vertical axis between courses. Choose a joint width, for example 2 mm on paper, and apply it uniformly. Draw each brick face shorter than the full unit by the joint width at each end (for a 20 mm unit and 2 mm joint, the visible face is 16 mm). Do not draw joints as random lines; they must follow the same axes as the wall.
To show joint depth, add a thin darker line inside each joint band on the side facing away from the light. Keep this shading simple and consistent. The joint band should be visible but not dominate the brick faces. Check that every joint has the same width and that no joint crosses a brick face.
- Choose a joint width in millimetres and write it on the page.
- Shorten each brick face by the joint width on both ends.
- Draw joint bands along the length and vertical axes.
- Add a thin depth line inside each joint band on the shaded side.
- Check uniformity by measuring three joints with a ruler.
Complete the wall and verify the layout
Finish by darkening brick outlines and joint bands while keeping construction lines light. Add the top course and the wall edges. Verify that every course alternates offset, every joint is the chosen width, and all lines follow the three isometric axes. A valid alternative is to draw the wall from the opposite end; the pattern should still alternate and joints should still align at midpoints. Accept any consistent lettering or labelling style that meets the rubric.
- Darken final brick and joint lines.
- Erase or lighten construction lines.
- Check course alternation from bottom to top.
- Measure joint widths at three locations.
- Confirm all lines follow the vertical or 30-degree axes.
Worked example
Draw a three-course isometric wall section using a brick length of 20 mm, course height of 8 mm, and joint width of 2 mm. Course one starts with a full brick; course two starts with a half brick.
Worked answer
Set the origin and three axes. Draw three horizontal course lines 8 mm apart. On course one, mark 20 mm brick lengths from the left edge, leaving 2 mm gaps. On course two, begin with a 10 mm half brick, then continue 20 mm bricks with 2 mm gaps. On course three, repeat course one's full-brick start. Draw joint bands 2 mm wide along the length and vertical axes, add one thin depth line per joint, and darken final lines. Check that course two joints sit at midpoints of course one bricks and that three measured joints equal 2 mm.
Four practice exercises
Exercise 1
A wall has four courses. Course one starts with a full brick of 20 mm. What is the starting length of course two if the running bond offset is half a brick?
Show answer and check
10 mm.
Why: Half of 20 mm is 10 mm, so course two begins with a half brick.
Check: Measure the first brick in course two with a ruler; it should be 10 mm before the first joint.
Exercise 2
You choose a joint width of 2 mm and a brick length of 20 mm. How long is the visible brick face along the length axis after subtracting joints at both ends?
Show answer and check
16 mm.
Why: Subtract 2 mm at each end: 20 minus 2 minus 2 equals 16 mm.
Check: Measure a drawn brick face between two joint bands; it should read 16 mm.
Exercise 3
A three-course wall uses course height 8 mm. What is the total height from the baseline to the top of course three, ignoring joint thickness between courses?
Show answer and check
24 mm.
Why: Three courses at 8 mm each: 3 times 8 equals 24 mm.
Check: Measure from baseline to the top course line; it should be 24 mm.
Exercise 4
In a running bond, course one has joints at 20 mm and 40 mm from the left edge. Where should the first vertical joint of course two fall if it starts with a half brick?
Show answer and check
At 10 mm from the left edge.
Why: A half-brick start places the first joint after 10 mm, which is the midpoint of the first 20 mm brick below.
Check: Check that the course two joint aligns with the centre mark of the first brick in course one.
Common mistakes
- Drawing vertical joints that align from course to course. Offset each course by half a brick and check that joints sit at midpoints of the course below.
- Using inconsistent joint widths. Write the chosen joint width on the page and measure three joints with a ruler.
- Mixing perspective lines with isometric axes. Keep every wall line parallel to the vertical axis or one of the two 30-degree axes.
- Shading joints so heavily that brick faces disappear. Use one thin depth line per joint and keep brick faces lighter than joint bands.
Self-check rubric
- Three isometric axes are present and wall lines follow them.
- Course lines are evenly spaced at the chosen course height.
- Courses alternate full and half-brick starts.
- Vertical joints align at midpoints of the course below.
- Mortar joint width is consistent and labelled.
- Joint depth shading is simple and does not obscure brick faces.
- Final lines are clear and construction lines are light.
- Any consistent labelling or lettering style is accepted if legible.
Questions and answers
What does coursing mean in this drawing?
Coursing is the arrangement of horizontal rows of bricks. Here it means drawing course lines at equal vertical spacing and alternating the starting offset each row.
How wide should mortar joints be?
Choose a width that is visible on your paper, such as 2 mm, and label it as a hypothetical example. Measure your actual ruler and keep the same width everywhere.
Can I start the wall from the right side?
Yes. Starting from either end is valid if courses alternate and joints align at midpoints of the course below.
Do I need to draw brick texture?
No. This lesson focuses on coursing layout and joint construction. Texture is outside the boundary of this task.