Free original lessons
Cracked Glass Drawing: Radial Fractures and Shard Shading
Learn to draw cracked glass from a center impact point using radial fracture lines, concentric rings, and shard shading with a clear convention and rubric.
Free lesson
Four exercises
Worked answers
Object Drawing Lessons
Cracked glass is a pattern of lines radiating from an impact point, crossed by irregular concentric rings that divide the surface into shards. This lesson teaches a repeatable construction: place the impact point, draw primary radial lines, add secondary branches and rings, then shade shards so edges read as bright and interiors as slightly darker. A defined convention keeps the drawing checkable while allowing valid stylistic alternatives. All measurements are hypothetical examples; measure your own paper and tools.
Practice materials: Printable downloads are not available for this lesson yet. Use the instructions and four exercises below.
Reference illustration
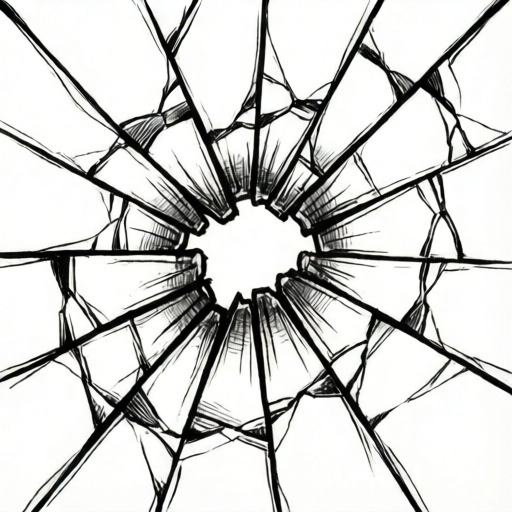
Use the stated measurements and conventions for each exercise.
Construction from the impact point
Begin by marking a single impact point slightly off-center on your paper. This point is the origin of all primary fracture lines. Using a light pencil, draw five to seven primary radial lines outward from the impact point, spacing them unevenly. Uneven spacing looks natural and prevents a mechanical starburst.
Next, add concentric rings at increasing distances from the impact point. Rings should be irregular, not perfect circles, and should connect adjacent radial lines. Where a ring meets a radial line, add a short secondary branch that splits away at a shallow angle. Keep branches shorter than the primary lines.
- Mark the impact point with a small dot.
- Draw 5 to 7 primary radial lines outward, spacing them unevenly.
- Add 2 to 3 irregular concentric rings connecting adjacent radial lines.
- Add short secondary branches at ring-line intersections.
- Lightly erase construction marks before shading.
Shard shading convention
Use this convention: each shard receives a bright edge along its fracture lines and a slightly darker interior tone. The bright edge represents light catching the broken edge; the darker interior separates one shard from the next. Shade with short parallel strokes that follow the shard's longest dimension.
Vary tone between adjacent shards by one or two steps so the pattern reads clearly. Do not shade every shard identically. Leave the impact point area lightest, since shards near the impact are smallest and most fragmented. Valid alternatives include cross-hatching instead of parallel strokes, provided the bright-edge and darker-interior relationship is preserved.
- Outline each shard lightly before shading.
- Leave a narrow bright band along every fracture line.
- Fill the shard interior with parallel strokes following its longest dimension.
- Vary adjacent shard tones by one or two steps.
- Keep the area nearest the impact point lightest.
Checking proportion and line quality
Check that primary radial lines are longer than secondary branches and that rings are closer together near the impact point. Measure with a ruler if needed: for a hypothetical example, primary lines might be 60 to 90 millimeters long while branches are 10 to 25 millimeters. These values are examples only; choose lengths that fit your paper.
Line quality matters. Fracture lines should taper slightly toward their ends and should not all be the same thickness. Thicker lines near the impact point and thinner lines at the outer edges suggest stress distribution. Avoid perfectly straight lines; slight waver reads as glass fracture.
- Compare primary line lengths to branch lengths.
- Check ring spacing: tighter near the impact point, wider outward.
- Confirm lines taper toward their ends.
- Confirm no two adjacent shards share identical shading.
Worked example
On a 150 by 100 millimeter sheet, place an impact point 40 millimeters from the left edge and 50 millimeters from the top. Draw five primary radial lines of lengths 70, 80, 65, 75, and 60 millimeters. Add two irregular rings at roughly 20 and 45 millimeters from the impact point. Shade three shards with tones 1, 2, and 1, leaving bright edges.
Worked answer
The impact point sits off-center, giving longer lines to the right. Primary lines are uneven in length and spacing. Rings are tighter near the impact point and wider outward. Shard tones alternate 1, 2, 1 with bright edges along fracture lines, so adjacent shards differ by one step.
Four practice exercises
Exercise 1
Draw a cracked glass pattern with an impact point near the top-left corner. Use six primary radial lines and two rings. Shade four shards with tones 1, 2, 1, 2.
Show answer and check
A pattern with six uneven radial lines from the top-left impact point, two irregular rings, and four shards shaded in alternating tones with bright edges.
Why: Six lines give enough density without clutter; two rings divide the surface into shards; alternating tones separate adjacent shards.
Check: Confirm six primary lines, two rings, and that no two adjacent shards share the same tone.
Exercise 2
Draw a cracked glass pattern with a centered impact point. Use five primary radial lines of lengths 50, 60, 55, 65, and 45 millimeters. Add three rings at 15, 30, and 50 millimeters. Shade five shards using cross-hatching.
Show answer and check
A centered pattern with five uneven radial lines, three rings spaced tighter near the center, and five cross-hatched shards each with a bright edge.
Why: Centered impact gives symmetric reach; three rings create more shards; cross-hatching is a valid alternative if bright edges remain.
Check: Measure ring distances and confirm they increase outward; check each shard has a bright edge.
Exercise 3
Draw a cracked glass pattern with an off-center impact point 30 millimeters from the right edge. Use seven primary radial lines and two rings. Shade six shards with tones 1, 2, 3, 2, 1, 2.
Show answer and check
An off-center pattern with seven radial lines, two rings, and six shards shaded in a stepped tone sequence with bright edges.
Why: Seven lines increase fragmentation; stepped tones create depth; off-center placement gives longer lines to the left.
Check: Confirm seven lines, two rings, and that tone steps change by one between adjacent shards.
Exercise 4
Draw a cracked glass pattern with an impact point near the bottom center. Use five primary radial lines and three rings. Shade four shards with parallel strokes, keeping the impact area lightest.
Show answer and check
A bottom-center pattern with five radial lines, three rings, and four parallel-stroked shards with the lightest tone nearest the impact point.
Why: Bottom placement changes line direction; three rings add shard count; lightest tone near impact follows the convention.
Check: Check that the shard nearest the impact point is lightest and that every fracture line has a bright band.
Common mistakes
- Drawing perfectly even radial lines like a starburst. Space primary lines unevenly and vary their lengths slightly.
- Making concentric rings perfect circles. Draw rings as irregular loops that connect adjacent radial lines.
- Shading every shard with the same tone. Vary adjacent shard tones by one or two steps and keep bright edges.
- Ignoring the bright edge along fracture lines. Leave a narrow unshaded band along each fracture line before filling the shard interior.
Self-check rubric
- Impact point is clearly marked and off-center or centered deliberately.
- Five to seven primary radial lines are present with uneven spacing.
- Two to three irregular concentric rings connect adjacent radial lines.
- Secondary branches are shorter than primary lines.
- Every fracture line has a narrow bright edge.
- Adjacent shards differ in tone by at least one step.
- Area nearest the impact point is lightest.
- Valid alternatives such as cross-hatching preserve bright-edge and darker-interior relationship.
Questions and answers
How many primary radial lines should I draw?
Five to seven is a practical range. Fewer looks sparse; more becomes cluttered. Adjust to your paper size.
Must the impact point be centered?
No. An off-center impact point often looks more natural and gives room for longer radial lines on one side.
Can I use cross-hatching instead of parallel strokes?
Yes, provided each shard still has a bright edge along fracture lines and a darker interior tone.
How do I know my shading is consistent?
Check that no two adjacent shards share identical tone and that every fracture line has a bright band.